


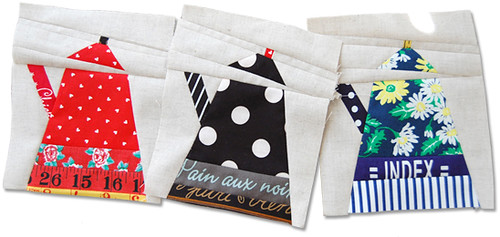
Yaaaaaay! I made a pdf for this teapot pattern!
You can download it from here.
If you're an experienced quilter, you can probably
figure out how to make this patchwork block almost
instantaneously, but if you are sort of a beginner
seamstress like me, you might find it helpful if
I show you how I make this teapot patchwork
block from the first step to the end, so here comes
the instruction of how I do it along with a bunch of photos.
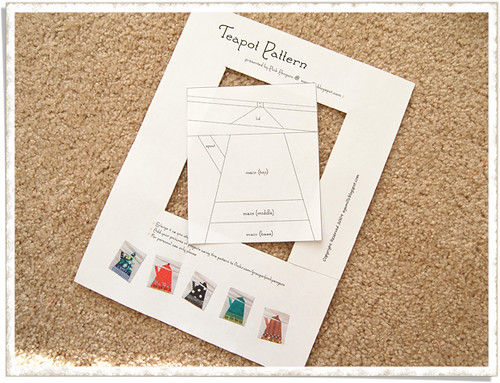
Cut out the pattern from the pdf printout.
(I recommend you enlarge the pattern, because it's too
small as it is, but here I am using the pattern of the original size.)
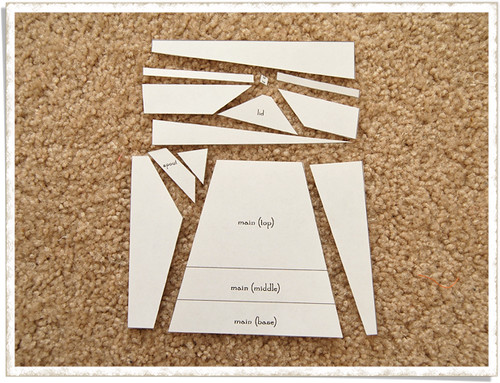
Cut it into pieces along the lines.
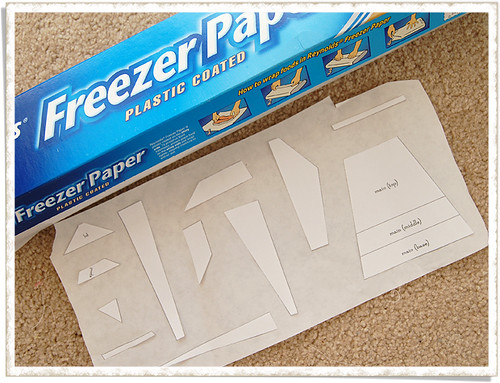
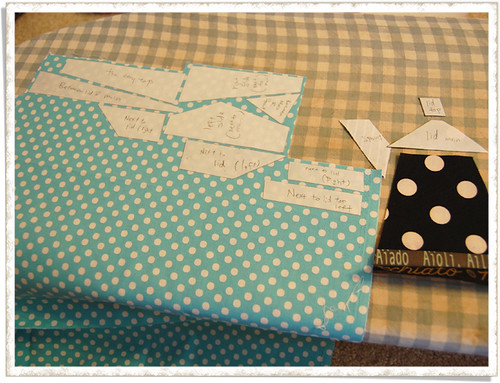
Using a small piece of double-sided tape, attach
each piece onto the right side (not shiny side) of
freezer paper, making sure there is plenty of
space between the pieces. (The layout shown in this
picture isn't a great example. I figured later that I
needed more space between each of them.)
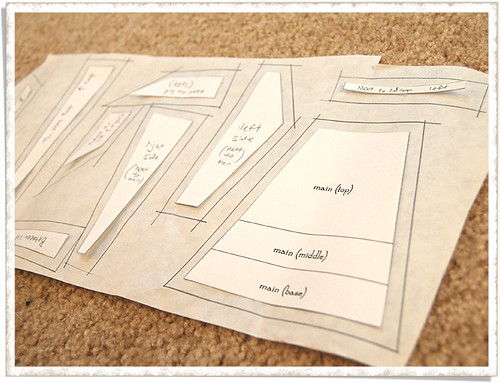
Using a ruler, add seam allowances of 1/4".
(Throughout the process, the seam allowance is 1/4".)
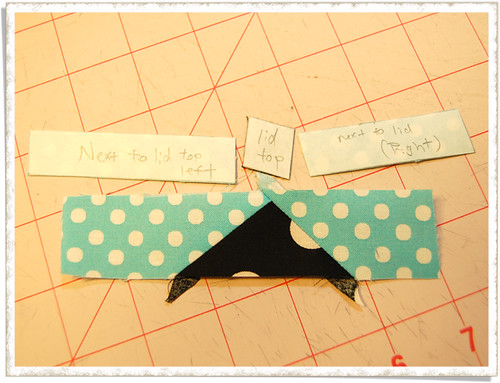
Also, make sure to name all the pieces so that
you'll know which one goes where in what way.
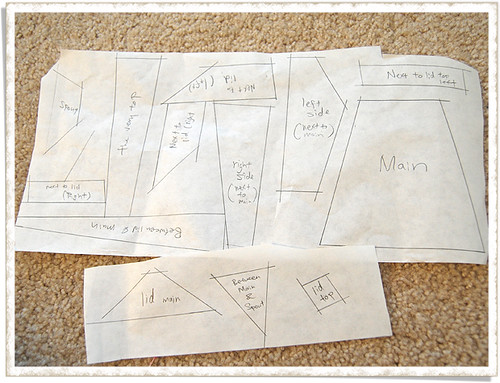
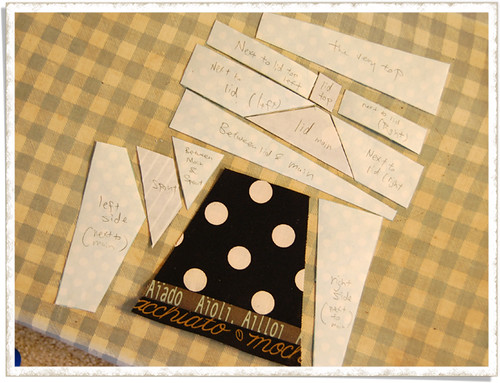
Take off the original pieces of the pattern and
Name the new freezer paper pieces. You can
discard the original paper pieces now.
Cut out the pieces of the freezer paper.
There should be 13 pieces total.
Let's make the funnest part - the main teapot body.
I really don't care the height of those two pieces
for the teapot base. Here I cut out them that
measure about 1" x 5".

Sew them together and press seam open.
(Pressing after every time you sew each line
will really help you work on this project easier).
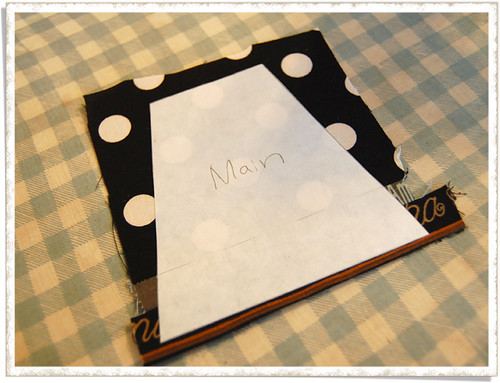
Place the freezer paper pattern on the RIGHT
side of the fabric and press on it to attach the
pattern to the fabric temporarily. (Remember to
always do this on the RIGHT side of the fabric!!)
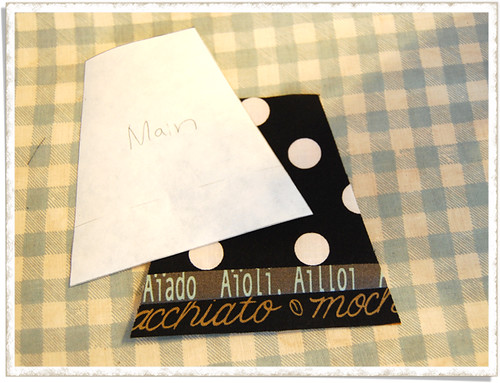
Cut out the teapot body along the pattern edges.
and peel off the pattern! (This freezer paper
pattern is reusable for many many times!)
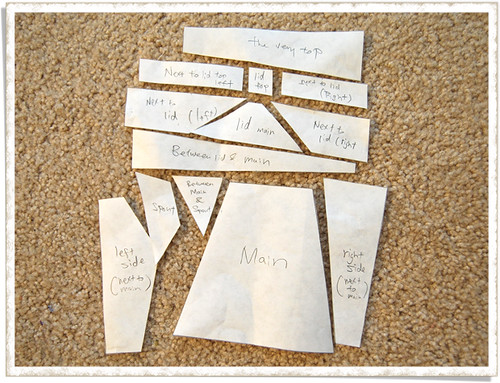
Using the same technique, cut out other pieces too.
Yay! 13 pieces done! I know it's tempting to peel the
patterns off at this moment, but I strongly recommend you don't.
It will be helpful if you peel it off right before sewing
the piece so that you'll know which piece goes where.

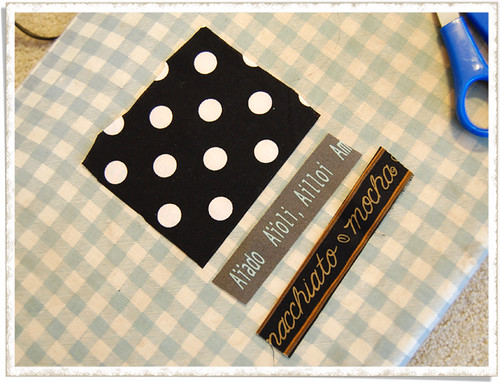
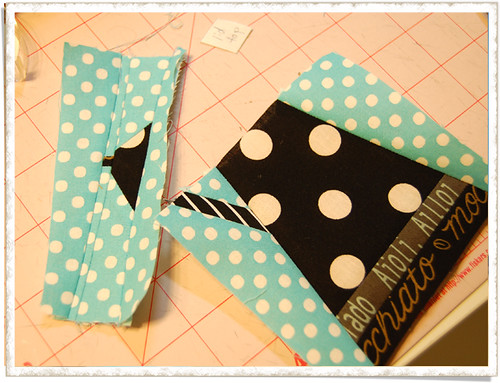
I always start off with the left side of the background
next to the teapot, because I can't wait to attach a spout
on it. Oh, I also make sure that the fabric for the background
is very different from the teapot color to make the teapot
stand out. I also choose background fabric that is either
solids like linen with no print on it or small polka dots.
Otherwise, the background would get too busy.
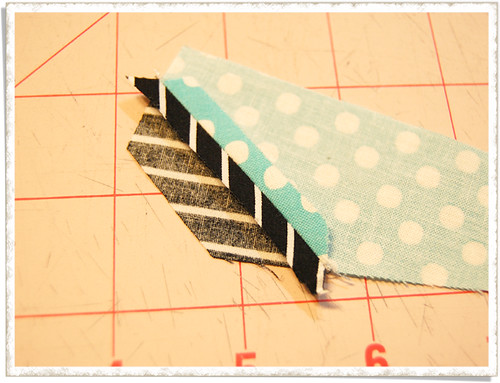
Sew, Press seam open, and sew the next one....
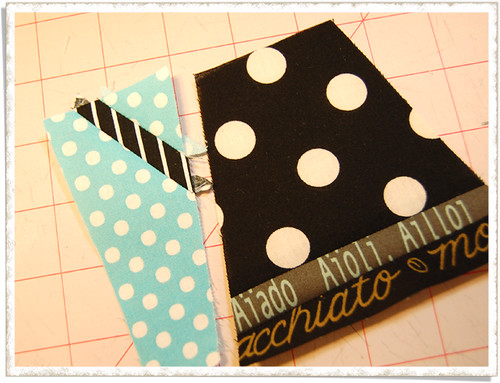
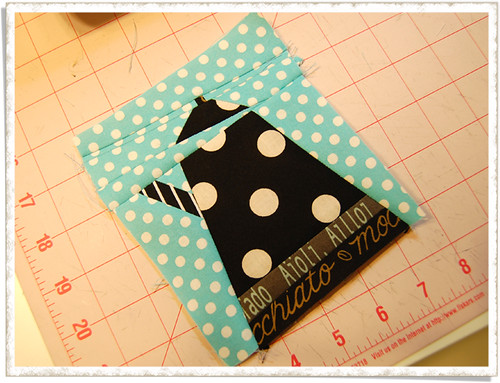
When the three pieces are together, it's time
to sew it to the main teapot!
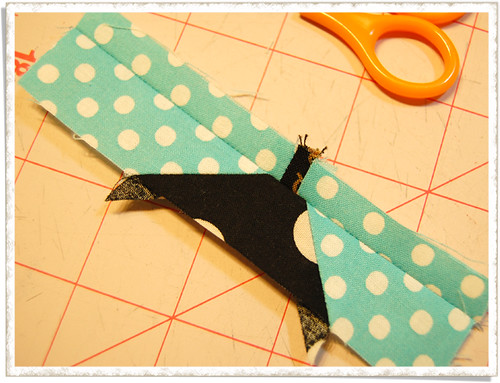
Yaaaay! Now let's attach the right side of the background too!
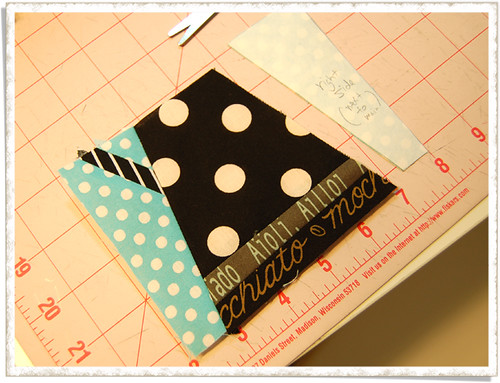
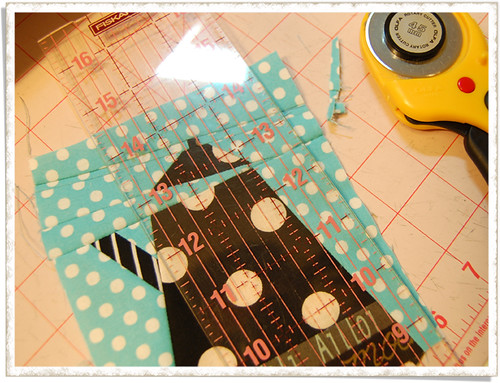
Then I usually sew these three pieces next.
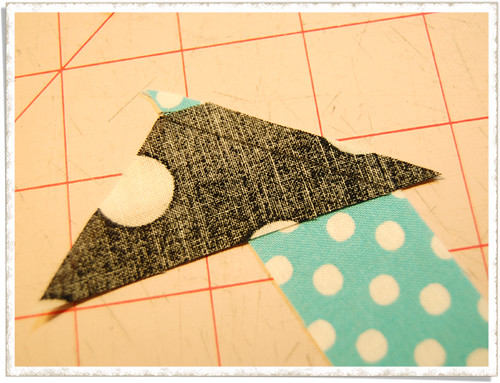
It took me a while to learn how to put
fabric together when the pieces are triangle.
Simple. Just make sure the end of the line
you draw merges with the edge of the fabric underneath it.
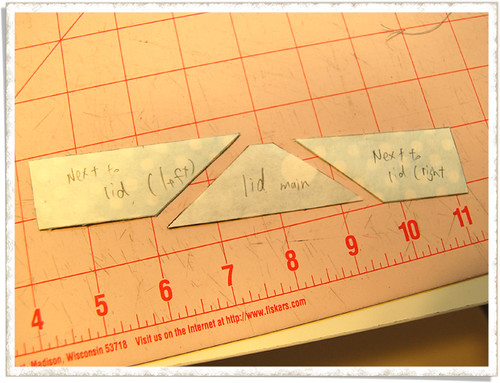
After the main part of the lid is complete,
I sew together the three pieces on the main lid.
If you enlarged the pattern in the first place,
you'd work on this part of process peacefully,
but if you didn't, then you'd have a little
tough time just like I did. The top lid is obnoxiously tiny!!
Oops, the top lid became a little narrower than it's
supposed to.. but I don't care about it that much.
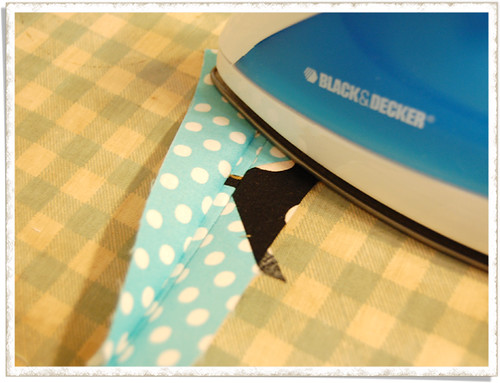
It's always hard to press seam open here,
so for this part, I iron it to just one side.
I forgot to mention about this very last piece that
comes between the main teapot and its lid. It's gets
really long when you add seam allowance to the original
pattern, so make sure to cut off some part of the
narrow angle. With the original pattern, this piece needs
to be just a little over 5" width.
Attach the two now and your teapot is complete! Hooray!
If you don't like the uneven edges, just cut off ;)

It's fun and quite addictive to make the teapots!
I hope you'll come up with many different sewing
projects using this pattern and share with us in
this flickr group. I'm already dying to see what
you create, so hurry up and make some please!!! ;)
If this link doesn't work, try this one.
- When you link to this tutorial, please link to
this blog, but not directly to the pdf. Thanks;)
Thanks for coming & reading!


You said in your post your'e a BEGINNER seamstress? No waaaaay. You are very clever and talented, and obviously a natural. Love those teapots!! :)
ReplyDeleteOh thank you for taking all the time to show us how to make these darling teapots!! What fun to pick tha fabrics to use!
ReplyDeleteThanks so much for sharing. Beginning seamstress? You are very modest.
ReplyDeleteThank you! You're so generous to share your talents and patterns. DARLING pattern.
ReplyDeleteThank you for your pattern!
ReplyDeleteI'm thinking it might be easier to paper-piece it. Hmmmmm....
I also like how, while it could be very cutesy, you choose fabrics that keep it from being too precious.
It's so nice!! Thank you for sharing this pattern with us.
ReplyDeleteVero
Thank you so much...I can't wait to make a teapot! Your designs are awesome!
ReplyDeleteI love the way that you explain all your tutorial. Very clear and you put a big photo and a good explanations. Thanks!!
ReplyDeleteI cant wait to make one!!! Or 20. Thank you for sharing this!!!
ReplyDeleteThanks for sharing the pattern and for the great tutorial!
ReplyDeleteThank you very much!!! You are so generous!!! Great tutorial!!!!!
ReplyDeleteWhat a generous and complete tutorial! Nicely done, and adorable squares.
ReplyDeleteWow! Thanks for making the pattern and the tutorial AND sharing it with us!
ReplyDeleteGreat Tutorial! Thank you for sharing this. I have linked to it on my blog and I included a picture from your blog (with many links back to you, of course!) I hope this is okay! I just wanted to share this with everyone!
ReplyDeleteWOW that is fantastic! Thanks so much for sharing this, I'll be linking!
ReplyDeleteThanks so much for the great pattern! Your work is always so beautiful! I definitely have your other projects on my to do list. This one though is destined to be a very cute tea cozy for my mother in laws birthday! :)
ReplyDeleteThis quilt looks like A LOT OF WORK! I'm on my first quilt ever and am having a heart attack. Nicely done.
ReplyDeleteI love it. It is beautiful, wonderful and so whimisical. However, I couldn't download the pattern, the site wouldn't work. It said something about exceeded bandwidth. I'll check back later and maybe it will be working. Thanks so much. How sweet of you.
ReplyDeleteThanks everyone! I really hope to see you what you make with this teapot pattern!
ReplyDeleteNanette, Thanks a lot for letting me know about the initial pdf link not working. I couldn't view the pdf neither, so I added another link using the different web hosting, but this one is in black and white ;(
I'll figure out this problem.. Thanks!
this is my first visit to your blog!
ReplyDeleteYou are one clever cookie!!..lol..
Thank you so much for the pattern and tutorial!..I'm new to quilting and piecing projects and this one is marvelous!!
I have posted about it on my blog!
thanks again!!
blessings,
Kristine ;-)
Thank you very much for this lovely pattern.
ReplyDeletesuch a cute cute pattern. thank you so much!!
ReplyDeleteThank you for the 2nd link. It worked. I just printed it out. I'm excited to try it and I may even do it tonight! If I can steal an hour and I plan to try. I'll let you know how it goes and post the block on my blog. Thank you again. I love this.
ReplyDeleteFabulous design. The fabrics really make it sing. Thank you for sharing the pattern.
ReplyDeleteSo LOVE this tea pot! It's adorable. Thanks so much for the tutorial. ;o) ooxx`jodi
ReplyDeleteOkay, this is lovely. And, have you ever heard of foundation piecing, sometimes called paper piecing? It's a technique perfect for this type of pattern.
ReplyDeleteThanks so much everyone! I can't want to see your creations!!
ReplyDeleteNorthwest Iowa mom & Candied Fabrics-
Thanks for sharing the great idea: paper piecing! It was completely new to me. I googled it and learned a little about it, but it looked really complicated.. maybe I need to try first if you guys think this way might be easier.. Thanks ;)!!
Hi, your teapot pattern is fantastic, I make a link in my blog.
ReplyDeleteThanks and kisses.
Lovely job, fun teapot!
ReplyDeleteLove the teapots. My husband and I are both big tea drinkers, so someday I WILL do something with the pattern. Linked to it in my blog. Thanks bunches!
ReplyDeleteOnce again you've outdone yourself with another well written tutorial for a great little pattern. Has anyone told you that you're brilliant & very generous to to this. I like Jill's suggestion of making it a tea cozy, especially for my MIL. Can't wait to see what others do.
ReplyDeleteThanks for sharing the paper piecing method. I tried something different and it didn't work out as nicely. Wehn I looked in books I found different methods. Your way looks like it would save a lot of fabric.
ReplyDeleteOkay - you're a genius! I've tried paper piecing before, only to end up ripping out my stitches and pulling out my hair! I'm going to try this - so thanks! Nan
ReplyDeletethank you very very much!
ReplyDeleteyou cool! sure to sew some teapots and upload at flickr!
Thanks so much for this pattern. I collect teapots and this would be such a cute addition. :)
ReplyDeleteYay! Thank-you so much for sharing the pattern and the how-to!
ReplyDeleteThank you for the tutorial. I love the teapot.
ReplyDeletevery very cool!
ReplyDeletei'm definitely giving this a try! it's totally fab!! thanks for taking the time and sharing this with us!
ReplyDeletemerci beaucoup pour ce super tutorial!!!!
ReplyDeleteWhat an adorable template! I downloaded it and will try it soon, I'm thinking it would make a cute hot pad for the kitchen.....
ReplyDeleteHope you're feeling better too!
thank you for the pattern and tutorial. I had been seeing them on other blogs and now I can make them for myself. thanks....
ReplyDeleteLovely and so easy to follow tutorial!
ReplyDeleteAs always, it's a pleasure to come and have a look to your blog
Phantastic, I just love this tutorial, thank you so much!
ReplyDeleteDo you mind if I put a link on my blog??
Thank you for sharing this pattern! I had a really good time making it, and the little trivet I made turned out so cute! A whole quilt with those on it would be adorable!
ReplyDeletethanks for the pattern, great! Do you have a pattern for tea cups and coffee mugs??? I would make for a great row quilt!
ReplyDeleteThanks so much everyone! If you make one, let me know! I'd love to see!
ReplyDeleteMarilynn-
Making a quilt sounds great, but I don't have any other quilting patterns besides this. Check out my blog friend Stephanie's blog. She has lots of information regarding teapot-related projects!
http://loftcreations.blogspot.com/2009/01/tea-talk-tuesday.html
hi, i love your blog visit me, http://agulhaetricot.blogspot.com
ReplyDeletebye
I love your teapot! Great fabric combinations and super tutorial. This is my first visit to your blog, and I will make sure to come back. You are very talented and generous, too.
ReplyDeleteWell done tutorial!! From another tutorial blog, I appreciate the effort it took to do this.
ReplyDeleteI'll have to send you a picture once I make one and quilt it.
Regards, Carla over at Feathered Fibers blog
Hi! I have linked to this post on my blog today because I am doing a teapot feature. Thanks for such fun and great tutorials!
ReplyDeleteAnna
Thank you for taking all the time to show us how to make these darling teapots!! You are so generous!!!
ReplyDeletei have not tried it yet actually, but it looks quite fun to make. there are so many pieces! :D
ReplyDeleteThis is oh so wonderful. It looks incredible in fabric, and I think it'd be a delight in paper too! Thank you SO much for sharing it. :O) Hope it's okay if I link to you?
ReplyDeleteCurrently doing quilt of Sue and Sam Sunbonnets. Saw this pattern for teapot IT will be next for sure....thanks tweetystitcher USA
ReplyDeleteI read your all the post and i like your teapot. I love to make this for next time. Keep sharing some more ones.
ReplyDeleteGreetings from Australia!
ReplyDeleteI was guided to your blog from the Quilters Quarters Newlsetter,and have just spent a large part of the afternoon reading your tutorials. Great work, they are so easy to follow, and the designs are lovely.
Could I suggest that you draw the pattern straight onto the freezer paper? It would cut out one fiddly step.
Thanks everyone!
ReplyDeleteAnonymous-
That sounds like a good idea. I've never tried it that way but I definitely will try!! Thanks ;)
gREAT¡¡¡¡¡
ReplyDeleteTHANK YOU
MARIA
XXOO
Thank you for this lovely teapot pattern x
ReplyDeleteTrès jolie théière.
ReplyDelete;@)
This is great! Thanks so much for sharing your pattern.
ReplyDelete-Holly
Thank you for the free pattern, I need such one for a friend....!
ReplyDeletecheers, Janny
What a cute idea! I'd love to share a link to this tutorial on sewwhattoday.blogspot.com on April 23!
ReplyDeleteOh I don't know how I missed these, they're so cute!
ReplyDeleteBrilliant! My hands are itching..
ReplyDeleteI featured this post on my tea lovers' roundup today! Thanks for sharing it!
ReplyDeleteASfasf
ReplyDeleteI'm a lazy woman I hate everything about tutorials and those things but I knew about this tutorial and now I love it because that's very simple.
ReplyDeleteGreat pattern I think! Thanks Dude!
ReplyDeleteHow adorable! Thanks for sharing! I've always wanted to make a quilt and I LOVE TEA! So this might be the one I try first!
ReplyDeleteArtículo muy interesante e informativa. Lea con mucha facilidad. Tales artículos de calidad realmente muy poco ahora.
ReplyDeleteThis is fabulous I am working on making a quilt right now that is made with my old fastpitch t-shirts. I think that maybe I'll try the teapot pattern next thank you for the instructions.
ReplyDeletemerrisue67@gmail.com
I enjoyed your entries on Toxic Words - such great thoughts and a wonderful reminder to watch the words I use - to be positive and kind and use words to build up rather than tear down. :)
ReplyDeletei am agree with this point, i am also a tea lover haha...nice article, o ya, why you not update your blog anymore?
ReplyDeletehi, that's so cute hahha....
ReplyDeletehello, thanks for the tips...
ReplyDeleteI agree with your point, please share with us more good articles.2008 Mitsubishi Raider AC Compressor
ReplyDeleteI am speechless after seeing these photos! I love them all! I teach kindergarten and I intend to make a theme like this, and your photos have given me so many ideas! You are so talented! Thank you!
ReplyDeleteHi, I loved this tutorial.
ReplyDeleteThank you.
I love reading and I am always searching for informative information like this! Write more informative news like this, and let's Stop Dreaming Start Action!!
ReplyDeleteOne of the more impressive blogs Ive seen. Thanks so much for keeping the internet classy for a change. You've got style, class, bravado. I mean it. Please keep it up because without the internet is definitely lacking in intelligence.
ReplyDeleteAdorei, muito obrigada por compartilhar seus conhecimentos!
ReplyDeleteGreat post! Keep it up the good work and also keep posting.
ReplyDeleteYes, good information you guys have here. I always prefer to read good quality contents and I think I have found it on your post here. Thanks!
ReplyDeleteMuchas gracias por compartir el tutorial y el molde, te felicito.
ReplyDeleteSaludos desde Buenos Aires Argentina.
Silvia
Hi, when I saw your tea pot, I fell in love with it!! I made two of them. the first one was a "mirror" image of what you show. the 2nd one turned out right. thou, I did have problems making them, I will try to make a 3rd one, and who knows how many more?? Thank-You for the tea pot!! It was kind of you to share...
ReplyDeleteTHANK YOU SO MUCH FOR SHARING YOU WORK, IT IS SO BEAUTIFUL !! CONGRATULATIONS !
ReplyDeleteI love your blog! Thank you for the teapot pattern. I made it and it's wonderful!
ReplyDeleteThank you for the lovely pattern and the great instructions!
ReplyDeleteThanks for the pattern! I made one of thouse tea pots and I'm definetly going to make some more as I totally fell in love with them! They are so easy and fun to make! Here is my first try: http://crochetomania.blogspot.co.uk/2012/08/brighten-up-day.html
ReplyDeleteVery useful information. I was very pleased. Thanks
ReplyDeleteThanks for sharing your project. Great tutorial, very useful. I think patchwork is going to be my next hobby. Crafts mainly. Have a nice weekend.
ReplyDeleteThanks for sharing your project. Great tutorial, very useful. I think patchwork is going to be my next hobby. Crafts mainly. Have a nice weekend.
ReplyDeleteThank you for sharing your project pattern. It is so cute!
ReplyDeleteLa tetera es preciosa!! gracias por compartir este tutorial tan bien explicado y los patrones. Un beso
ReplyDeleteNice one. Great
ReplyDeleteThis comment has been removed by the author.
ReplyDelete