


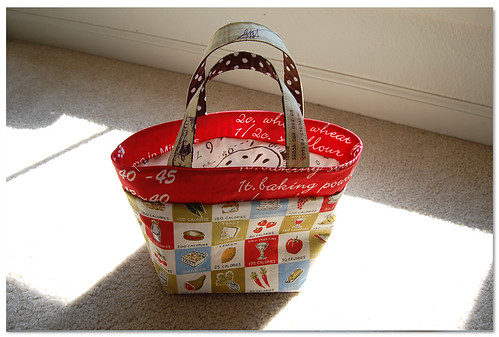
Thank you for encouraging me to write up a tute on
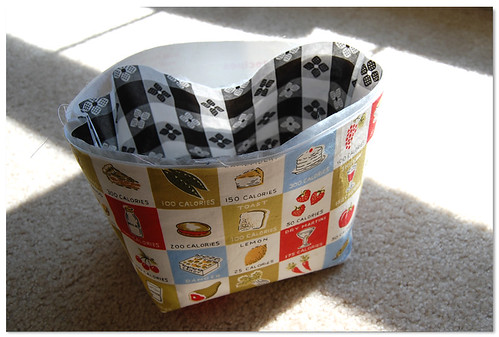
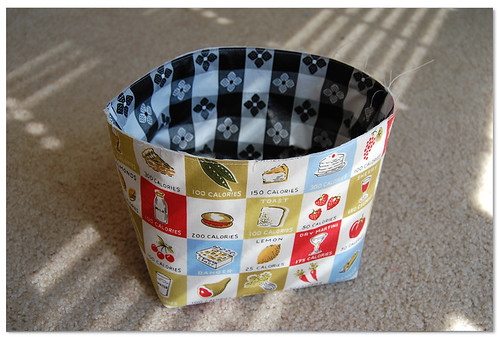
this lunch (bento box) bag! I really like this bag
pattern because this bag, measuring approximately
9"(width) x 7 1/2"(hight w/o handles) x 5 1/2" (depth),
can be used not only for bento boxes of any kind but
also for carrying little crafty projects like yarn +
needles. It has a cover inside that can give nice privacy
for whatever in there and the cover can also prevent
it from getting dusty in a windy day. It is much
sturdier and larger than the fabric basket, so if you
found that your fabric basket was too small or too
floppy as a gift bag, this might be a good alternative..?!
As usual, I have tons of images to share each
step with you, so bare with me! There you go!!
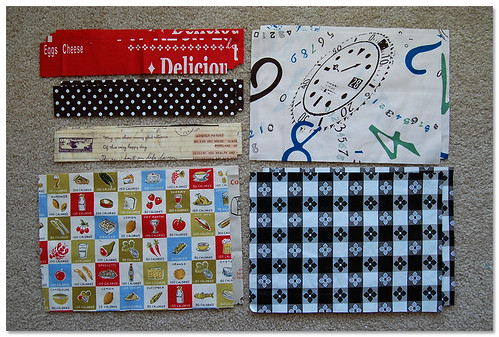
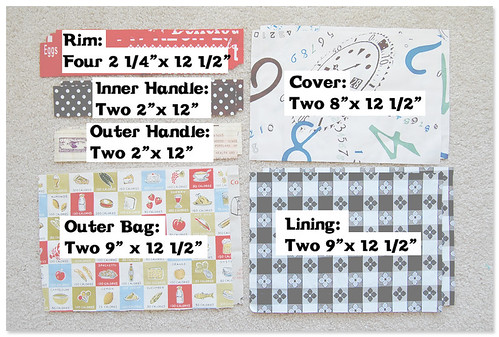
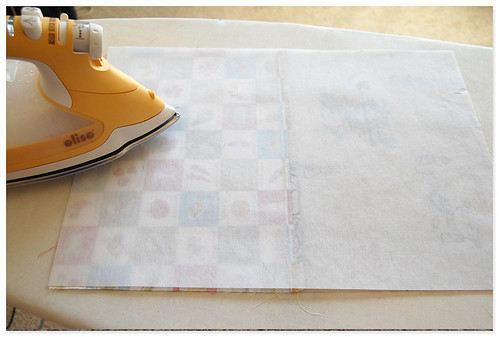
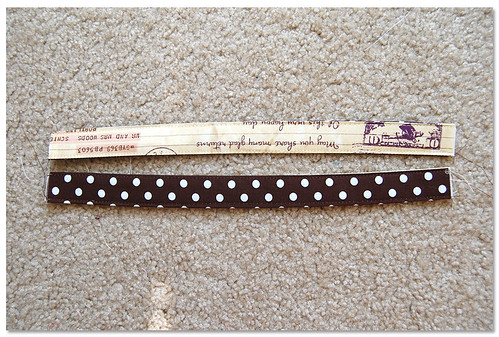
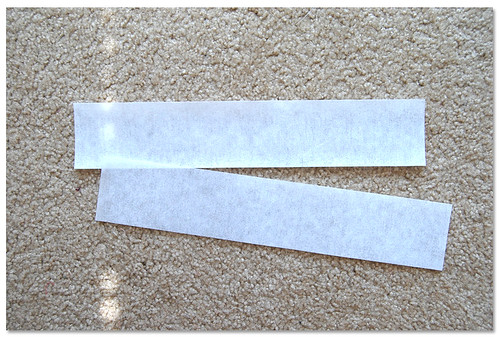
We'll need these pieces of fabric,
I think the best type of fabric to be used
for the outer bag, rim and outer handles are
duck fabric, but if you'd rather use pretty
quilting-weight cotton fabric like I do,
remember to also get 1/2 yard of sturdy fusible
interfacing like Pellon 809 Decor Bond.
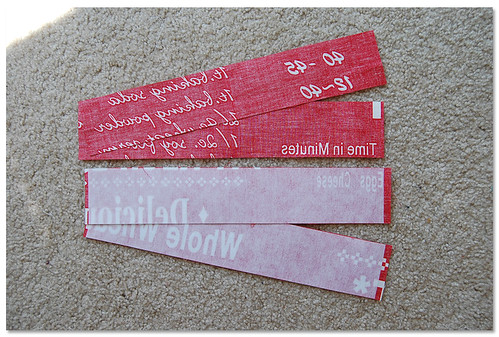
I used vinyl-coated fabric for the lining
just so that when some food spills in the bag
from the bento box, I can still smile ;)
(Hart's Fabrics has lots of cute vinyl-coated
fabrics FYI ;) ) Oh and you'll need 1 1/2 yard
of craft cord too.
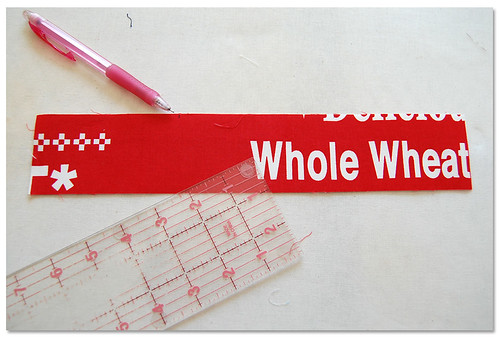
As usual, all the measurement includes
1/4" seam allowances unless otherwise noted.
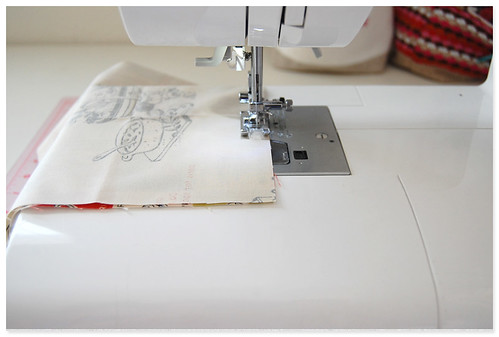
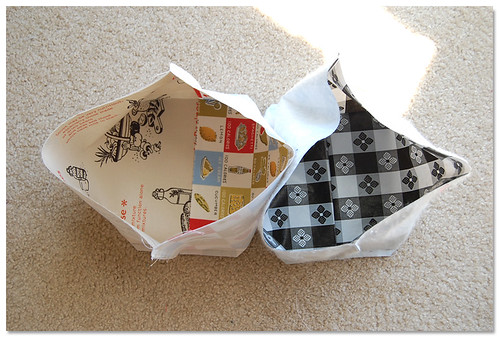
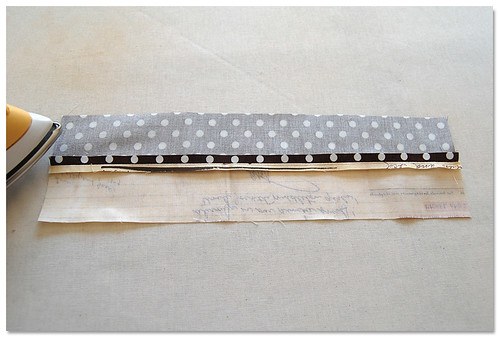
First, let's sew the two pieces for the outer bags
together by sewing the bottom edges. I used two
different fabrics for the outer bag just to make it
interesting. Well, in other words, I simply didn't
have enough of the Anna Griffin kitchen fabric
left over to get two pieces. Improvising works!

Then press seam open.
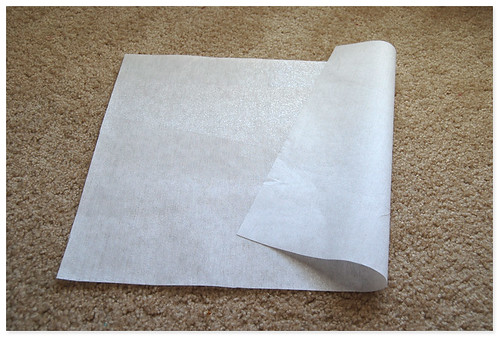
Since I am using cotton fabric for the
outer bag, I need to make it sturdier,
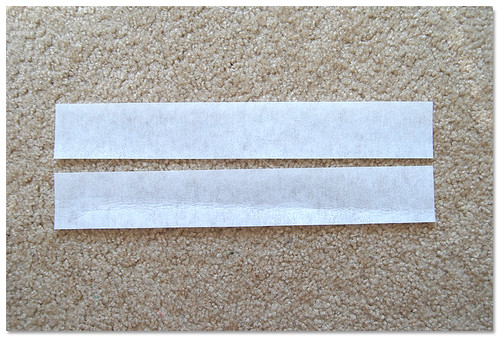
so I am using this interfacing measuring
17 1/2" x 12 1/2" here.
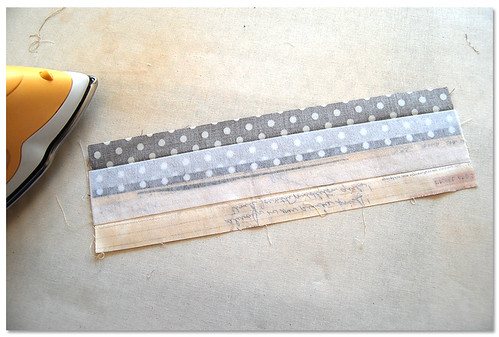
I am fusing it onto the wrong side
of the outer bag piece.

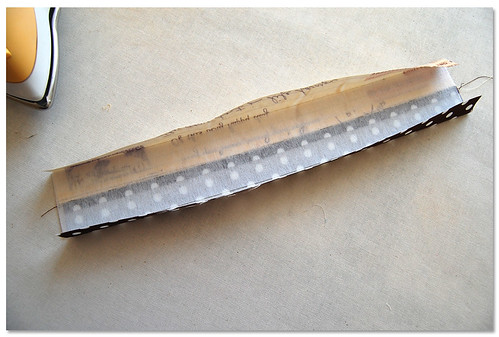
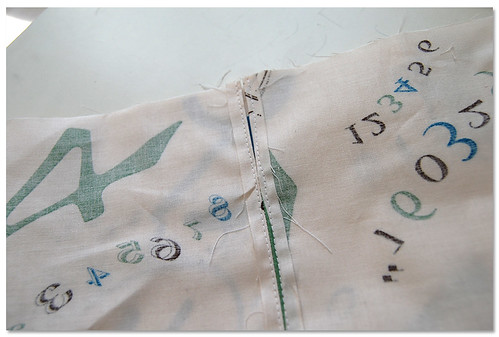
Then I fold it in half with right sides
together and sew these two short edges.
>
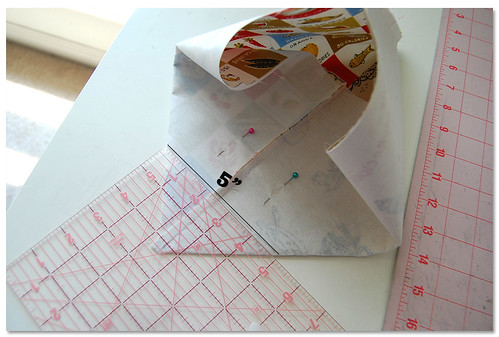
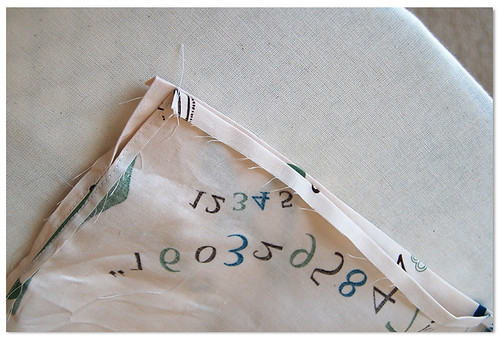
Boxing corners. We want to draw a line
where it's 5" from one side to the other.
Then cut off the corner. Just like you did
for the fabric basket, do this for the other
corner too.

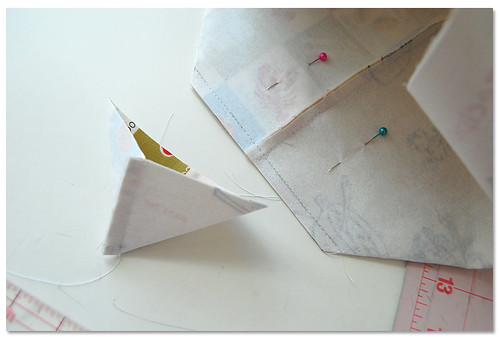
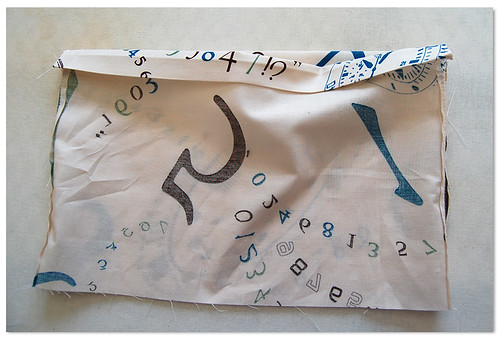
And repeat the same process for the
lining. For the lining we don't need
interfacing though.
Remember how you had to leave an opening
when you sewed the lining for the fabric
basket? This time we can omit the step!
Isn't that nice?
Now let's move onto the handles.
This is again just like the handles you
made for your fabric basket, except..
the fact you need interfacing here,
if you are using cotton fabric for the
outer handles. Each piece of interfacing
measures 12" x 1 3/4".
Now we need to fuse each interfacing
onto the middle of the wrong side of the
handle.
Fold and press the long edges toward the middle,
fold in half, and top-stitch the long edges.
Repeat this for the other handle too,
so you'll have two handles.
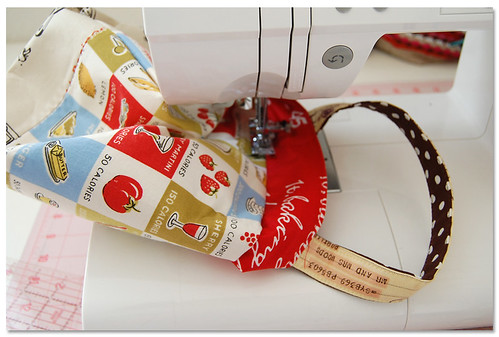
Let's now make the rim that you'll
attach the handles onto. Since I am
using cotton fabric, once again I need
interfacing - this time each piece
measures 12" x 2 1/4".
We'll fuse the interfacing onto two
pieces of the rim like this.
Take one of them and mark at where
it's 4" from one side on the top
edge. Do this from the other side too.
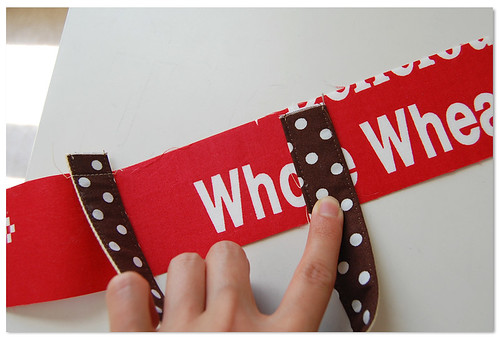
Making sure that you place one side of
a handle at the mark (the mark will be
in the middle underneath the handle),
sew very close to the edge. Repeat
the same process for the other side
of handle.
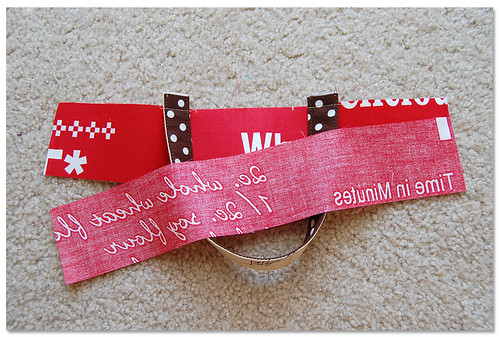
Then we'll sew the top edges of these
pieces together with right sides together.
Repeating the same process for the
rest of the rim pieces will
create the other side of the rim!
Press seam open.
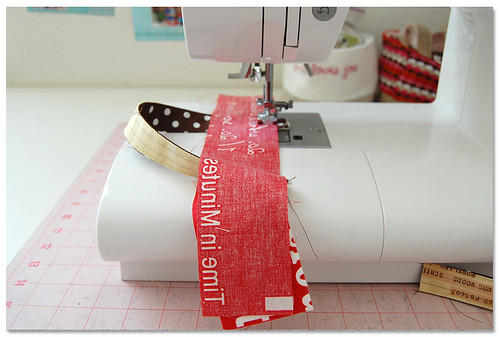
And now we'll sew these two
together like that.
And then sew the other short edges
together to create this loopy thing.
Top stitch the top edge.
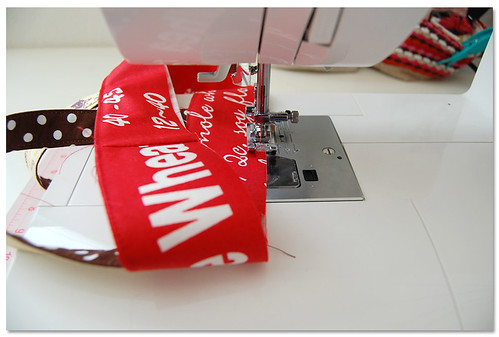
And sewing very close to the bottom
edge will save you some time later on.
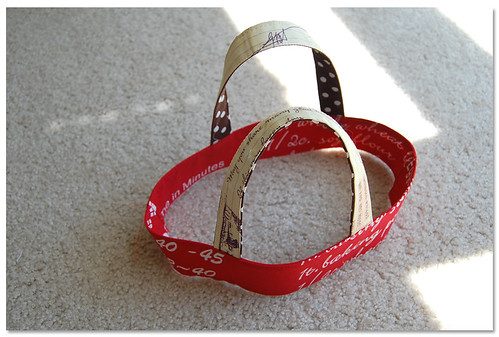
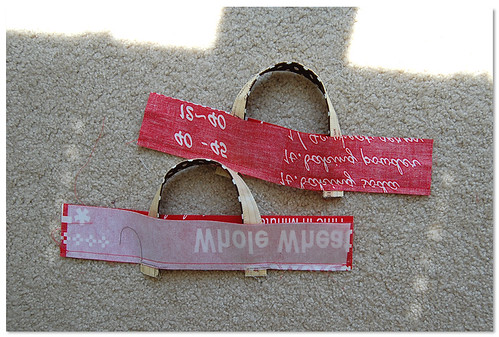
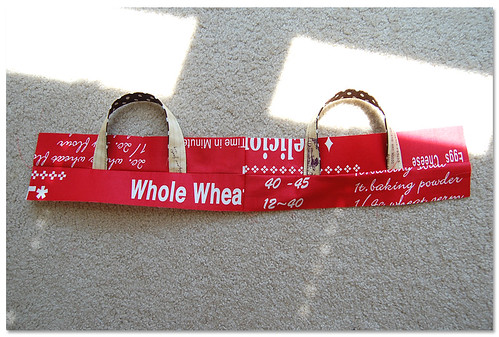
Aha! Now we have the rim + handles complete!
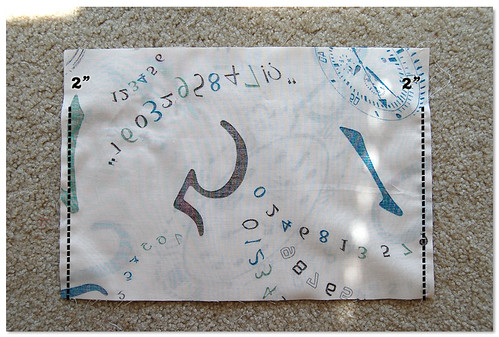
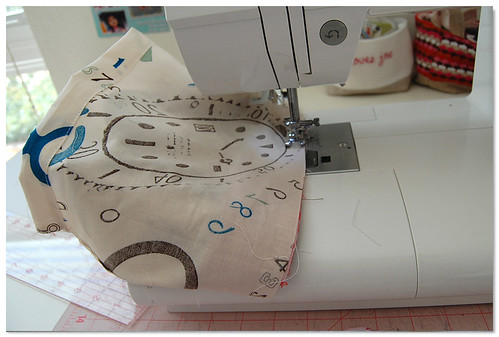
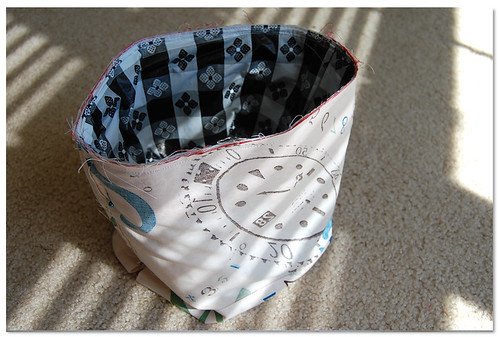
Lastly, let's make the cover.
Sew the short edges of the two pieces
with right sides together. Remember to
leave 2" unsewn at the top like this.
Added Note: This raw edges at the side edges of this
cover piece will be left unfinished in the lunch bag.
If you'd like no exposed raw edges at all, you could make
each cover piece 0.5" wider so that you'll be able to
double-fold the seams. (In this case, your seam allowance
will be 1/2" wide, and you'll press the iron to create
a double fold at each side edge seam.)
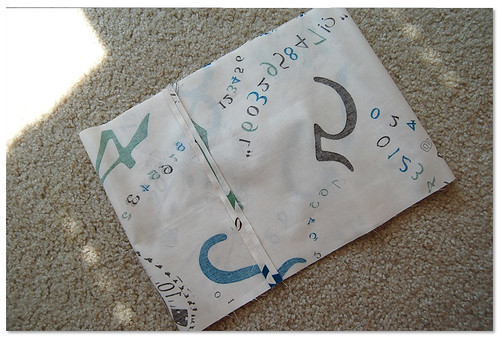
Press seams open as if the top
part were also sewn.
Now we'll sew onto the seams all the way
from the top to the bottom.
Then we will fold and press where it's 1/4"
from the top edge.
Fold and press it again - this time it's
3/4" from the top edge.
Now sew very close to the folded line
so that you have a casing for the cord.
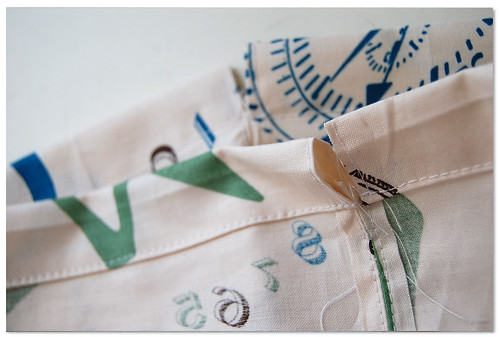
Coming back to the main bag,
let's place the lining inside the
outer bag with wrong sides together.
Sew very close to the top edge.
It looks pretty nice; in fact, we could
just turn it into a big fabric basket by
sewing a bing tape at the top edge, huh?

But let me continue with the lunch bag
because that's what I started off with.
Now sew the rim to the main bag like this,
sewing very close to the edge again.
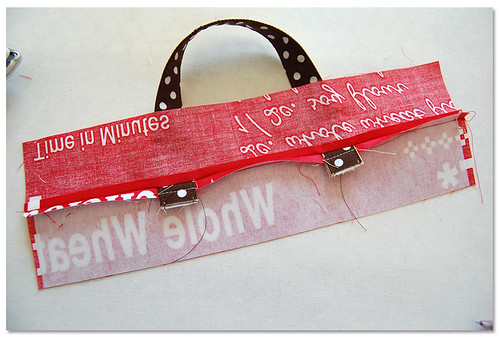
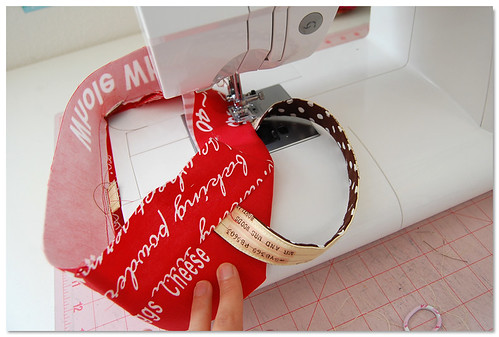
Now we'll sew the cover onto the main bag.
You can't see this in this image, but there
is a bag inside the cover. We are sewing
the top edges of the cover and the bag
together. This time though, we sew where
it's 1/4" from the edge.
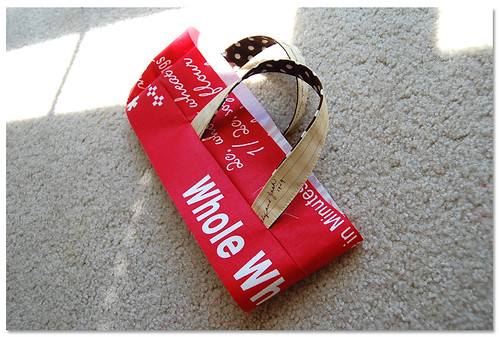
Everything is connected at the top edge now.
It will look like this if you bring
the cover inside the bag. Fun!
Top-stitch here between the rim and the bag.
Added Note: If you do your top stitching more than 1/4" below the seam,
the raw edges will be completely encased under this top stitching.
Therefore, you'll have no exposed raw edges below the cover inside.
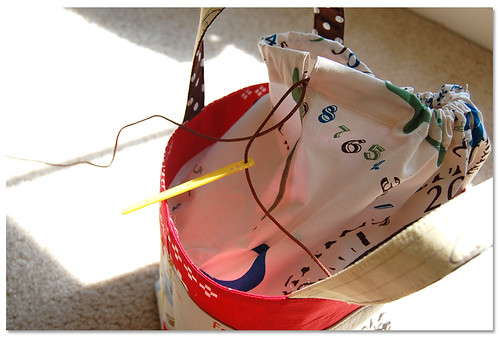
We're almost there; we just need to
Thread one cord through casing and knot ends
together. Thread second cord from a different
casing opening and do the same, just like
you did for the patchwork drawstring bag!

Yay, that's it!
Your lunch bag is complete!!
I can't wait to see your lunch bag
that you make from this tutorial,
so please post your completed lunch
bag picture in this flickr pool :D
As usual, feel free to use this image
of finished lunch bag in your blog
and link to my blog (thanks!) but
please do not make sales off of any
projects made based on any of my
tutorials.. thank you ;)


Ayumi, this is a great tutorial- you know I am going to have to make it- I can think of a lot of uses for it as well as lunch! Fabrics look fantastic
ReplyDeleteoh ayumi that is so precious! I can't wait to make one! What a great bag for lunches as well as just about anything else!
ReplyDeleteThank you for another great tutorial! I love this bag and really like the idea of using it for knitting tote. I hope I have some time to make one soon! RIght now I'm sewing a skirt, but maybe once I clean up after that project I can start on a bag! :)
ReplyDeleteWhat a fantastic tutorial! I'm thinking Christmas gifts! THANKS!
ReplyDeletewow, you have such amazing tutorials, they are SO helpful to a beginning sewer such as myself, thank you!! this is adorable :-)
ReplyDeleteOh so cute!!Thanks for sharing :)
ReplyDeleteI have some of the "calories" fabric so I may have to try it with that one too :)
just brilliant! thank you!!!
ReplyDeleteYES YES YES! You have made me a happy happy girl! I think your tutorials rock...they are so very easy to follow. Thank you so much for doing this!
ReplyDeletegreat tut!! I love it and I will for sure make one of this. Thanks for sharing!!
ReplyDeleteLovely! Thanks for creating this tutorial!
ReplyDeleteI love that! I really like the drawstring to to tuck away the contents of the bag. Thank you so much for sharing this awesome tutorial!
ReplyDeleteThank you so much for taking the time to write this up. I'm adding it to my list of projects! :)
ReplyDeleteOn another note: how do you like that Oliso iron?! I have been on a quest lately for a great iron and checked into the one you have a bit but can't seem to decide whether it's worth the extra money. Do you love it? Please email me if you wouldn't mind! I would love to hear your feedback on it. Pretty please!!
skooksplayground[at]gmail[dot]com
Thanks for this tutorial! Love it! Your blog is amazing!
ReplyDeleteThank you so much for the wonderful tutorial! It is so tempting to jump right-in and make one :)
ReplyDeleteHi Ayumi, I love your lunch bag - it looks so wonderful!! And I have just bought it from your Etsy shop. Thank you so much for creating such beautiful work!!!
ReplyDeleteLoving it! I wonder if I can knock three out before school starts in 9 days...
ReplyDeleteThank you!!!!! It ´s a great tutorial
ReplyDeleteHugs from Málaga (Spain)
Liliana
Thank you!! This is exactly what I need to make for my daughter's lunches this year!
ReplyDeleteI linked to your tutorial over at Craft Gossip Sewing:
http://sewing.craftgossip.com/tutorial-drawstring-lunch-tote-perfect-for-bento-box/2010/08/10/
--Anne
Ayumi,
ReplyDeletebig thanks for the tutorial! Awesome :)
Wow. You are a rock star. Just brilliant tutorial. THANKYOU THANKYOU.
ReplyDeleteThis is simply amazing. I am a teacher and I will be carrying one of these on the first day of school!
ReplyDeletethedomesticgroove.blogspot.com
As usual, your tutes are simply awesome!! Thank you so much!! あゆみさんのレシピは本当にわかりやすくて素晴らしい~。 今回のお弁当バッグの布合わせもあゆみさんらしさが出ていて最高です~~。 お疲れ様でした!!
ReplyDeleteGreat tutorial!! Thank you!
ReplyDeleteThank you so much for another beautifully illustrated tutorial. This is exactly the type of lunch bag I have been looking for!!
ReplyDeleteoh my! i just loev your tutorials!!!! and your creations...... you make everything so... PERFECT!.... IM YOUR FAN!!!! thanks for sharing your things...
ReplyDeleteThis is such a great lunch bag!!! Thanks so much for sharing your tutorial.
ReplyDeleteOh thank you so much for your nice comments everyone! The best part of making a tutorial for me is to discover someone actually enjoys making something using my tutorials! I really hope to see your lunch bags in this flickr group!
ReplyDeleteJennifer-
I am very slow at sewing in general, but it takes me less than an hour to sew up one lunch bag. I hope you get to make three before school starts ;)
Wow, what a great tut, thx a lot for this one.
ReplyDeletehugs from germany
Marion
just GREAT! can't wait to find the time to pull my machine and start sewing!
ReplyDeleteThank you very very much!
this is the most adorable lunch tote! thanks for putting up the tutorial~~
ReplyDeleteOh wow, Ayumi! Thanks for this great tutorial. I have just the fabric I want to use for my 'lunch bag' which will probably end up being my crochet bag (crochet wool and work currently housed in a plastic bag!).
ReplyDeletearrg! I just caved and bought a lunch bag last week something like this. I think I'll still make one though.
ReplyDeleteAwesome tutorial. so easy to follow.
thanks for sharing
Lovely as always! Thank you for taking the time to make this tutorial ! :)
ReplyDeleteThat is one fantastic bag! Thank you so much!
ReplyDeleteI'm gonna have to make one of these for my knitting!! Thanks for sharing the tutorial!
ReplyDeleteHi, Ayumi. Thank you for writing a turtorial. I will make one for my husband and I may make one for me because it looks nice for carrying some crafty goods as you said. Good job!!
ReplyDeleteCan't wait to make one! Thanks for the tutorial!
ReplyDeleteThis is sooo cute Ayumi! Thanks so much for sharing!!!
ReplyDeleteThanks for another great tutorial!
ReplyDeleteOk..I've bookmarked this tutorial :)
ReplyDeleteThanks for your kind comments on my blog. Your tutorial on the fabric basket made it happen.
Ooh that's so pretty! Thanks so much for the how-to, I'll be linking.
ReplyDeleteYEAH!!! You made it to One Pretty Thing! You are such a rock star with a bento!
ReplyDeleteあゆみさん、それはすばらしいです!!! 素敵なチュートリアルほんんんんとにありがとうございます!!役に立ちます♥ 今日か明日、布を買いに行きたいと思いますけど、ぜひそのカワイイ弁当箱を作ってみたいです!! ^_^
ReplyDeleteあゆみさんのブログが大好きです♥ 本当にありがとうございます~♪
ぁ、すみません、弁当箱じゃなくて弁当バッグですねー 日本語くそ下手で申し訳ありません www
ReplyDeleteI can't wait to try this....Thanks!
ReplyDeleteI love this! Thank you!
ReplyDeleteWonderful tutorial - it's the perfect size for a knitting bag. And I think that I forsee myself making some of these for teacher gifts this year. I made one for a swap, using my swapee's favourite colour (green) and her favourite fairy tale themed fabric (Cinderella). Thank you!
ReplyDeleteGreat tutorial ! Thanks for sharing !
ReplyDeleteFabulous Tutorial! As always your fabric choices are so wonderful...Perfect for the project. Thanks for your generous sharing.
ReplyDeleteSusan
I love your tutorials! They are so detailed for those of us who don't have all the skills, but like to try our hands at sewing. I wondered if you ever used insulbrite? I have used it for potholders and also water bottle holders. This would work well to keep things cold. Something to ponder... Can't wait to find time to try this project!
ReplyDeleteThank you so much, Ayumi! I have now made my first lunch bag for my daughter - we couldn't resist the temptation either of us.. The tutorial was easy to understand - and so detailed! You really ought to teach sewing classes :)
ReplyDeleteHugs from Norway.
Hello from germany :o)
ReplyDeleteI LOVE your tutorials and please you to make one for the zipper pouch. Thanks a lot!!!
Best wishes, Betti
Thank you everyone! I can't wait to see your lunch bags popping up in the flickr group! There are already a few of them from you guys! I'm so happy to see them :D
ReplyDeleteJenn Mc-
I think using insulbright for this project is a great idea! I didn't use one just because the oil cloth had flannel attached on the back side. I thought it may have some insulation effect. If you are using quilting weight cotton or oil cloth for the lining without any backing, I would recommend using insulbright :D
Thanks again, everyone!
Thanks for the tutorial. I got mine made. I posted it on my blog with a link back to you. I will post it on the Flicker photo stream also.
ReplyDeleteThanks for the tutorial!!! I've been looking for lunch bag tutorial for a while, and found this one!! :) Thanks for sharing this!
ReplyDeleteThank you for the great tutorial! I think I would like to make it with insulbrite...when I have time. I love your tutorials! They are so easy to understand. Thanks for sharing!
ReplyDeleteThanks for the great tutorial...this is exactly what I have been looking for. One quick question though...when boxing the corners...do you sew on the line that you draw and then cut off the excess? Or is the line to be lined up with the presser foot? Sorry if this sounds dumb!
ReplyDeleteAngel
Thank you everyone!
ReplyDeleteAngel-
No you don't sound dumb at all! I should have been a bit clearer! I do sew on the line I draw so that the depth of the bag is about 5" ;)
Hello,
ReplyDeletethe 'rim and handles' bit is brilliant ! Thank you for the tutorial. Beatrice.
Thank you for the tutorial. I am linking your tutorial on my blog today to send more visitors your way!
ReplyDeleteThanks,
Leah
What a super cute project!! Thanks for the detailed tutorial...just found your blog, and I love it! I'm a new follower!!!
ReplyDeleteHi,
ReplyDeleteThis lunch bag is adorable and I hope to make a bunch as Christmas gifts. One question though...have you ever tried using PUL inside the bag instead of a laminated vinyl? Do you think PUL would work, maybe if I add interfacing to the back to make it sturdier? I have a bunch of it from making cloth diapers and am trying to bust my stash for Christmas gifts! Any help is appreciated! Thanks!
I just finished my lunch bag!!! I love it! And...it was the very first photo that I have ever uploaded to flickr!
ReplyDeleteThank you so much everyone!
ReplyDeleteJennyGoLightly-
I think PUL would be just great for the lining without interfacing to it as long as your outer bags are sturdy enough. The oil cloth I used for the lining was pretty thin too but it worked perfectly. I wish I had a baby to make diapers for too :D
What a lovely bag! I think I'm going to make one for Hubby's birthday that's in his favorite fabrics. Thank you for sharing :) :)
ReplyDeleteThanks for this tutorial - it's a lovely little bag, and I have just made one - I used cotton batting in place of the interfacing, and quilted it. I also had to find out what a bento box is as here in Scotland we use sandwich boxes and refer to them as "piece boxes"!Thanks again.
ReplyDeleteThis is such a fun bag! I love your tutorials. Just made the drawstring bag and my kids love putting their trinkets in them. :)
ReplyDeleteI can't wait to try this one! I finally found a way to enjoy sewing. BTW, where do you get your fabric with the wording on it? I love the look of it!
Thank you everyone! I have been having so much fun hearing from you guys that you sewed up a lunch bag or two! That makes my day :D
ReplyDeleteStephanie,
Thank you! There are a lot of fabrics with writings on them in the American market. If you search 'word fabric' in etsy.com, you'll find lots of them ;) I usually get mine from a Japanese online shop like the shops listed in the right side but a lot of Japanese fabrics with writing can be seen in Etsy now ;) Hope this helps!
Hi Ayumi. I'm Sunny, from Italy.
ReplyDeleteGreat work and outstanding creativity!
Baciotto!
Thanks for another great tutorial! This is a great bag! I love how the cover has a drawstring instead of a zipper like the tote bag I make with the zippered extension. Makes it much easier to make, but still easy to use. I'm going to use your tutorial to make my bag for the Halloween Tote Bag Swap that I joined. Already picked out my fabrics! Thanks so much!
ReplyDeleteMGM
Thanx from Bulgaria too for the wonderful tutorial!
ReplyDeleteGreat tutorial...I have linked to you on my freebies blog...can you tell me where you got that fantastic fabric from with calories etc on it...hugs Khris
ReplyDeleteHow cute is that! I love that the bag has an inner bag you can closed. I will be having a go at making one of these bags. Thank you.
ReplyDeletehttp://smallstuffsewingroom.blogspot.com/
I cant believe how easy you made this.
ReplyDeleteThankyou so much!
I think my father in law will be very happy with his new bento bag xx
Keep the tutorials coming x
http://miya-miya-kl.blogspot.com/
Very nice! I love all the details. That makes making it soo much easier. :)
ReplyDeleteHi thank you so much for this tutorial, easy to follow and understand (even for a French blonde like me ! lol) you can see pictures on my blog : http://isaehome.wordpress.com/2010/09/11/lunchbento-bag-premier/
ReplyDeletethanks for everything you are the best for tutorials !
take care
Isa in the center of France having loads of fun making bags ;)
Thanks for this wonderful tutorial. I started making my own already.
ReplyDeleteWhen it is ready, i will post a photo and let you know. :)
Sofia,x
www.sofiasworld.com
Okay, i am back with a bag!! :))) here is the link:
ReplyDeletehttp://www.sofiasworld.org/2010/09/on-being-org-plus-new-diaper-dag.html
I am so sad that I am so behind in discovering this lovely place!
ReplyDeleteI'm so excited to make the lunch bag, for ME!
Also pumped to look through your archives!
I just discovered this awesome post today and have alreay made 2 lunch bags for Christmas gifts. Thank you so much for this amazing tutorial :)
ReplyDeletenannergirl@hotmail.com
Many thanks for posting this wonderful tutorial! I totally love the result and your instructions were very clear. Once again, thanks for sharing, I love your blog.. I have posted photos of my lovely little creation on my blog! http://withallgoodintentions.blogspot.com/2010/10/fabric-bento-carry-bag.html
ReplyDeleteI really must make one of these Ayumi! I saw one on Anna's blog and fell in love. Thank-you for the great tutorial!
ReplyDeleteI saw this on Anna's blog and had to make one too! this was SUCH a wonderfully written tutorial. My bag went together quickly and with no issues! thanks so so much, i love it. :)
ReplyDelete*I used one of those wipe-clean vinyl tablecloths i picked up at for only 5 bucks at walmart for my lining. it worked perfectly!
rayyeloves[at]gmail[dot]com
Maravilhoso esse tutorial! Deus lhe dê em dobro!!! Felicidades e muito sucesso sempre!!!!!
ReplyDeleteFaço artes com tecido e feltro, patchwork básico, pinto e bordo. Amei o seu blog! Nota 10!!!
Abraços com muito carinho e beijos no seu coração. Marize/Maceió-AL/BRASIL
http://marizeartesdipano.blogspot.com
marizearthoby@hotmail.com
www.flickr.com/photos/marize_artes_dipano
www.facebook.com/marize.artesdipano
Deus lhe abençoe, proteja e ilumine sua vida e sua arte em todos os momentos de sua vida!!!!!!!
Você merece!!!!!
Amei essa bolsinha.
ReplyDeleteIt´s super cute! I must make one soon! Thank you soooo much for the tutorial!
ReplyDeletehello ayumi,
ReplyDeletei have been so excited to try this lunch bag. so i made one based exactly on your tutorial. and i should thank you for willing to share this tutorial. i'm happy with the result.
thank u so so much!!!!!!
thanks, grt tutorial.
ReplyDeleteJust finished one and I love it! Thanks so much for this tutorial :)
ReplyDeleteGreat project and tutorial! I am definitely going to make one of these for my oldest daughter who has been taking her lunch to work in one of my cloth shopping bags. She will love this!
ReplyDeletekgouvin @ hotmail.com
I made this today and I am so happy with it! My almost 18 year old will be getting it for Christmas. Thanks for the tutorial!! I posted a couple of pictures in the flickr group.(It's cuter in real life.)
ReplyDeletekgouvin @ hotmail.com
I want to say: Thank you so much for this wonderful tutorial. I made a lunchbag for my husband- you can see it on my blog. It was a great christmas present for him. http://gewaendertruhe-louise.blogspot.com/2010/12/pausenbrottasche-oder-auch-lunchbag.html
ReplyDeleteLouise
I featured this over at Today's Top 20!!
ReplyDeleteAmanda
www.todaystoptwenty.blogspot.com
Currently, I have hanging over my sewing area a vintage handkerchief from my great grandma that is the EXACT fabric you used for the outside that is the food with calories on it. I have it hanging, hoping for inspiration. I want to do something cool with it. Is yours vintage or did you find it new? Can't believe it!
ReplyDeleteBmoore_mamabee(at)hotmail(dot)com
Hi there!
ReplyDeleteI just made a lunch bag using your tutorial and it looks so great! Thank you so much! My daughter loves it. She started school now and needed a lunch bag to carry her little bento box!
Alice
how do i make this larger for a purse or small tote. love the lunch bag!!!
ReplyDeleteAnonymous-
ReplyDeleteI would make the main bag in the side I want and calculate measurements of other parts proportionally :)
And I made your lovely lunchbag as well! I have to make another one, and than 2 little girls will have new school bags :-)
ReplyDeletehttp://creadientje.wordpress.com/2011/02/08/lunchbag/
I made another one, and their mom told me: two little girls are very happy :-)
ReplyDeletehttp://creadientje.wordpress.com/2011/03/04/nog-een-lunchtas/
Fantástica sua descrição da construção dessa bolsa, muito obrigada por ajudar para uma net colaborativa e participativa, cada dia encontro mais motivos para acreditar que o nosso mundo pode ser melhor, só depende de cada um de nós.
ReplyDeleteSuper abraço.
Ângela Lima
I made one bag and really loved it. Thanks so much for writing and sharing this tutorial :)
ReplyDeleteIm a newbie learnign how to prepare Bento lunches, justo ordered a bento box but couldnt find a lunch bag pretty enough with the right size, thank you so much for your help, I cant wait to choose pretty fabrics and make it by myself! Warm greetings from Mexico :)
ReplyDelete@brunhi_g
Loved this tutorial! Thanks for sharing it. Here's the one I made: http://sparetimecontinuum.blogspot.com/2011/05/lunch-bag.html
ReplyDeleteHola
ReplyDeleteEste tutorial es fantastico, me encanta.
Desde Berlin
Rossy
ja21ke@yahoo.com
ReplyDeleteI love this bag. This is the first thing I have ever sewn besides quilting. It's a great little gift tote for holidays and special occasions. Your tutorial was AMAZINGLY clear and concise. Thank you so much.
I agree with your point, please share with us more good articles.2006 Mitsubishi Raider AC Compressor
ReplyDeleteArigatao Ayumi, your tutorial is so clear I can imagine myself sewing this adorable lunch bag already. thank you again. terima kasih.
ReplyDeleteAbsolutely love it! Thank you so much for sharing your ideas and creations. And for making the so easy to follow tutorials!! Thank you :)
ReplyDeleteMy bag is here... Http://frommommyscraftroom.blogspot.com
Hello!
ReplyDelete(excuse my english, i am french...)
Thank you for this Tutorial!
I have juste finished my bag, I can go at work monday morning with my beautiful bag :-D
There are my first step in sewing, and i am proud!
HELLO I JUST STARTED SEWING AND WOULD LIKE TO ATTEMPT THIS BAG FOR A FRIEND. THE INTERFACING THAT YOU ARE USING FOR THE HANDLES IS IT THE SAME FOR THE BODY THE DECOR PELLON? OR IS IT 2 DIFFERENT INTERFACINGS? THANKS
ReplyDeleteThank you so much everyone!!
ReplyDeleteAnonymous-
Yes, I used only one type of interfacing this project, so those two are the same ;) Good luck on whipping up a lunch bag for your friend!
This is simply beautiful. Thank you very much for sharing.
ReplyDeleteI hope you don't mind that I linked you in my blog.
http://licenciaparacoser.blogspot.com
Ana
I love this! I can't wait to make one or two or more. These would be great gifts for co-workers that bring their lunches to work.
ReplyDeleteThanks so much!
Sheri
Thank you so much for this tutorial!
ReplyDeleteYour instructions and photos leave nothing to chance. I can't wait to get started. Thank you again for taking the time to share this with us.
Kay
Sudbury, Ontario
Canada
Thank you. A very good workshop. In my bag.
ReplyDeletehttp://dianalaegas.blogspot.com/
Diana
haaaaaaaaaaaaaaaaaaaaaaaaaaaaaaaaaaaaaaaaaaaaaaaaaaaaaaaaaaaaaa this tutorial is fantastic, I'll send you the photo of my bag.
ReplyDeleteTHank you very much
I'm finally making one of these tonight, Ayumi! It's been on my "gotta make" list for to long. Thanks for the tutorial!
ReplyDeleteI made a bag from this tutorial, I really liked and want to see the result here http://docinhoalgodao.blogspot.com/2011/12/bolsa.html. I am Portuguese know this country?
ReplyDeleteThank you for sharing your ideas!
Carmo
Beautiful bag! On my list for gifts next year!
ReplyDeleteExcelente la enseñanza para realizar este Bolso. Feliz Navidad y Prospero Año 2012. Con Gran Cariño desde Venezuela.
ReplyDeletewilperez38@gmail.com
Thank you Ayumi for sharing your ideas as well for the perfectly clear instructions. Sharing is one of the many reasons we came to this world. kiss
ReplyDeletehttp://www.facebook.com/pages/Little-Things-BY-ME/178806008868123?v=info
ReplyDeleteThat's where you can find me :))
Gabriela
Just done the lunchbag for my younger sister! Have a look at it :)
ReplyDeletehttp://sewsauce.blogspot.com/2012/01/lunch-bag.html
Would like to tell everyone that you don't need to be a sewing genius to make this! It was so easy and fun to make! Thank you Ayumills!
ReplyDeleteHi Ayumi!
ReplyDeleteI just made up one of your lunch bags for my daughter to carry her ballet shoes in. Such a great tutorial! It's so clear and easy to follow and makes the cutest bag. I had a lot of fun sewing this one. Thank you so much! :)
what a lovely bag, and such clear instructions - well done:)
ReplyDeleteJust saw this bag on Happy Zombie & came immediately to you. I love it & can't wait to sew one. Thank you so much. You really have the best & clearest tutorials.
ReplyDeleteI just love this bag and after seeing it at Happy Zombie, I had to find you.
ReplyDeleteGreat project.
cheers
maggie
Wow! I definitely want to make this lunch bag for my kids....Thanks!
ReplyDeletethank you so much for this wonderful tutorial! Have to give it a try
ReplyDeletegreetings from Germany
Brigitte
You do the MOST AMAZING tutorials!! I made the wristlet and now this looks awesome!! Can't wait to make it!! THANK YOU!!
ReplyDeleteThank You so much! Easy directions...my first bag and I was nervous, but it came out perfect and cute as can be. My granddaughter will love it. Thank You!
ReplyDeleteNana
Thanks for the great tutorial. I had a pack of fat quarters which worked out great for this project. I wanted to make the handles a little longer and I used fabric scraps for the drawstring.
ReplyDeletebeautiful and cute, i love it and now i am following your adorable blog from Brazil ;))
ReplyDeleteBella
http://dasbellas.blogspot.com
Greetings from Portland, Oregon! I just got sent here today by Daisy Cottage Quilting, and I immediately subscribed. I love your tutorial style!! I'm looking forward to reading your blog from one end to the other, and seeing what you have in store for the future. Thank you!!
ReplyDeleteexcellent tutorial - love the pics/instructions! You did a great job and I appreciate the details! Will try this project!
ReplyDeleteGreat tutorial I love this so much and I can't wait to try it.
ReplyDeleteThank u..!!
Kiitos ihanan kassin opetusohjelmasta.Terveisiä
ReplyDeleteSuomesta.Kokeilen heti tätä.
Ayumi, thank you so much for this tutorial. I made it last weekend and found the instructions and pictures were the best I have used in a long time! I will definately be making more as gifts for my friends and family.
ReplyDeleteThank you for the tutorial for this adorable lunch tote. I just made two for grand daughters. I added a pocket and insulated lining. They get them tomorrow and I hope they like them as much I do. I added my pics to Flickr.
ReplyDeletePerfect. Great tute... Thanx
ReplyDeleteThank you so much for this great tutorial. I have been looking for something like this for soooooo long.
ReplyDeletePlease do more bento bags. Bigger for putting my knitting in. Xxxx thanks xxxxx
Have i said thank you yet?? i don´t know, but thank you!!!! i looove this bag.
ReplyDeleteThank you for this tutorial. I've just made it, it's esay to sew, nice and very practical!
ReplyDeleteI just used your tutorial to make a knitting bag for a Mother's Day present. The bag is so cute! Now I need to make one for myself. Thank you so much for the wonderful tutorial!
ReplyDeleteThis is a WONDERFUL tutorial! I don't make bags normally because I struggle with directions, but yours are fabulous! Instructions are very, very clear and the pictures make all the difference. I hope to upload a pic soon and will definitely sing your praises on my blog. Thank you!
ReplyDeleteThank you to share , here are what i made http://www.flickr.com/photos/fuxiquices-da-isa/7083552425/in/photostream
ReplyDeleteBetter late than never joining this party.
ReplyDeleteYou can see my bag here: http://runningwithrocket.blogspot.com/2012/04/lunch-sewing.html
Thank you for very clear photos and directions. This was easy peasy to make.
Thank you, Ayumi, with another wonderful tutorial. I made my bag this weekend and I absolutely love it.
ReplyDeletehttp://timefordinner.wordpress.com/2012/04/22/pink-penguins-lunch-bag/
もう、すごく気に入ってます。いつも、素敵なアイディアを提供してくれて、ありがとう!
Hirono
Thank you, this is just what i was looking for my lunch !!
ReplyDeletevery clear instructions and many pictures so helpfull !
Charlotte (From France!)
Thanks for the tutorial, I have done a few of them, I just posted a Tote that I made like this one.
ReplyDeleteIt is perfect, thanks again.
Love, wanilza
My second bag with 'improvements'. Thanks for the pattern.
ReplyDeletehttp://runningwithrocket.blogspot.com/2012/05/finished-purse.html
This comment has been removed by the author.
ReplyDeleteWow! I just found a bag on Pinterest on a ladies blog, she had used your tutorial and linked back to you. Thanks so much for the instructions!! I am definitely going to make this bag soon. I need something for my knitting needles.
ReplyDeleteThanks soooo much!
Anthea
j'ai réalisé un lunch bag
ReplyDeletethanks
i'am french
Deletemy blog : mespoupouilles.canalblog.com
Just finished making this bag! It is sooo cute! Your instructions are fantastic and super easy to follow, Thank You!
ReplyDeleteThank you for a great tutorial on this supercute bag!
ReplyDeleteI just finished this bag and I love it! Thank you so much for such flawless instructions! Your details were incredibly easy to follow!
ReplyDeleteOMG that is good. =) I doubt I will be able to make one, but I sure can try some day. =) Thanks for a great blogg. =) Hugs
ReplyDeleteGreat tutorial! thank you so much****
ReplyDeleteWhere did you buy the calorie fabric please?
ReplyDeleteIt was Anna Griffin's fabric that is unfortunately out of print :(
DeleteExcellent tutorial! About the best I've ever seen. Thank you.
ReplyDeleteRuth Root
Amarillo, Texas
Thank you for posting this wonderful tut! The bag is beautiful.
ReplyDeleteThanks for this great pattern. It is very well thought out. I have already made two and I can see these as Christmas gifts for sure!
ReplyDeleteGreat tutorial and I have a new bag made following it. Thank you for sharing your knowledge.
ReplyDeletejust made this. it's a really good size and i really like the drawstring part that provides the privacy, as you say.
ReplyDeleteHi Ayumi! I finished my son's lunch bag! If your ears are burning, this is why: http://www.freepatchworkquiltinfo.com/2012/07/2012-july-lunch-bag-link-to-awesome.html I was talking about you, hehehe :p BIG hugs, let me know what you think when you get a chance :-) Tiffiny
ReplyDeleteGreat tutorial and great blog!
ReplyDeleteLove this pattern -- thanks so much for the great tutorial. I finished the bag, as a knitting bag -- my blog post about it is here: http://oldsweetsong.blogspot.com/2012/07/im-bag-lady.html
ReplyDeleteThanks again!
How creative. Lovely design.
ReplyDeleteThanks for sharing such a great tutorial! I saw your bag on pinterest and followed it back here. Like too many things on Pinterest, it took multiple steps to find the original, but it's worth it! I love making bags to give as gifts, because who couldn't use a new bag?! :) They're great for all ages. I really like that I can make this with a variety of fat quarters.
ReplyDeleteAyumi, I made another one of these awesome bags and another post about your free tutorial on my blog. Check it out when you get a chance :-) hugs, Tiffiny http://www.freepatchworkquiltinfo.com/2012/08/2012-august-another-lunch-bag-and-link.html#
ReplyDeleteThank you, cute lunch bag and a great tutorial!!!
ReplyDeleteLiebe Grüße
Bente
Found your tutorial today. Thank you, it's pretty nice!
ReplyDeleteNuF (from Vienna/Austria)
I love this lunch tote! I included it in my collection of diy lunch bags and totes here:
ReplyDeletehttp://freshjuniper.blogspot.com/2012/08/50-lunch-totes-and-bags-with-tutorials.html
Thanks for posting!
Your tutorials are SO easy to follow. I love this pattern. I made one to carry baby food to school for my kids. I created a link back to this post from http://notyournormalsteam.wordpress.com/2012/08/31/never-say-never-bags/
ReplyDeleteThank you so much for your tutorial! It was easy to follow! I can't wait to give my mom her new lunch bag as a birthday present this week! =)
ReplyDeleteI did do one adaptation to your pattern maybe worth mentioning... To avoid having the seams showing inside on the "hood" I cut four cover pieces instead of two. Sewed them first across the top seams and then while still laying flat doing the the sides (leaving a two inch opening at the top seam on each side). Then proceeded somewhat the same as you, pressing open the seams and stitching in place. Folding over the two layers back to back. A stitch very close to the top to hold in place and another under (the now one inch opening) all the way around (this becomes the place holder for the drawstring). Now when I attached the flap there were no seams showing from around the ring of the flap or down the inside sides. =) Plus I used your idea of top stitching the final ring 1/4 inch in so you could see those loose edges! I hope i explained myself properly. But that is why you have the amazing blog and not I! =) Looks good! Thank you thank you!
ReplyDeleteThank you so much for sharing your adoption here, Stephanie! You are so clever!!
DeleteThank you, Ayumi, for such a great tutorial!!! I made 4 of these bags to give as gifts, the most recent, out of my daughter's school uniform pattern for a school fundraiser auction item!! It turned out so cute!! I will definitely send you pictures of my bags. They are so much fun to make!!
ReplyDeleteI am so glad to hear you were able to make bags for the fundraising purpose! If you have a flickr account, I would love it if you posted your bag picture here ;)
Deletehttp://www.flickr.com/groups/pinkpenguin/
Hi, I just love this bag. I have a shop on etsy and would love to add a few of these bags. I understand the 20 per month, and that's perfect. We make "one of a kind" creations and this can be in so many patterns. I have paid for the license and was wondering if it comes in the mail or emailed. I did purchase it on Sept 22, so I'm sure you haven't processed it yet. Wanted to make sure it didn't get lost in junk email if delivered that way. I do mostly floral creations but have added bags to the mix. They are such fun to make. Check out our shop www.theskrappery.etsy.com. Happy Creating.
ReplyDeleteThanks again
DonnaMarie
koolkows20@hotmail.com
United States
I've already replied to your email, but thought I'd answer your question in case other people have the same question ;)
DeleteAs long as you purchase the license, you are good to go and start selling your lunch bags! I am sorry for the confusion. I'll figure out if there is a way to send a message right away from Paypal now..!
Cute bag. I would to sell them arts and crafts show during Christmas holidays do I still have to purchase the licenses? How much is the licenses?
ReplyDeleteMy email address is vdnelson@spocom.com
ReplyDeleteHi Ayumills, how have you been. hope everything is ok. how much is the licenses? my email adressa is: fabiola@cargonave.com.br from Brazil . i did one and will send to you a photo as soon as possible.
ReplyDeletetks
fabby
Found your tutorial today. Thank you, it's pretty nice!
ReplyDeletehttp://www.flickr.com/groups/pinkpenguin/ and www.bizbize.org
Smart!!!! I might make some for Christmas gifts for nieces.
ReplyDeleteGreat! I love it! It's really easy to follow your tutorial and it's big enough for all of my lunch (and I take a lot!). Blogged here: http://tdcell.com/threadridinghood/wordpress/?p=309
ReplyDeleteHi Ayumi
ReplyDeleteI am a complete novice when it comes to sewing but would really like to have a go at this cute little bag. I understand most of the tutorial but can I just ask - at the step where it says 'place the lining inside the outer bag wrong sides together. Sew very close to top edge' how do you get the neat finish? do you hem the edges before you sew them together? This probably sounds like a dumb question when you are such an expert sewer lol!!
Thanks
Sharon x
Hi Sharon,
DeleteNo, it is not a dumb question at all! I am glad you asked because you probably aren't the only person who wondered about it! I used a lot of pins to hold the two bags together along the top edge when I sewed. If you are using any interfacing or lining that is too thick to use pins, I recommend you use glue to attach them first and then sew. Either way, the stitching will be hidden in the finished project, so I wouldn't worry too much about it if my stitching didn't come out nicely. Hope this helps ;)
Thank you for your reply Ayumi. It makes more sense now! xx
DeleteWhat a great concise and all inclusive tutorial--I had a blast making it -will post pictures. Thank You!!
ReplyDeleteFab tutorial, just knocked on up in 3 hours flat when I discovered my daughters old lunchbag had gone mouldy over the summer... School trip tomorrow hence emergency requirement for a lunchbag! I used mini bulldog clips to hold multiple layers of fabric in place, rather than pins - and it's better for oilcloth as pin holes don't show :-)
ReplyDeleteGreat, love your tutorial ...
ReplyDeleteI made 12 of these to take to a handmade swap party, and they were the supreme hit of the night! Thank you so much for the easy tutorial.
ReplyDeletereally easy to make and influenced fashionable bags really impressive..
ReplyDeleteBuy Branded Bags
Great tutorial I love this so much and I can't wait to try it.
ReplyDeleteThank u..!!