 Hello! This is my second posting! Yeah! I am really excited about exploring what I can do with this blog. Creating a new blog is so much fun. It's like having new home online. I have too much stuff that I wanna write about, but today I would like to talk about just two things: These birdies and a tutorial on how to make the camera case. I just found these wire-birdies in this shop. Super Cute! Aren't they? They are only 367 yen: less than US$4 each. Unfortunately, they are sold out... One thing I like about Japan is that I can find a lot of things that are so cute that it's hard to resist. Finding pretty stuff does make my life brighter. ----------------------------- Ok, let me show you the tutorial. This is absolutely my first time to create a sewing tutorial in English. I might be missing a lot of details... If there is anything not clear, please let me know! 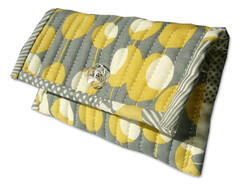 The only materials needed are fabric(outer and inner), bias binding(you could make your own or buy one), matching thread, and a button. 1) The first thing is to determine the size of your digital camera to see how big your final camera case needs to be. My camera is about 3 3/4"(width), 2"(height), and 1"(depth), so I cut out one piece of 8 x 5 1/2"fabric from each fabric: one for outer and one for inner. If your camera's size is about mine, you could cut out the same size's fabrics as mine, but if your camera is a lot bigger you might want to make the scale bigger, accommodating with your camera's size. I cut out the batting for the same size+ some extra width and height. Then, I sandwiched the batting between my fabrics so the right sides of the fabrics are outermost. After pinning the layers together, I machine-stitched like this (the width between the pararell stitch lines are about 3/8") and cut off the excess batting. 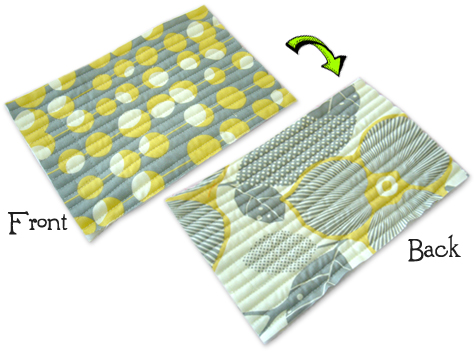 2) Then, I made 4 bias strips. (If you are using a store-bought one, please omit this step) Two tapes : 6" length Two tapes : 9" length Using a bias tape maker makes it a lot easier and quicker! 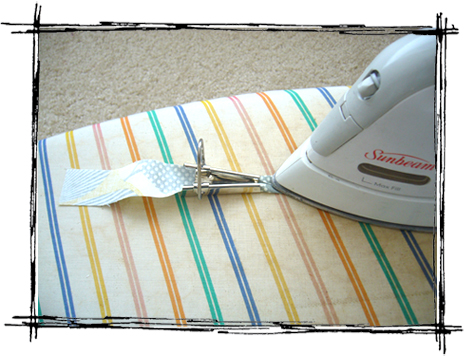 They should look like this after pressing. 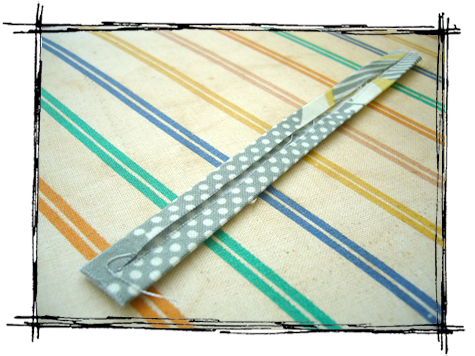 3) Then I attached the 6" bindings onto the width part of the sandwich. First, open out one turning on the binding and pin it along the edge of the fabric, right side together, then machine stitch along the fold line. 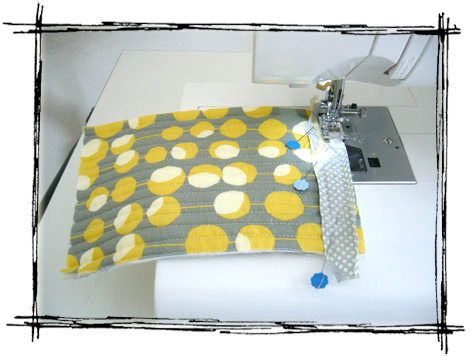 4) Then I folded the binding over the fabric edge to the wrong side, so the edge of the binding is just above the machine stitching. I slipstitched the folded edge of the binding to the fabric, catching up the fabric in the allowance, just above the machine stitching. 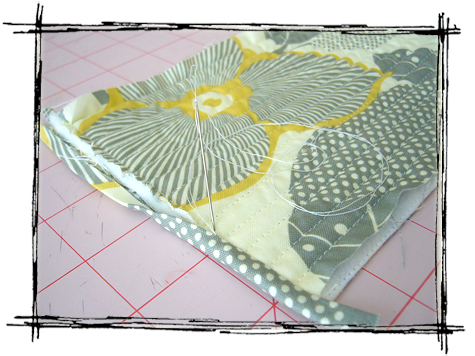 5) Repeat this for the other side too and cut off the excess bindings. 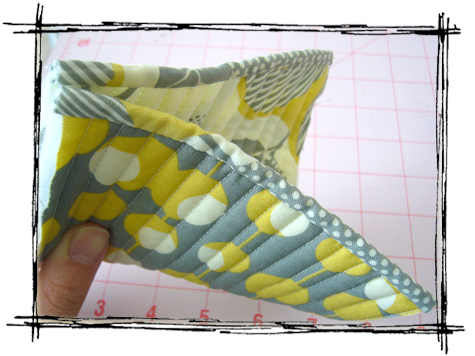 6) The next thing is to do is to make a pocket. I folded the sandwich to make the pocket whose height is 2 1/4" and based it. Then, I attached 9" bindings onto the sandwich. This time, I turned the both ends like this then machine stitched. 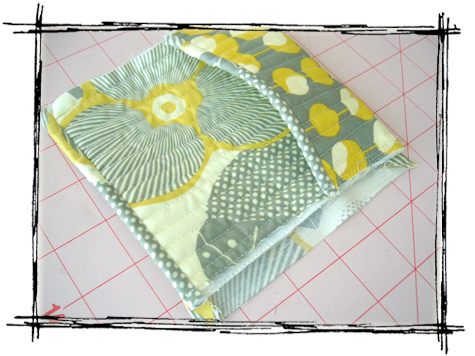 so that the corner looks nice like this.  Your camera case should look like this now. 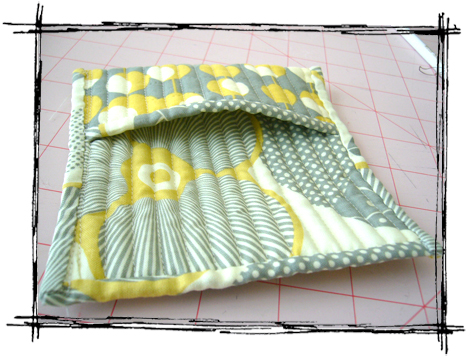 7) The only things left to do is to sew a button hole and attach a button! 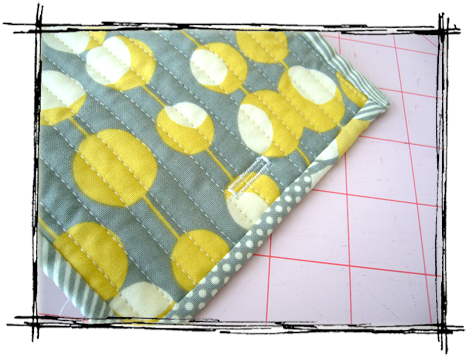 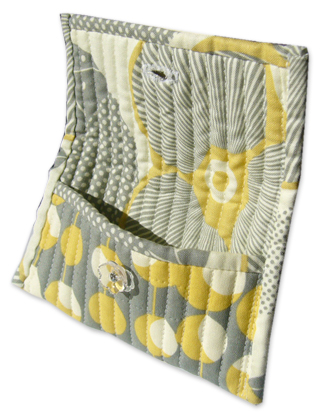 Done!! This is fairly easy to make and it does give a nicely soft protection for your camera. Pretty to carry with as well! If you make one, please let me know! I would LOVE to see it! Thanks for looking!!  |

 |  |  |
Monday, April 21, 2008
| How to make a super simple camera case |
Subscribe to:
Post Comments (Atom)


Dear friend Ayumi,you are a wonderful person&friend.lovely site that you create.I like your work is perfect.Congratulation.
ReplyDeleteWith love from ece//
Hi, Ayumi- your blog is beautiful, and I can see you have put a lot of effort into it. I look forward to more of them, and I don't even sew! -Paul, Yakima
ReplyDeleteEce-
ReplyDeleteThanks soooo much for keeping to cheer me up! You are such a sweet girl! You encourage me big time! Thanks my crafty friend!
Paul-
You succeeded! Thanks for your nice thought to give me a comment!! I understand it's quite boring for you so far, but I plan to write about other things besides sewing like maybe a date with Joe or something. I'm hoping that this blog will be a way to connect folks in WA and show how we are doing. Thanks again for your comment!
Hi Sweetie,
ReplyDeleteI love your new blog! It was fun to look at your old one, but very nice to be able to read the text on this one.
You have done a great job on your tutorial. It is very easy to understand and follow the directions. I am always impressed by the way you put color and patterns together, very artistic. And the quality of your workmanship is terrific, as always!
I would like to see some of the projects from your other blog on this one too.
I'm looking forwarding to seeing pictures of you and Joe, and reading about what you two have been doing. Congratulations on another job well done, we are all very proud of you! Kim
Kim-
ReplyDeleteThanks so much for your very sweet and warm comment, Kim! I've wanted to start a blog in English so much partly because I wanted you to be able to read about my crafting life and, of course, how Joe and I have been doing. I'm so glad I started this, because now all of you including Joe can actually read! If you can think of any folks who might be interested in reading this blog like your parents, please let them know;)
I would LOVE to see your crafts too, Kim! Hopefully Joe and I can make it to Yakima this summer and you can show me your recent sewing projects! YOU are the talented one and YOU insipre me all the time!!
Thanks for the great tutorial! This is just what I was wanting to make for my new camera....a girl can always use another cute bag of some kind!
ReplyDeleteI love your camera case! I have been wanting to make one and yours is the most stylish that I have seen!
ReplyDeleteLola-
ReplyDeleteThanks for your nice comment! Yes, we are always in need of cute bags!
Molly-
Thanks for your sweet comment!
This camera case is super easy to make..Try!
My first time visit to your blog & have liked what I've seen so far. This is a very fancy camera case, & I think it is "subarashi". The fabric choice is great!Julia
ReplyDeleteJulia-
ReplyDeleteThanks so much for leaving me a nice comment;)
I hope to make more subarashi stuff, so please check back! Thanks!
Hello! I came to your blog through Craftzine - I hope to one day make that camera case (need to ask my mom how to use a sewing machine first). Love your blog - I just came back from a year and a half stint in Kyoto and loved all the crafty and cute stuff there - very inspring and so tempting! My suitcases were overweight because I decided to come back with things like Hello Kitty Bento boxes and other stuff as well.
ReplyDeleteThis comment has been removed by a blog administrator.
ReplyDeleteThank you for the tutorial. It was very easy to understand and follow the directions. If you hadn't said so, I would have never known that English wasn't your first language.
ReplyDeleteI look forward to more projects!
Drawing is the same as sewing sense we create with our hands and minds. You really have amassed interesting ideas into your site. It is you through and through. Can't wait to see what else you think up. Ill share my doodles with you as well. =P
ReplyDeleteExcellent tutorial! Thanks for the inspiration.
ReplyDeleteSuch beautiful fabric! Can you tell me the name of it or where to find it?
ReplyDeleteWow - you did a great job on this tutorial! I am quite impressed. Congratulations on the new blog, too!
ReplyDeletehi Ayumi,
ReplyDeletei absolutely love the pictures you took for you tutorial. They make your instructions so clear!!! And the bag is so pretty!!! i can't wait for more tutorials from you!! :)
Maria-
ReplyDeleteThanks for visiting my blog and letting me know that you came from ceaftzine. I wouldn't have known that craftzine had my link on their blog if you didn't tell me.
Kyoto is a very nice place, isn't it? Overweight suitcase...That happens me every single time I go back to Japan.lol. I am visiting Japan this summer. Can't wait!
evenstar-
ReplyDeleteThanks so much for your comment!
So glad to hear what you said.
I am hoping that by doing this blog, I will gain some English skills.
I'll post more soon;) Thanks!
Cameron-
ReplyDeleteThanks for your comment! You are very artistic friend of mine, Cameron. I'm lookiing forward to see more drawings of you too!
Bonita-
ReplyDeleteThanks so mucch, Bonita;)
Carly-
ReplyDeleteThanks for your comment!
I used Midwestern fabric by Amy Butler.
You can find these fabris at many online shops. For instance...
http://www.hancocks-paducah.com/
http://www.sewmamasew.com/
http://equilter.com/cgi-bin/webc.cgi/st_main.html?catid=203&sid=93LKiA1zh0HIALf-45108069567.24
I hope this helps;)
-anna w
ReplyDeleteThanks for your nice comment!
I'll try to work on more tutorials later, so please check back;)
Meiyo-
ReplyDeleteThanks so much for your sweet comment! I wasn't sure if I was being clear enough so it does make me smile that you think it's clear.
I'll update more tutorials in the future;)
Thanks for the tutorial! The camera case is awesome and so is the fabric!
ReplyDeleteValerina-
ReplyDeleteThanks for your nice comment;)
I love the fabric too;)
This thing is not only pretty but also a stunning creation!
ReplyDelete-Mostafa
Great job! I love it! Can't wait to see more!
ReplyDeleteLinda
Neat! And you were featured in PhotoJojo!
ReplyDeleteokay ... *blinks* *blinks* ... that is SUPERcute! I want to make one right now, and I mean NOW! I've been wanting to make my own bags and such for a while and haven't! This may be a good start1
ReplyDeleteoh that is super cute!!!
ReplyDeletei don't think i have the skills to pull it off..but who knows..but i love it..tfs the tutorial!
mostafa, Linda, dave, _megankish, grover-
ReplyDeleteThanks so much for your sweet comments!! This is not a difficult project so i hope you all try and if you do, I would love to see it;) Thanks!
I came from Photojojo - great site. Not only am I a photo nut (hence how I found you) but I also love finding new things to sew. I'm going to make the camera bag and even try adapting it to make a small wristlet! :)
ReplyDeleteelizabeth-
ReplyDeleteThanks so much for your nice comment!
If you make your camera bag, please let me know;)I would LOVE to see yours!!
I found your site from Photojojo. Your camera case is inspiring. I can't wait to pull out my fabric and start !! Thank you for sharing your wonderful idea.
ReplyDeleteCrazy cute! Love it!
ReplyDeleteHi………….. This is a great site.
Deleteglenda & rlyon-
ReplyDeleteThanks for your nice comments;)
If you make one I would want to see it;)
Thanks for the post. I need a case and was considering making one since I have a stash of fabric and am trying to consume less. I would prefer something original over a basic store bought one anyway.
ReplyDeleteIt's always refreshing to see people who are passionate about the things they love.
ReplyDeleteAyumi your passions seems to be hand crafting and sewing. Mine is photography and nursing.
Thanks for your great tutorial.
=)
E Jane of all trades and bullet salvador-
ReplyDeleteThanks so much for your nice comments;) Make your original camera case and let me know if you make one+I can see the pics of it;) Thanks!
I slid over to your blog via Photojo and really enjoyed your tutorial on making a camera case. I was so intrigued I had to browse around your site a bit and just wanted to let you know you've done a great job on not only your tutorial(s), but also on your blog itself. Very nice. Your tutorial instructions are clear, the photos are sharp and your creativity is hard to hide.
ReplyDeleteKeep up the great work; you inspire me!
thelma-
ReplyDeleteOh boy..your comment made my day!!!!!!!Thanks for looking at other things here besides tutorials and complementing! This is a very new blog and I am still trying to renovate my blog in many ways.
Thanks, thelma!!
I love your camera case tutorial! I'm planning to make one for smaller camera, and I'll be so proud to carry it! Thank you, and I'm so glad to have found your pretty blog!!!
ReplyDeleteteresa-
ReplyDeleteThanks for your nice comment!
I'm so glad to hear that you like this tutorial/blog. Enjoy makng it!
The camera bag is great but do you think it could be adapted to work for a medium size camera--such as the Sony H9?
ReplyDeleteAnonymous-
ReplyDeleteThanks for your comment;)
I don't know how big your camera is, but if your camera is a simple digital camera like a flat one, this bag should work for it as long as you make the base bigger. but if your camera is SLR camera, this might not be a great choice.
I'm happy my camera case has your approval. It was fun and easy to make (because of your tutorial, of course).
ReplyDeletethucnghi-
ReplyDeleteThanks for making and putting up the link to my blog. Your camera case is really cute!!
Nice article.
ReplyDeleteBy the way. Get the cheapest prices on digital cameras, digital camcorders and accessories at Megacameras.com
I finally did it! I found some cute fabric and made the camera case. I love it! I'm already thinking of ways to adapt it for other uses. I put a picture up on my blog too. Feel free to take a look. :)
ReplyDeleteI finally got a chance to look at this tutorial and I'm planning on making a camera case for my friend for Christmas. I never knew I could make my own bias tape like this! I'm so excited to know this new skill - thanks!!!
ReplyDeleteElizabeth-
ReplyDeleteThanks for making it and letting me know! Your camera case is awesome and what you said about me on your bog simply made me smile..! Thanks!
Heather-
I'm sure you'll make very pretty camera cases for your friends! Making bias tapes are actually quite simple! Looking forward to seeing what you'll make!
Lovely! I made many cases like this 20 years ago. My god, I'm old.....
ReplyDeleteHi I've been admiring your tutorials and this is the first one I'm trying out. I've made 2 cases and I hope you'll check them out at http://projectsbyjane.blogspot.com/
ReplyDeleteHi,
ReplyDeleteI just wanted to say I like your blog and I appreciate the work you put in it. I came over here from a photoraphy website, might have been DPS or something.
I probably was this thread:
http://digital-photography-school.com/blog/choosing-a-day-bag-for-your-camera/
But I'm not for sure.
Anyway, your English is really good, I'd be hard pressed to peg you for a non native speaker. Well done, and have a good day.
Eric
I love your camera case! It was so simple and only took about an hour! I made mine a little bigger and with Strawberry shortcake material for my toddlers camera! She loves it too. Thanks so much for the great tutorial!
ReplyDeletethank you so much for this tutorial, my sister is getting one for Christmas. This tutorial was very easy to follow and it really helped my get the hang of it for the first time! Now that I have made one, I am going to adapt this pattern and make my own!
ReplyDeleteHere is mine on my blog:
http://inspiredbyhand.blogspot.com/2008/12/camera-case-for-christmas.html
A very cute site! I love this tutorial and plan to make the camera case someday. Great instructions.
ReplyDeleteSo lovely of you to share that camera case tutorial - can't wait to look at your others. Love your blog - I'm so behind posting in mine. found you through Freida's Hive. robin from Tennessee
ReplyDeleteSimple great, I love that camera case. thanks for shearing.
ReplyDeleteGREAT TUTORIAL!! =)
ReplyDeletelooks easy and nice! i wanna try it but I've a question: which fabric did you use? Because if i use regular fabric is not soft enough and my camera might break!
my email is bijuland@gmail.com
Thanks in advance! =)
Wow... This stuff you are making is amazing! Keep it up, I have bookmarked your page and I have seen designs inspired by yours... I will try it out!!
ReplyDeleteSo cute! I am adding this to my list of projects to make!
ReplyDeleteYou really do have the best tutorials. This would be great for my little camera. Thanks!
ReplyDeletelove the fabric pattern. very nifty idea.
ReplyDeleteGreat tutorial! I'm excited to see more on your blog!
ReplyDeleteYour tutorials are always very good and easy to understand. Thanks for this one, it's lovely. Greetings from Germany :)
ReplyDeletewaouhhhhhhhhhhhhhhhhhhhtrop bien bises
ReplyDeletethanks for your wonderful tutorial and i love your site so much! Hope you will post more tutorial sharing!
ReplyDeleteAmazing!
ReplyDeleteAny ideas for a professional camera case?
How cute is that? Love the fabric you chose. I'm going to have a go... Jules x
ReplyDeletelovely tutorial!!! thanks for sharing it
ReplyDeletei will ahve to try this is awsome and it is a great present
ReplyDeleteSo cute stuff! - - Lucia (blogger for digital camera review)
ReplyDeletei love it! do you reckon i could make a big version of it for a laptop?
ReplyDeleteThank you so much everyone!
ReplyDeleteAnonymous-
I'm sure you can make a big version to make a laptop cozy! If I were to make a laptop cozy this way, I would make sure to use velcro instead of a little button just to secure the opening. Thank you!
This tutorial is very clear and precise, great job! I had to go make a camera case after I read this! :)
ReplyDeleteSammy
well when I first saw the first picture, I thought this tutorial was about making those metal cord birds, but then I read the title and I knew what this tutorial is about, and I just bought a camera and this will help me a lot, thanks!
ReplyDeleteYep!! I definitely need a cute camera case and I think this is the one for me!!!
ReplyDeleteThis comment has been removed by the author.
ReplyDeleteThank you, everyone!
ReplyDeleteTori-
Mine is about 5" x 3". It would be great to make it a money carrier.
Ok, thank you!
ReplyDeleteCLEAR AND SIMPLE. FEEL INSPIRED TO GIVE IT A GO. WILL POST RESULTS.
ReplyDeleteHI Ayumi, may I know what size of your bias tape marker, thank you very much
ReplyDeleteThank you everyone!
ReplyDeleteThe bias tape maker is 0.5" :)
hey ayumi....my mom is very intersted in patchwork bags and she loved all your different creations....thanx so much for sharing your work with others...they are ver beautiful and useful :) :)
ReplyDeleteHi Ayumi!
ReplyDeletei wonder if the camera case can be used as a wallet. and i want to add that you're a total GENIUS, i feel your passion for textiles so much that my laptop is about to burn up! i'm going to do a pen case and i'm going to use your tutorial for it in school, you really made my life easier with the detailed descriptions! ARIGATOU <3 :3
Thank you everyone :)
ReplyDeleteInteresting post and thanks for sharing. Some things in here I have not thought about before. Thanks for that important information, its really helpful. Red Cross CPR Certification
ReplyDeleteAs well as convenience, the bag serves to protect the exposed LCD screens and the camera body from scratches. Those easy to operate control knobs that stick up are also more vulnerable to accidental knocks, so a bit of cushioning is important even for a compact pocket size camera.
ReplyDeleteUsually I do not post comments on blogs, but I would like to say that this blog really forced me to do so! Thanks, for a really nice read.
ReplyDeleteThanks for sharing. I'm going to try this one. I'm new in sewing. so I hope I can follow your tutorial. Really like your blog.
ReplyDeleteThis is such a great resource that you are providing and you give it away for free. I love seeing websites that understand the value of providing a quality resource for free. It?s the old what goes around comes around routine. Did you acquired lots of links and I see lots of trackbacks??
ReplyDeleteCna Certification
Nice stuff,Thanks for the share I can use this idea to earn money by doing pieces of camera case in different colors and then sell it to have an extra money.
ReplyDeleteVery nice sharing and lovely post.Step by step tutorial is very easy and new to eyes.
ReplyDeleteLove your post;).
Cheers
Rex
that's amazing!, thanks again for the tutorial...i will try to make this one :D
ReplyDeletehi you have a good talent on this, you can sell your stuff or product and starting make money hehe
ReplyDeletehello there, thanks for your tips...
ReplyDeleteThanks for the information, this tutorial was highly useful for me to gain knowledge of how to make a super simple camera case. Many thanks
ReplyDeleteVery adorable craft.I admire you for your creativity. I really love it, maybe its because i really love bags. Maybe I'll try it some other time.
ReplyDeleteI agree with your point, please share with us more good articles.2007 Mitsubishi Raider AC Compressor
ReplyDeleteI am certainly thankful to you for providing us with this invaluable info. My spouse and I are truthfully grateful, precisely the computer data we needed.
ReplyDeleteCNA Practice Test
Sewing is the craft of fastening or attaching objects using stitches made with a needle and thread. It is really amazing that we can create a variety of stuff by just sewing a fabric and some threads.
ReplyDeleteThanks for the great tutorial. I love it! Can't wait to see more!
ReplyDeleteI didn't know your artistic works but now I Will not miss it. That wonderful!!! Thank your for sharing them. Greeting from Spain
ReplyDeleteI haven't any word to appreciate this post.....Really i am impressed from this post....the person who create this post it was a great human..thanks for shared this with us.
ReplyDeleteWow amazing art. I really like it. I will definitely try this. It inspires me to do more with my art skills.
ReplyDeleteThis Blog Is Really wonderful and amazing information is there and looking so attractive.
ReplyDeleteI feel good to be here.
keep it up and thanks for sharing. :)
I am following your blog regularly and got great information. I really like the tips you have given. Thanks a lot for sharing. Will be referring a lot of friends about this. Keep blogging
ReplyDeleteYou...are...my...hero!!! I cant believe something like this exists on the internet! Its so true, so honest, and more than that you dont sound like an idiot! Finally, someone who knows how to talk about a subject without sounding like a kid who didnt get that bike he wanted for Christmas.
ReplyDeleteCrafting is something which I have always loved when I was small, still now also if I gets time I used to make such items. This time I am thinking to make this, hope that output will be good as yours.
ReplyDeleteReally intelligent piece of writing buddy, keep it up and I will keep tweeting your blog posts for you so you can get the readers you deserve!
ReplyDeleteMost of time we spend a lot of money paying for stuff we can do at home, but as lazy persons we simply prefer top pay for it. I think I can do this camera case, I understand all steps and actually I'm gonna try to it.
ReplyDeletewow you've made this with such precision. It looks beautiful.
ReplyDeleteI enjoyed reading it. I'm supposed to be somewhere else in a minute but I stuck to reading the story. I like the quality of your blog: D
ReplyDeleteHope this makes a good cell phone case as well... because I am about to make one.
ReplyDeleteI will keep tweeting your blog posts for you so you can get the readers you deserve!
ReplyDelete* thành lập doanh nghiệp
Wow, nice post,there are many person searching about that now they will find enough resources by your post.Thank you for sharing to us.Please one more post about that..
ReplyDeleteThat does seem pretty simple, and pretty cute! Maybe I can make some for Xmas next year. :)
ReplyDeleteI liked the posts and cool layout you have here! I would like to thank you for sharing your experience and the time it took to post!! Two Thumbs up!
ReplyDeleteI think I might buy some of those birds, I'm obsessed with birds! Love them. :)
ReplyDeleteHello .. I have never seen a smart articles that you created. It really helped me to get back my ideas for writing. I will save this post, for I learn.Debra
ReplyDeleteExcellent article that will provide the incentive and basis for my works. I wonder if I can mention the article as a bibliographic reference in my work. Thanks!
ReplyDeleteThat was really very great trick. I learned it very well and will be trying it soon. Hope to see some more like this in future.
ReplyDeleteSuper duper cute! Can this fit an iPhone? That's what I have.
ReplyDelete~Pam~
Thank you everyone!
ReplyDeletePam-
You can definitely make one large enough for your iPhone ;)
As usual i am searching some useful information, immediately i found this post and gain some useful information great work such a great brain to use.
ReplyDeleteOutstanding things by you, person. There are examine your own things before and you are merely additionally awesome. I love exactly what that you’ve received in this article, appreciate just what you are proclaiming and in what way anyone point out this. You’re making this interesting but you just have the ability to maintain it wise. My spouse and i find it difficult to delay to examine much more by you. That is really a superb blog.
ReplyDeleteiphone 5 features
Excellent factors by you, individual. There are analyze your own factors before and you are merely furthermore amazing. I really like exactly what that you have obtained in the following paragraphs, appreciate just what you are stating and in what way anyone factor out this. You are creating this exciting but you just have the capability to sustain it sensible. My partner and i fight wait to analyze much more by you. That is really a fantastic weblog.
ReplyDeleteI love it!!!
ReplyDeleteI love tudo!!!
ReplyDeleteYou can't really say what is beautiful about a place, but the image of the place will remain vividly with you.
ReplyDeleteKLEBE BH
It’s refreshing to read a good quality blog post for a change. You’ve made many interesting points and I agree. This has made me think and for that I thank you.
ReplyDeleteiphone 6 plus case