


I was flattered when Jennifer of Ellison Lane Quilts kindly
asked me to be a part of 12 gifts of Christmas Blog Hop!
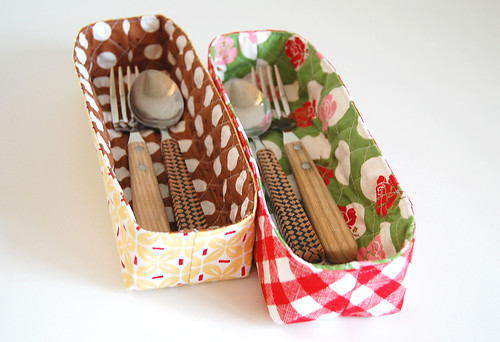
with a tutorial on how to make these
easy-peasy organizer baskets!
Not ready to think about Christmas yet?
Me neither, but we know it will come before we know it!
Jennifer picked this perfect timing to get this rolling
so that we have plenty of time to whip up gifts!
It's been over a year since I last posted a tutorial,
so I was a bit nervous writing this up, although it is
probably the easiest project among all sewing tutes
I have ever written, hehe. Hopefully I took enough pictures
so that the visual will help you through! If you have any
questions about this tute, you know you can contact me anytime!
questions about this tute, you know you can contact me anytime!
Ok, here you go!
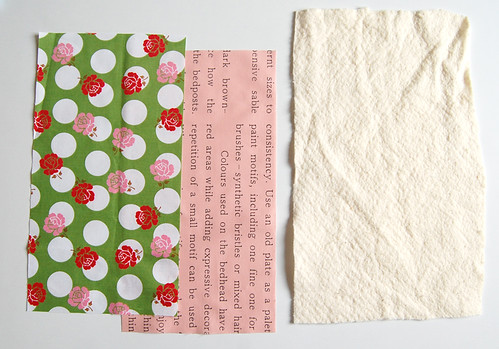
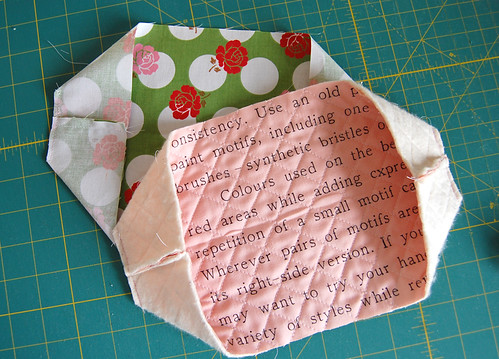
To make one basket, you'll need two 13" x 7" cotton rectangles
(one for exterior, one for interior) and one piece of
cotton batting that is just a little larger than 13" x 7".

(one for exterior, one for interior) and one piece of
cotton batting that is just a little larger than 13" x 7".
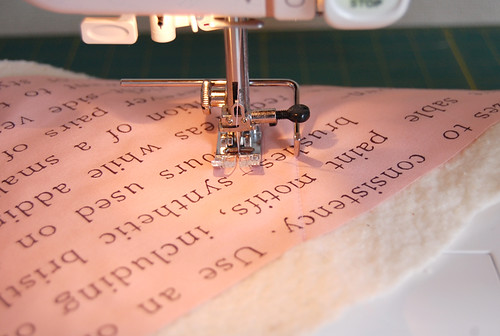
Spray the wrong side of the interior piece and add the batting.

Quilt as desired. I like mine diagonal cross hatch quilted.
I marked a line from one corner to the point where it's 6" from the other corner.
I marked a line from one corner to the point where it's 6" from the other corner.
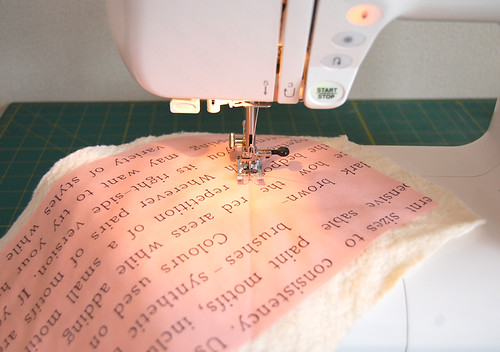
Quilt along the line. (My stitch length was set at 3.0)
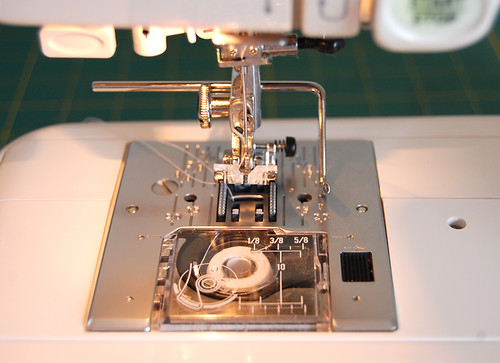
This quilter accessory is such a big help!
I sew while guiding the quilter over the previous row of stitching.
(My quilting lines are approximately 3/4" apart from each other.)
I sew while guiding the quilter over the previous row of stitching.
(My quilting lines are approximately 3/4" apart from each other.)
Like that. If your sewing machine didn't come with
this accessory, you can mark parallel lines throughout the interior piece.

this accessory, you can mark parallel lines throughout the interior piece.
Here is how this looks after diagonal quilting is done.

Now mark a line perpendicular to the stitching and quilt in the same manner.
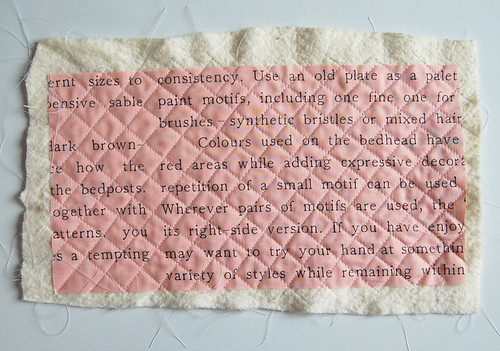
Yay quilting is done!
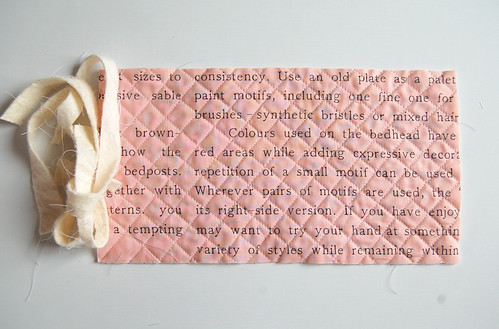
Chop off the excess.
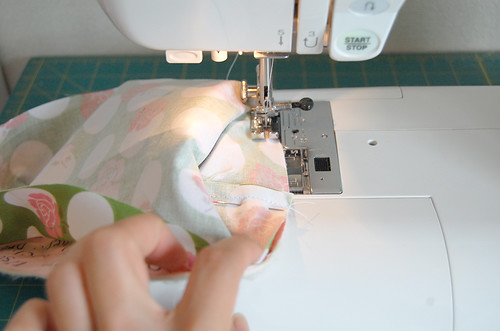
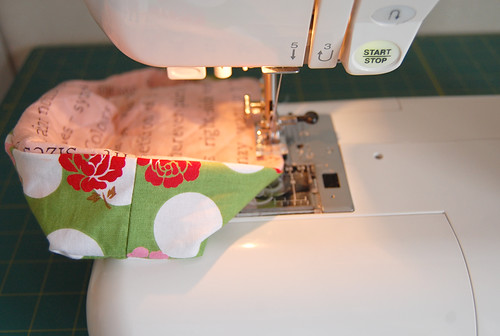
Now fold in half the piece with right sides together lengthwise
and sew both short edges. (1/4" seam allowance)
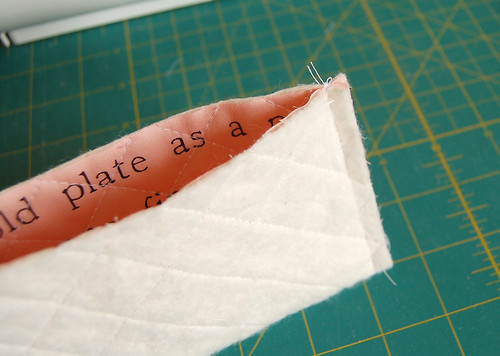
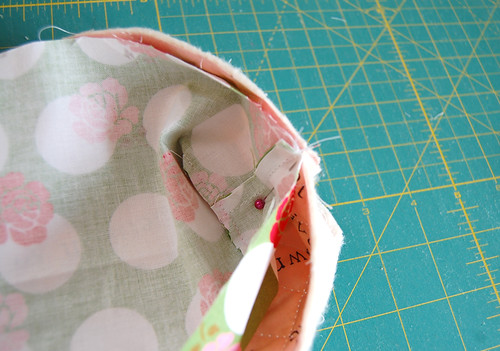
Time to box corners!
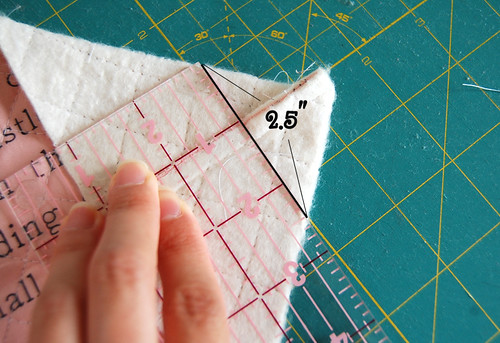
Mark where the seam line is at 1 1/4" from both sides.
(2.5" long from one edge to the other.) Sew along the marked line.

Cut off the corner. Leave a small seam allowance.
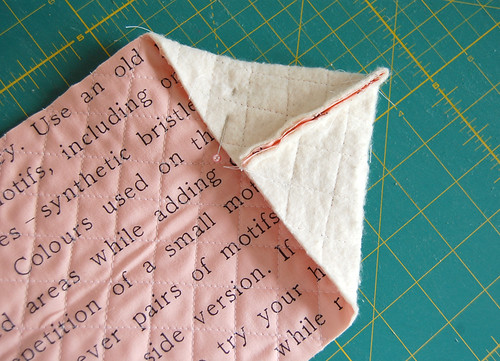
Repeat the same process for the other short edge so that
your quilted interior looks like this.
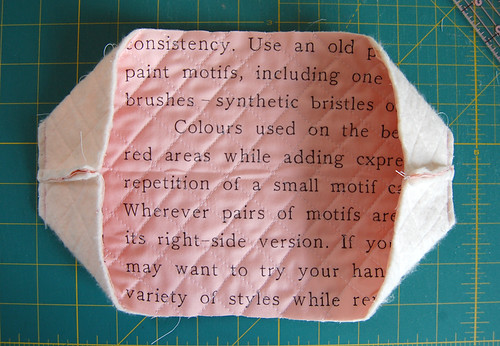
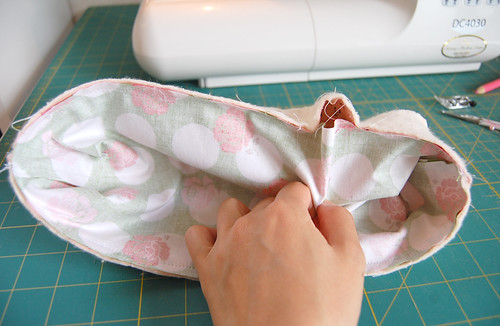
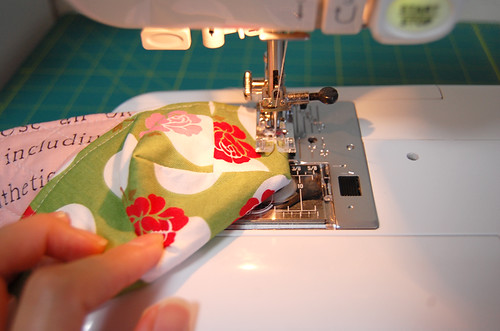
Do the same with the exterior piece.
With right sides together, place the exterior inside the
interior. Match seams and pin in place.
I like to start sewing just about 3" away from the seam.
Leave about 1 1/2" wide opening. Turn the right side out from the opening.
Press the opening.
Top-stitching!
Now you've finished making this organizer basket!
(Finished size: 2"H x 9 1/2"W x 2 1/2"D)
These nicely soft baskets serve well as drawer organizers/utensil trays,
but if you want to stabilize the baskets a little,
you can alternate the pattern by using interfacing on
the back of the exterior and/or using stiffer batting and/or...
Top-stitching four corners.
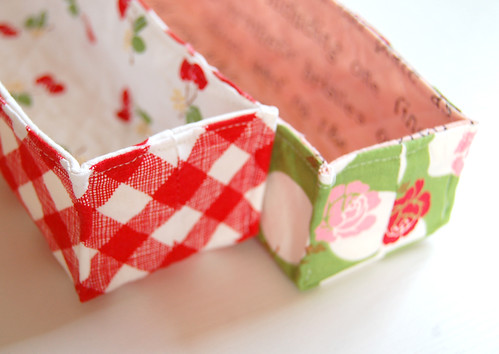
Your basket will be more squarish like this.
(these were made in the same way except for top-
stitched corners.)
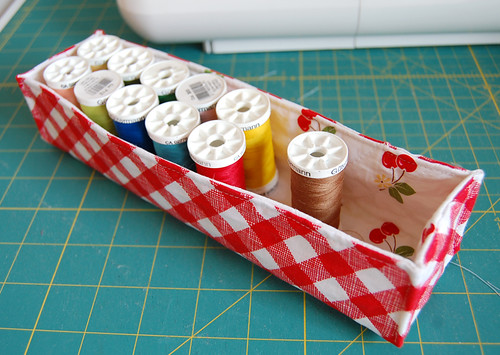
This basket is a perfect size to put together 16 spools of Gutermann 250m
threads for a gift. (Oh I just had a vision of this basket filled with spools
and one big handle in the middle! That would make a cute gift, wouldn't it?)
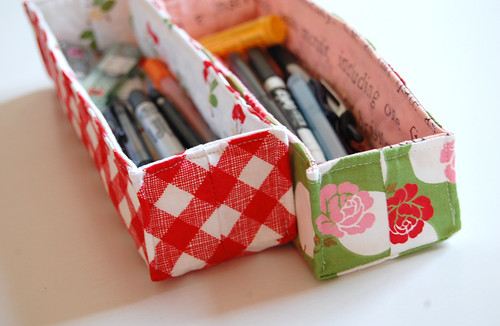
Or maybe pen holders? Whatever you or the recipients
of your baskets can think of :) Lots of possibilities!
I would love to see your baskets in this flickr pool and
here for anything you made using tutorials in this blog hop!
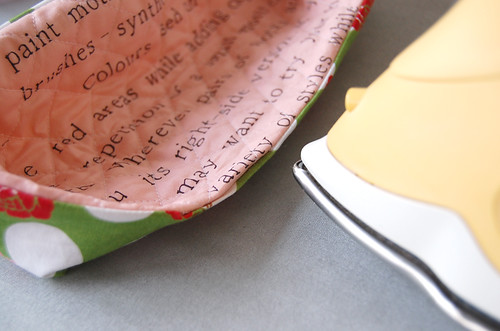
Fabric used: Sew Cherry and Kei
I hope you'll find some great inspiration for Christmas
gift makings by hopping over these amazing blogs.
I am so looking forward to seeing what they'll come up with
because I haven't decided what I will be making for Christmas yet!
because I haven't decided what I will be making for Christmas yet!
Friday, October 14- Jennifer/ Ellison Lane Quilts
Saturday, October 15- Ayumi/Pink PenguinSunday, October 16- Amy/ Lots of Pink Here
Monday, October 17- Faith/Fresh Lemons Quilts
Tuesday, October 18- Penny/Sew Take a Hike
Wednesday, October 19- Kati/From the Blue Chair
Thursday, October 20- Lee/Freshly Pieced
Friday, October 21- Elizabeth/Don't Call Me Betsy
Saturday, October 22- Melanie/Texas Freckles
Sunday, October 23- Lindsay/Craft Buds
Monday, October 24- Amanda/A Crafty Fox
Tuesday, October 25-Vanessa/Little Big Girl Studio
Oh and to make this blog hop more exciting, there are
a giveaway at each blog stop AND a grand prize you could win
- $250 gift certificate to fabricworm! (Yes you heard it right :))
Enter to win a $25 gift certificate to Fat Quarter Shop by leaving
one comment on this post by the midnight on October 26th.
I'll have the random number generator
pick a winner for me on October 26th.
I'll have the random number generator
pick a winner for me on October 26th.
Make sure to leave a comment on Jennifer's tutorial
for the the chance to win the grand prize!
for the the chance to win the grand prize!

And just for stopping by, you can take advantage of a generous
15% off discount at Fabricworm with the coupon code fw12days
through the end of the blog hop.


these are adorable! I'm imagining a set of these inside my kitchen junk drawer to corral stuff!
ReplyDeleteYou are so talented! What a great idea for coworkers, or a teacher, and not just for Christmas...Thanks for the tute!
ReplyDeleteThanks for the tutorial -- your baskets are adorable! :)
ReplyDeleteLove your tutorials...I'm looking forward to trying out the the top stitched corners... great idea...thanks!
ReplyDeleteSo cute! I love this idea for organizing anything.
ReplyDeleteThat is so nice! I have made so many bags that this tutorial has no surprises sewing wise, but it's not anything I've ever done before and I LOVE it! Especially the last step on the corners. Thank you.
ReplyDeleteTHis is such a cute and clever project! Thank you for sharing it!
ReplyDeleteGreat tutorial - so cute!
ReplyDeleteThese are so cute, I'll be making some for sure! Our stuff finally arrived in Japan from the States, so I can sew now that I've been reunited with my sewing machine!! :)
ReplyDeleteGreat tutorial, thanks for sharing.
ReplyDeleteLove these baskets and think I will make a few for teacher gifts this year. Thanks!
ReplyDeleteThanks for sharing this tutorial. Those baskets are great! And thanks for the giveaway!
ReplyDeleteWhat a Great tutorial! Thanks!
ReplyDeleteoh my goodness, i just had a vision of my entire sewing room organized in gorgeous little soft baskets like this. wow. that's on my "january to-do list"
ReplyDeletelove it so much ayumi. they are awesome, I really want to make a few. love the quilty goodness. :)
ReplyDeleteyay!! Thank you so much for taking the time and effort to do this...I'm looking forward to making several of these soon!
ReplyDeleteNeat way to organize with pretty fabrics!
ReplyDeleteThese fabric baskets are so cute! I'd love to make some as gifts for family and friends. Thanks for the tutorial!
ReplyDeleteI'm a sucker for baskets; of any kind. Will make some for my drawers. Thanks for a fantastic tutorial. Cheers
ReplyDeleteso cute!!! thanks for the tutorial! and i definitely have to get one of those quilter accessory!!
ReplyDeleteIm definitely going to make some of these! Thanks for a great tutorial!
ReplyDeletex
So cute! I need a place to put my spools of thread!
ReplyDeleteThanks! These are great and I will probably make some as gifts this year...
ReplyDeleteFor pens, now that is a great idea!! Thanks for the awesome tutorial.
ReplyDeleteLove these! I may be first on my Christmas List!
ReplyDeleteI have to laugh because it is still mid-afternoon Friday in Hawaii!
Wonderful, will make some for all my guild friends. Thanks you for the tutorial.
ReplyDeleteThe tutorial is great, plenty of pictures and easy to follow instructions. Thanks heaps Ayumi.
ReplyDeleteHugs
Naomi
Very lovely! Your text prints fabric is so sweet, I love it:)
ReplyDeleteThanks so much for sharing with us.
These are super cute and I think that they would look great for everyone's place setting at christmas lunch with their knife, fork, spoon napkin in a ring and that all important bonbon.
ReplyDeleteThanks for the lovely tutorial...this project is going to be added to the list of projects being made tomorrow (and all of them based on your tutorials). Can't wait to try it out!
ReplyDeleteThanks as well for the giveaway!
I have tons of left over fabric from many many projects, I can't wait to make some of these :D ty so much for the tutorial :)
ReplyDeleteLove this tutorial. It is only Friday here and I was trying to figure out why you had posted already.
ReplyDeleteI love these and I can't wait to get started on making about 100 of them! :) Now, which fabric to use.
ReplyDeleteOh Yes!! This is a must do, not try project! Thank you for always showing such great tutorials!! I love these!!
ReplyDeletethanks Ayumi for this very clear and easy to understand tutorial. I'll have to try to make these...what shall I put in them.
ReplyDeleteThis is a wonderful idea. Some for myself and definitely some as gifts. Thank you so much for the tutorial.
ReplyDeleteYou are so crafty! What a neat idea. I'm going to have to get with it for Christmas projects.
ReplyDeletethese are so cute - i can think of a bunch of people they'd make great presents for...
ReplyDeleteSo cute and versatile! Great tute.
ReplyDeleteThank you for the tutorial for the cute baskets!
ReplyDeleteYour instructions are great!
Really cute! You make it look so easy. Thanks for sharing because I've been eyeing yours ever since you first posted a photo of them. My kitchen drawers will love a little makeover!
ReplyDeleteSo cute and a great tutorial. Thanks.
ReplyDeleteGreat Tutorial! Thanks so much! My fingers are crossed- I LOVE Fabricworm so this would be a fun and useful prize:)
ReplyDeleteCute baskets!! Thanks for the tutorial :)
ReplyDeleteGreat tutorial! You make it look easy!
ReplyDeletexoxo
-sukie
p.s how's being home? Miss the states?
Thank you so much for taking the time to do this great tutorial. I love baskets and fabric baskets will be so fun with so many colors and styles of fabric to choose from.
ReplyDeleteThis is really cute!! Very clear pictures too :)
ReplyDeleteI'm making one tonight. Perfect size!
ReplyDeleteHow cute and so easy. What a great idea. I love the squared up ones. Thanks.
ReplyDeleteGreat Tutorial! I knew I had to try this as soon as I saw the tread!lol
ReplyDeleteThis is such a simple but clever idea! Thank you so much for making the tutorial. I am already thinking about fabric ideas!
ReplyDeleteGreat tutorial! These baskets are absolutely adorable! :)
ReplyDeleteThanks for this great tutorial! I am now following you, and I'm also keeping this tutorial in mind because that could definitely be something I could put my spools of thread in since I do not have anything to put them in and scraps of fabric to use! Thanks so much for sharing this tutorial. :)
ReplyDeleteThese look like fun and usuable. Thanks!
ReplyDeleteWell I am loving this 12 days of Christmas, already! Thanks to Jennifer I found your blog and have become a follower through Google Reader. I love fabric boxes and can think of all kinds of things that need to be organized. Great ideas for Christmas gifts too! Thank you.
ReplyDeleteAyumi, your tutorial is the best. Great how detailed you show us how to quilt with exact lines and all those pictures make the tutorial so easy to follow!
ReplyDeleteI want to make some for my threads. Love it!!
I am so happy I found you a while back. I think it was through Lisa at A spoonful of sugar.
Happy weekend!
Oh Ayumi, you always share such FANTASTIC tutorials! I was trying to click on this tute button last night and it wouldn't work...now i know why! I had to be patient until today! And it was worth it. Thanks so much for sharing...again!
ReplyDeleteSam from Australia.
Большое вам СПАСИБО!!!
ReplyDeleteWhat a great idea and a great tutorial! I'm a visual learner and you did a super good job. These are perfect as they are way cute, don't take alot of fabric and won't(shouldn't) take weeks to make. I'm a new follower and found you thru Jennifer and this hop.
ReplyDeleteThank you and Fat Quarter Shop for a great giveaway and a chance to win.
uairdoll(at)gmail(dot)com
What a great gift idea! And perfect to keep things tidy in the sewing room too ;)
ReplyDeleteTracey
thepeonyteacup.blogspot.com
Your tutorials are always SO fabulous! I can't wait to make one of these!
ReplyDeleteAyumi, these are so cute, I'd never be able to give them away! Thanks for sharing this.
ReplyDeletewhat a great idea! Thanks for the tutorial.
ReplyDeletehug from Portugal :)
Molt ben explicat,esta molt be per tenir-lo tot organitzat, salutacions
ReplyDeleteAwesome. I'm making some!
ReplyDeleteGreat tutorial, I'll try that! Thanks for the giveaway!
ReplyDeleteMy email is my first name at my domain.
Love these Ayumi!! Thank you for sharing!
ReplyDeleteoh, these are fabulous! right now i use plastic trays to sort my thread by colour, but colour coded fabric trays would SO MUCH better! thank you so much for the tutorial!
ReplyDeleteSuper cute baskets. Thanks for the great tutorial!
ReplyDeletearbendlin@gmail.com
A brilliant and fun tutorial!
ReplyDeleteWhat a super tutorial! Could be used for so many different things.
ReplyDeletejudithlynes(at)btinternet(dot)com
I'm so happy that you posted the tutorial just in time for the weekend .
ReplyDeleteI think I will spent my weekend with making a few for myself.
Where did you find the cute letter print fabric?
These are really cute. They'd be great for pencils for the kids too!
ReplyDeleteSo glad I stopped in. It's half time in the RUGBY but tomorrow I'm going to have a go. Great Idea and very understandable tutorial. Really clear pictures.
ReplyDeleteFab' tutorial! I've adored these baskets ever since you first showed them! I have to go out shortly but I want to make one now not later :-)
ReplyDeleteVery cute baskets and very practical. I love gifts that I know someone will really use. Thanks.
ReplyDeleteI love the baskets, they are perfect for my unorganized desk. I have to make some, lots of pretty fabrics lying around. Thank you!
ReplyDeleteMarieke
Really sweet little baskets! I love that pink text print too :-)
ReplyDeleteThose are so cute :D
ReplyDeleteThanks for the tutorial!
It's a nice idea. Thanks for sharing it, Mª José (majogonga)
ReplyDeleteWhat a nice idea! Thank you for your tutorial, It seems to be easy to sew!
ReplyDeleteHave a nice day,
Silke from Germany
Lovely tutorial, definitely going to make some of these for my daughters sock drawer!
ReplyDeleteAs usual, your tute is totally inclusive and fun to see. Makes it look so easy that I feel like they're already made!
ReplyDeleteThx so much, Ayumi
Lovely clear tutorial! And such a useful item too- ideal Christmas present!
ReplyDeleteGreat tutorial - can think of lots of uses for this project - I fancy seeing my balls of cotton perle in this little basket!
ReplyDeleteGreat tutorial! That may be perfect for my newly painted furniture in my sewing room :)
ReplyDeleteoh my kids have a zillion little things that would fit snuggly into these sweet boxes!!
ReplyDeleteThis is such a clever idea! Thanks for sharing.
ReplyDeleteGreat tutorial, your instruction are so clear and the baskets are just cute.
ReplyDeleteI love this tute! I know just where I want to use some of these boxes. Thanks for sharing.
ReplyDeleteThanks for a great tutorial Ayumi! These would make a great present
ReplyDeleteI love the pink text fabric you've used
Such a clever idea and a great tutorial. Thanks :)
ReplyDeletelove these! So adorable. and excited to have found your blog, I'm a new follower.
ReplyDeleteI guess I know what I'm working on today!! Thanks!
ReplyDeletethose are sweet little baskets! i bet my son could use some to organize his desk...
ReplyDeletethese are so cute ayumi! thanks for sharing :)
ReplyDeleteOh I been wanting to make some of these little organizers! Thank you for this tutorial! Will look forward to other tutorials..love getting ideas for gifts!
ReplyDeleteYou made these look so easy - great tutorial and love all the photos - thanks!
ReplyDeleteOooh, I'm a teacher and could SO see these as pencil holders in my classroom! starfishlover615 (at) hotmail (dot) com
ReplyDeleteThese are really cute. I think they'd make great little holders for candy!
ReplyDeleteI've made small square fabric boxes before but these quilted rectangular ones can hold so much more. Love the top stitched corners idea to 'square' them off :).
ReplyDeleteCheers,
Robyn
Your baskets are so cute. Thanks for the tutorial on how to make them, especially the corner making instructions. Very easy to understand.
ReplyDeleteThese little baskets are so cute !
ReplyDeleteThanks for the tutorial :)
marika_ouellet(at)hotmail(dot)com
Really adorable. I have a new house that needs some cute accessories and I'm thinking these would help nicely.
ReplyDeleteSuper tutorial as usual Ayumi. These little baskets have so many possibilties. Thanks for the link to the blog hop, great timing.
ReplyDeleteWonderful tutorial. I need one of these organizers next to my sewing machine. Thanks for the giveaway.
ReplyDeleteYou make it look very easy :) Thanks for the tutorial and the giveaway.
ReplyDeleteVery easy to follow - can't wait to make some of these.
ReplyDeletethank you from the bottom of my heart for this tutorial. I am a visual learner and your pictures (and words) helped me to *get it!!!*
ReplyDeleteI am eager to give this a go...because with 8 children there is plenty to organize (and we homeschool...so lots of little trinkets and such).
bless you for sharing your wonderful gift.
can you buy that quilting attachment for any sewing machine...I'd love to give it a try.
(is it expensive?)
Kimmie
mama to 8
one homemade and 7 adopted
I will be getting some laminated material to make a few of these as bathroom organizers!
ReplyDeleteVery very cute!
ReplyDeleteA little basket filled with thread!? That's genious. I think I know what my sister is getting for Christmas now. akmajor (at) gmail (dot) com
ReplyDeleteThanks, Ayumi, for sharing another great tutorial with us readers. I know I'll be doing this one too. I've made several of your small baskets after having your tutorial and when I was making them at a retreat once the others there were making copies, and pretty soon there were many of them at that retreat. You are generous to share your ideas with us! Thanks again.
ReplyDeleteAs soon as I eat my breakfast, I'm going to my sewing room and make some of these baskets-love them! Thanks!
ReplyDeleteSuch a quick and cute basket. I love the possibilities!
ReplyDeleteThanks for the great tutorial Jennifer. Those will make great Christmas gifts.
ReplyDeleteSuch a cute idea. Thanks for the tutorial!
ReplyDeleteThese are so cute and the tutorial is top notch!! Thanks for sharing.
ReplyDeleteOH - how perfect is this!? I will be making some of these for sure...thinking of these with peppermint sticks! Great tut!
ReplyDeleteVery cute, love the idea for storing thread!
ReplyDeleteCool! I didn't know there was an accessory that old help do parallel lines. I will have t see if that is available for my machine.
ReplyDeleteHow adorable! I can so see my girls using this for all their pencils and crayons.
ReplyDeleteOh Ayumi, how I wish you could have come to Sewing Summit! I adore everything you make, and greatly admire your skills.
ReplyDeleteThese baskets are so great! I love the idea for gifting a little basket of threads! Thanks for the great tute!
Love the blog hopping, thanks so much for sharing!
ReplyDeleteWhat a cute idea! Great tutorial! Thanks for sharing!
ReplyDeleteSo lovely.Thanks fpr the tuto!!
ReplyDeleteAdorable baskets and great tutorial Ayumi. I look forward to making these! PS: Don't count me for the giveaway. :)
ReplyDeleteThanks for the tutorial! What a lovely gift that basket of threads would be... feeling inspired!
ReplyDeleteThat is just so smart! I can think of about a million things that I really need to organize.. and to make your own cute organizers.. genius!!
ReplyDeleteThat is so neat, and so precisely explained. Thank you.
ReplyDeleteThese are super sweet!
ReplyDeleteI love the text fabric! :D So cool! Thanks for the chance to enter the giveaway!
ReplyDeletehomespunhandmaiden(at)yahoo(dot)com
so cute!!!!
ReplyDeleteThanks for the tutorial, Ayumi. Love the fabrics!
ReplyDeletelovely tutorial! thanks Ayumi.
ReplyDeleteGreat tutorial. So glad to have found your blog through the blog hop! Thanks for the giveaway!
ReplyDeleteGreat tutorial!!! Thanks so much! =) New follower too! Can't wait to look around your blog.
ReplyDeletewww.sewdivertimento.blogspot.com
ottima idea per queste stupendi contenitori,cercavo contenitori per il filo. saluti dall'italy.il mio blog è:www.cuoriestoffeblogspot.com
ReplyDeleteYour organizer baskets are so cute! It's a great idea and a well-done tutorial. Thanks so much!
ReplyDeletelove it! I can't wait to see the other Christmas tutorials! (and hopefully win a prize or two...)
ReplyDeleteOh my gosh! I have the perfect co-worker who needs these. Thank you!
ReplyDeleteI love your work and your fabric choices -- very inspirational. Thanks for the giveaway!
ReplyDeleteThese are so cute. I think my girls would love some for there little trinkets.
ReplyDeleteWhat a wonderful tutorial and great gift idea, thank you for sharing.
ReplyDeleteDebbie
This is such a wonderful tutorial. Thank you for sharing.
ReplyDeleteHeike
hi!!
ReplyDeleteI'm so happy with this blog hop, I am finding terrific blogs!!!
will stay reading older posts ;)
vivi
Super cute little baskets, and what a great stashbuster project!
ReplyDeleteLove these little boxes ~ especially when I saw the thread in them, so cute and even practical! thanks for the tutorial.
ReplyDeletePerfect little boxes! I'm thinking they would be great in a lingerie drawer, my nylons always seem to get lost in the chaos!
ReplyDeleteThese are so cute! What a great idea. Thanks for the tutorial.
ReplyDeleteWhat a great tutorial! I can see all kinds of uses...one wide enough for a row of tea bags, perhaps...definitely a more stylish way to organize thread than the plastic tub I have all mine thrown in, and a great use for larger scraps!
ReplyDeleteCute Organizers! I love small projects like this. Thanks for sharing it!
ReplyDeleteWhat an awesome basket! And your tutorial is so easy to follow. Thanks and thanks for the chance at the gift certificate! (soniaquilts at gmail dot com)
ReplyDeleteVery cute baskets!! Your tutorial was easy peasie to follow and I can imagine these made in several different sizes - like maybe a square to hold napkins or fat quarters!! Thanks for the giveaway.
ReplyDeleteI can think of about a million uses for these cute baskets! And they might do a good job of using up some scrap stash, bonus!
ReplyDeleteLove this tutorial and am totally going to make some!
ReplyDeleteOh, I love these! The holiday cookies I gift to family and friends would look great in the baskets.
ReplyDeleteWonderful tutorial. I love the organizer baskets. Happy quilting!
ReplyDeleteYou made this look easy! Thanks! Mail4vale(at)hotmail(.)com
ReplyDeleteSuch a cute tutorial! Thanks! christina112358 at gmail dot com
ReplyDeleteNEAT TUTORIAL!
ReplyDeleteTHANKS FOR SHARING!
Thanks for sharing your wonderful tutorial and inspiring us with another gift idea. I do love blog hops.
ReplyDeleteWho couldn't use such cute baskets? Thanks for the great tutorial.
ReplyDeleteWhat an adorable project! I want to make some of these soon!
ReplyDeleteYour organizer basket does look straightforward. I think I like the version with the topstitched corners. Thanks for the great tutorial and giveaway.
ReplyDeleteThank you for the tutorial! I love how you used them to gift thread! Cute!
ReplyDeletegreat Tutorial, thank you very much!!!
ReplyDeleteWhat useful baskets! I can see them grouped in a drawer holding make-up and nail polish.
ReplyDeleteWow! At first I thought that was a real basket lined with fabric. It looks great.
ReplyDeleteinteresting size and shape. I would like to give it a try. Cute for buffets and I am thinking even drawer dividers.
ReplyDeleteThanks!
What cute little baskets. And thanks for the chance to win the giveaway.
ReplyDelete(supermomnocape at yahoo dot com)
love the baskets!
ReplyDeleteJust like your other little basket, this is sure to become a favourite project! Thanks for sharing your talents :)
ReplyDeleteOh, these look like a fun project! Thanks!
ReplyDeleteThank you so much for this excellent tutorial Ayumi - I will definitely have a go at making one myself. I love these beautiful and useful fabric trays. ;) I enjoy using them so much.
ReplyDeleteI haven't done any quilting before. The spray looks interesting, any info would be much appreciated.
Great tutorial and a beautiful gift for friends.
ReplyDeleteThank you ^__^
Yes to a basket of Gutermann!!
ReplyDeleteGreat tutorial! I love the topstitched corners.
ReplyDeleteWow what a great tutorial and pretty straightforward too! I must make some of these, I'm thinking they'll will be great for displaying little things in at craft fairs! thanks for sharing.
ReplyDeleteYour baskets are absolutely adorable! I love the simplicity. I will definitely be making some of these for myself and almost certainly as gifts, too!
ReplyDeleteLove these. Maybe I'll organize my cabinets.
ReplyDeletekristin
kamerrigan at hotmail dot com
So cute!!! I'd love a few for the sewing studio.
ReplyDeleteThanks for the great tutorial! Loved this project - my sewing room is desperately in need of more organization!
ReplyDeleteThis looks so easy! Thanks for the tutorial.
ReplyDeletesigrunmoller@web.de
I love these baskets! I loved the ones with the handles so I know I am really gonna enjoy these!
ReplyDeleteThanks for sharing!
Your work is simple and beautiful and has a quality I admire. These trays are delightful and your tutorial was easy to follow, thank-you Ayumi! I have joined your blog today.
ReplyDeleteWhat a neat idea. Do you think they would work as well if made larger?
ReplyDeleteSo cute, nice directions.
ReplyDeleteyou make everything look so easy in your tutorials x love your blog x
ReplyDeleteLove these! So great for my moms desk at work!
ReplyDeleteThese are great I plan on making several. Thank you!
ReplyDeleteCute organizers! Thanks for the giveaway!
ReplyDeleteFabulous tutorial - thanks for sharing!
ReplyDeleteGreat tutorial. Thanks for participating in the tour.
ReplyDeleteThese are sew cute! Love them. Can't wait to make some! thanks for the tute!
ReplyDeleteI love this tutorial, my head is already swimming with ideas on how to use this and who will get them. Thank you.
ReplyDeleteThese baskets are adorable! Would be great for organizing all the little things in my drawers! Thanks for the tutorial!
ReplyDeleteGreat tutorial! Thinking one of these would be great by the sewing machine to hold my leaders and enders. They always manage to end up on the floor. :)
ReplyDeleteThank you for sharing this tutorial with us. It is easy to follow and a perfect Christmas project!
ReplyDeleteWonderful tutorial! Those little baskets are the perfect size. And they look quick to whip up. I'll be super organized before you know it! Thanks!
ReplyDelete