skip to main |
skip to sidebar

Thanks a million for your congrats for my engagement!
You guys are so super sweet!! I read and adored each
and every single comment/e-mail I've received for the
past week! I feel so lucky that people like you
have become my blog friends. Thank you, Thank you!!!
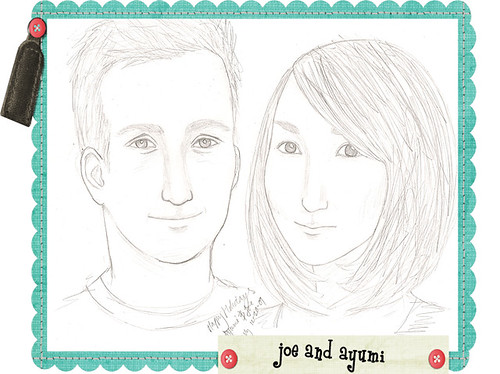
Drawing by our friend Vy
As for the wedding, we were thinking about doing
a small one just because 1) we don't have lots of
money for it and 2) we are too shy for a big wedding.
But yesterday for the first time I stopped by
the wedding-related magazine section at a bookstore
and was totally consumed there seeing a whole bunch
of beautiful wedding dresses, cakes, handmade gifts,
and all sorts of stuff. And now I want a fancy wedding.
Poor Joe. He was describing this shift of my plan
as "Ayumi's got a wedding bug." I know he really
wants a very small, conservative wedding but...
isn't a wedding supposed to be a girl's thing?
It doesn't have to be a humongous one but I might
have to be a little pushy now because I really
want to wear a pretty wedding dress and other
pretty stuff! Well, I guess we'll see..
The place-wise, it seems like we'll do it in Japan.
The major differences in how a wedding is done
here and in Japan are that in Japan, you would
go through a wedding consultant and she'll pretty
much take care of everything. You would of course
have a chance to select your own wedding dress and
stuff but you wouldn't have to worry about who to
ask to decorate the place or where to order flowers.
So it comes out much more pricey, and there isn't
too much challenge to prepare the wedding for you.
Another difference is that in Japan, each person
attending a reception is pretty much required to
bring money. I know. We all hate it. But it's a sort
of unavoidable tradition. So being invited to a
wedding in Japan could be not just fun but a pain,
because you would be paying at least $200-$500.
I don't want to make my friends suffer
just because I invite them.
Having these thoughts in mind, I thought doing in
America might be better. Less expensive, more
creativity involved, people happy attending,
but Joe really wants to experience it in Japan.
Also, it will be a great chance to finally push
his family to visit Japan, the country he loves.
We'll see how it goes... :)
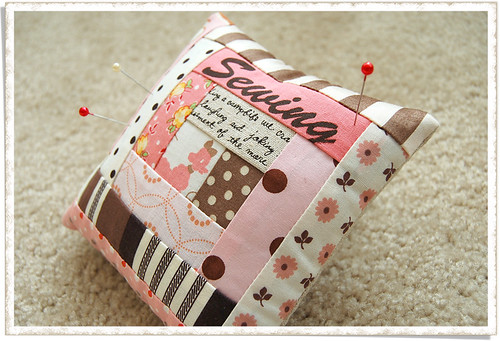
Getting back to crafty talk, here is a pincushion
I made today. I feel like I've been picking the
same fabric repeatedly to make logcabins, but
I certainly love having the pink poodle in the
middle and using pink and brown fabrics to go
around her.
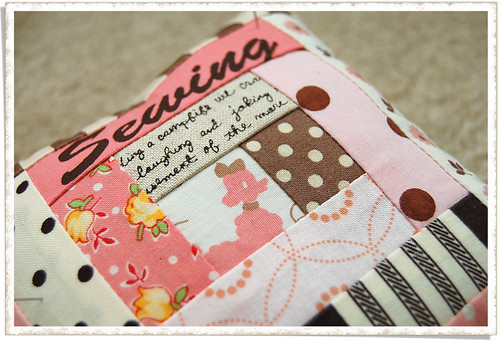
Cute ;)
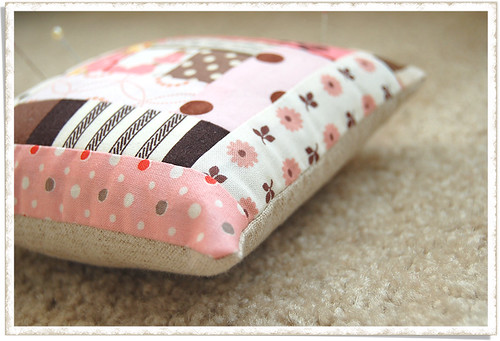
The back side is linen/cotton.
I really like how it turned out!
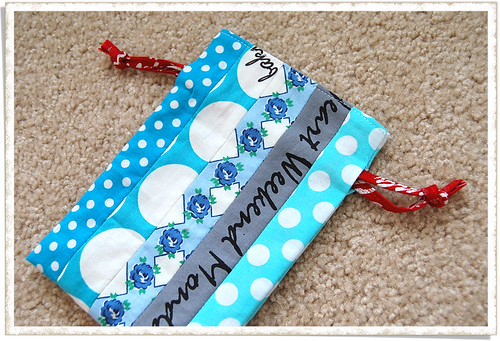
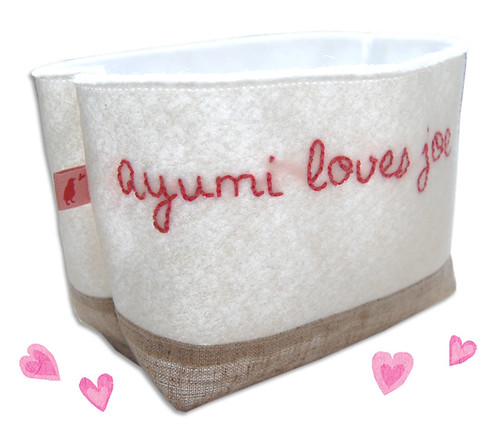
Another one I've finished making recently is
this little patchwork drawstring bag.
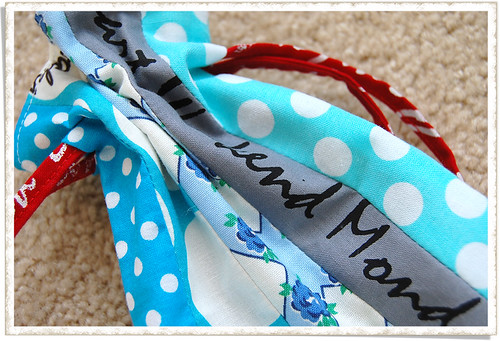
I'm having lots of fun with the
silk-screened fabrics...
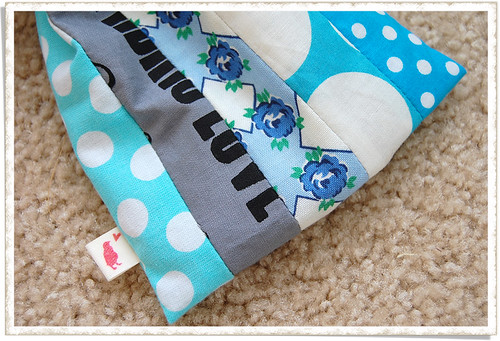
and adding my handmade label saying 'hello!'
Thank you so much for those of you who ordered
the silk-screened fabrics and PDFs for label designs!
I've listed some fabric as well as the poodle
pincushion and the drawstring bag in my shop.
As usual, tell me that you come from here when
you snatch an item there so that I'll
add a little gift ;)
Thanks for taking your time to stop by!


I've been extra happy for the past few days. Among
many reasons for that, I would like to share just two
for today. For one, I am having a blast at silk-screening,
(well, obviously.) I really enjoy printing fabric just
because this is something I'd wanted to do for the
longest time. I've been using the same stencil to
produce many sheets of fabric with different colors.
Fabric with writing is a high demand for me, so it
simply makes me happy to know that the more fabric
I print, the richer my fabric resources become.
Some people have nicely asked me if I would sell these
silk-screened fabrics. At first, I was so impressed
with your bravery. "Are you sure? You can trust my
silk-screening skills?" I was really happy that anyone
would want fabrics that was printed by me.
I wasn't sure if my fabric is something worth
being sold. But then I thought about it for a while
and came to the conclusion that I would like to humbly sell
my silk-screened fabrics. This is simply because
I love these fabrics and can think of many ways to use
them, meaning that probably there is someone out there
who might feel the same way about the fabrics.
Each sheet of fabric has at least 0.5"
borders and the printed area is approximately 8" x 10".
I have some left, and I'll print a lot more.
Please e-mail me if you are interested in
purchasing any by letting me know which
one you would want (please use letters next to each
fabric in the picture.) and how many,
and we'll go from there ;)

A set of lunch mats in progress...fun!
Another thing that made me really happy happened
yesterday. Joe suddenly came back home around 3 pm
yesterday, happy and blushed, with a little box in
his hand. I was still in pajamas; my hair totally
messed up; I was sewing up those lunch mats.
Then he came over to me and handed me the box.
"Will you marry me?"
In my hand was a shiny necklace with a little heart.
I was absolutely surprised.
I became teary in the very next moment, feeling
so warm, pleased, lucky, excited, and blessed.
Of course, I said yes and we became engaged now.
It was over 6 years ago when I met him.
We were both students at the community college.
I met him in the Japanese class where I was
volunteering as a teaching assistant.
Almost immediately after we became acquainted,
I knew for sure that he was the man for me.
Before I met him, I really didn't know what it is
like to love someone besides family. When I was
in high school, many of my girlfriends and I got
together and made a list of 'who gets married first."
Interestingly, those names listed for small numbers
did really get married before the ones listed later.
And me? I was the very last one.
My friends knew that I could be extremely careful
when it comes to making a big decision, and they
were totally right. I would've had no problem
staying single in my entire life if I had not met Joe.
Joe was an absolutely ideal one for me.
It was him who was always there to remind me
to think positively about life, myself, and everything.
It was him who understands me the most and
fully accepts me as who I am. And it was him
who encouraged me to explore in life.
I feel so, so lucky that he happens to
feel the same way as I do. I kept
asking him; "Are you sure I am the one
you want to spend your rest of life with?"
And he said "Yes, like I said a million times."
I hope your life is filled with love like mine.
Sorry, the last half of the post was totally unrelated
to sewing, but I really wanted to let you know
about this, because you've become a big part
of my life. Now, time for me to call my friend who
has been waiting to hear about this news.
I'm so excited to talk to her!!!!
Thanks for taking your time to stop by!

Thanks for wishing me luck with silk-screening!
I hope it's not so disappointing that the design
was just writing with no any sort of art.
I was desperately in need of more and more fabric
with writing so I thought I might as well make
it so simple; words of things I simple like.
My next design however will definitely include
some art! But I bet I'll have some writing in
it too, because I just looooove the effect
the writing fabric can provide for patchwork!
I think my second attempt of silk-screening
was a success! yay!
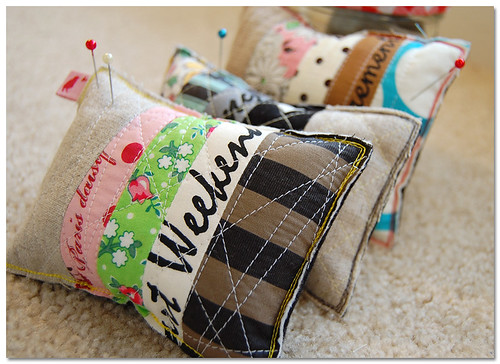
With the fabric I silk-screened on, I made some
pincushions to be listed in Craft Hope shop.

I'm sure many of you have probably heard about
this already, but this is such a great opportunity
for us crafters to donate handmade items to raise
funds to help earthquake victims in Haiti.
100% of the profits from this shop will be donated
to Doctors without Borders.
There are many cool items listed in the shop
and they go super fast! My item, a set of
three pincushions, should show up sometime soon..
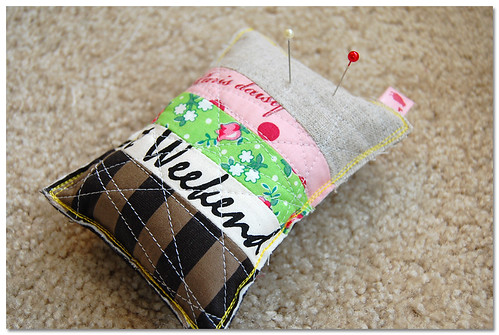
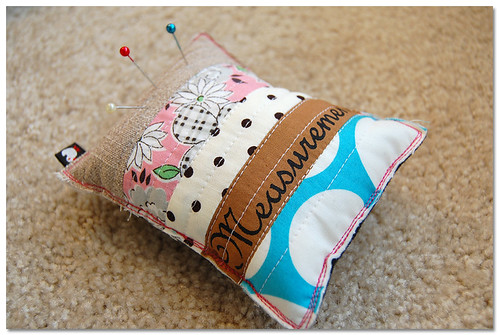
I love this one. Don't we all love weekends?
I made this label this morning using this
awesome tutorial that I'd been wanting to try.
Making my own labels was another thing
that I postponed doing forever.
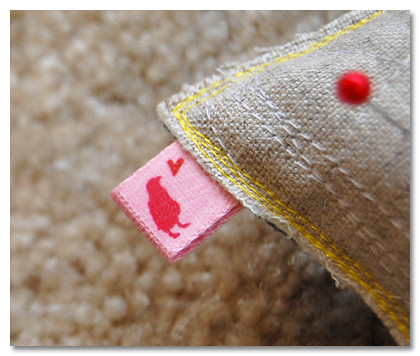
I think it's pretty cute. I'll try my best
to sew this guy onto almost everything
I make from now on, unless I make some
more tags that are prettier.
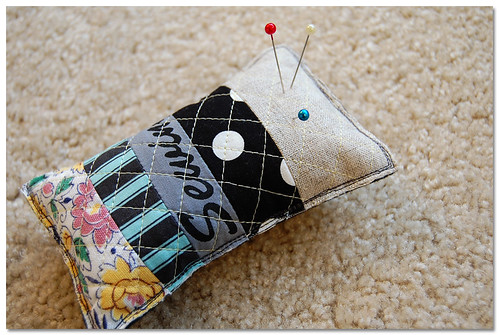
I've seen some fabric with writing on it
popping up in the fabric market, but I've found
that it has been difficult for me to discover
ones that say things like "sewing" or "patchwork,"
so I knew I'd better produce fabric that says so :D
This one is really nice too.
I always love happy, bright colors.
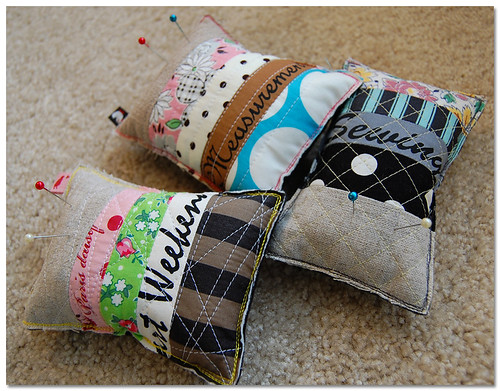
I'm so excited to design more fabric!
Once I get better at silk-screening, maybe
I'll do a little giveaway here in case
some of you like fabric with writing as well ;)
Thanks for taking your time to stop by!
Have a great Monday afternoon!

Thank you so much for the puffy pouch tute love!
I'm so glad to hear you guys like it. I've edited
the post a couple times to add FAQs at the bottom.
Hopefully that will help you save time on writing
me an e-mail and waiting for a response. I'll
probably add more FAQs as questions come in.
I've already seen a few pouches made by you guys,
which are so pretty and well sewn!
Discovering the pouches online made my day and
I'm now really dying to see yours next!!!

Today I'd like to show you some projects I worked
on in the past week. This is a flex frame pouch
I made for a custom order. I've 'met' this really
nice girl through my blog, and I feel honored that
she now owns several things made by me. This pouch
as well as the pencil case below will soon be hers.

She loves birds and so do I. She also adores Japanese
fabric, and so do I. That makes it fun to make stuff
for her. Whenever I make things for her,
I try to include as many birdie prints as possible,
and of course, lots of Japanese fabrics.

Pink x Brown = the best!!

There are even more birdies inside ;)

Another project I finished was lots and lots
of pincushions for another custom order.
Remember how insane I was about making
pincushions just about a year ago?
I really loved making those and am so lucky
to have this chance to make more of those.

I have not mailed them off yet, so I don't
want to show all of them but a few.

A great thing about this project is it lets me
utilize lots of fabric scraps that keep multiplying.

Also, it gives me an opportunity to practice
putting different fabric together and see
how they will turn out when sewn.

And making these are so quick. There aren't
so many projects like this that I can easily
make multiple of in a given day.

These pincushions will be Thank-you gifts.
I hope every recipient will enjoy what she receives..!
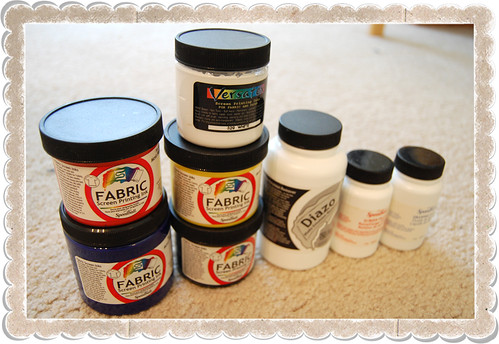
And guess what I finally started this morning?!
It's silk screening! I'd been meaning to design
some fabric for the longest time. I've had ideas
for the designs popping up in the head but it took
me so long to finally push myself to get the bowl
rolling. Partly I was a little paranoid I might fail
and waste all the materials I've invested lots
of money for.. because I did once. Joe got me
a silk screen kit last year for my birthday. I was too
excited to have enough patience to take a look at
the instruction and completely messed up in the
process of making a photo emulsion mix. And
because of that, I pretty much had to buy a completely
new emulsion kit, which was a lot more pricey than
I expected. Ever since, although I had everything
ready to begin screen printing, I was kinda
reluctant to give a shot again. But I was really
thinking about doing it on the daily basis!!
I'm glad that this time I seem to have succeeded
in making the frame. I'll print some fabric now
(OMG!) and will keep you posted..! Wish me luck!
Thanks for taking your time to stop by!
Have a great weekend!
Here comes the tutorial for the puffy pouch ;)
As I promised, I am introducing two ways to
make this pouch, one made with a 5" flex frame which
may not be very accessible and the other made with
velcro which is fairly easily found at any craft stores.
(The flex frame can be spotted at here,here, and here.)
I love this pouch either way.
This pouch is like the fabric basket tute and
the patchwork drawstring tute combined into one
with a little twist, so yeah, it's quick and easy again!!
I'm keeping my fingers crossed that you'll like it....!!!
As always, seam allowances are 1/4" unless otherwise noted.
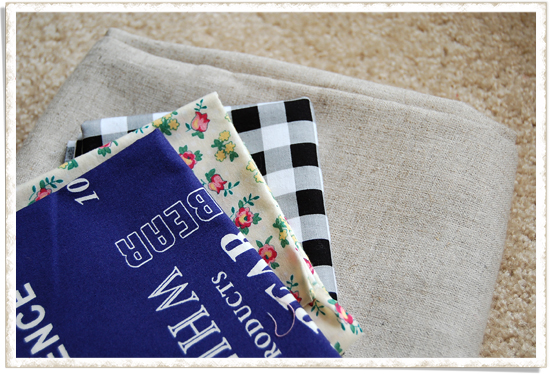
First off, pick out linen (or medium to heavy fabric)
and three different print cotton fabrics that contrast
each other for the external shell.
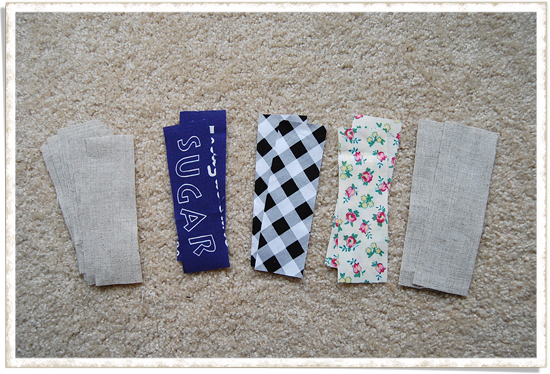
Cut out fabrics into pieces:
Eight 1.75" x 5.5" pieces and
Two 2" x 6" from linen
Two 1.75" x 5.5" from each cotton fabrics.
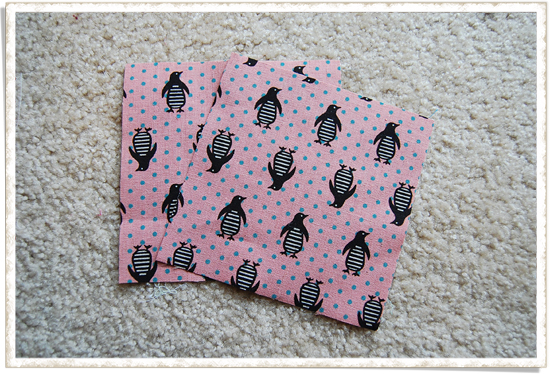
From the fabric for lining, cut out two
5.5" x 5.5" pieces.
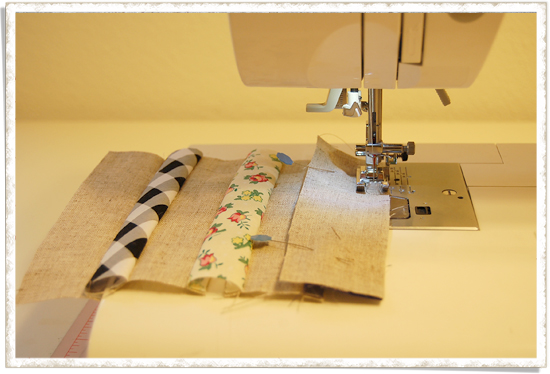
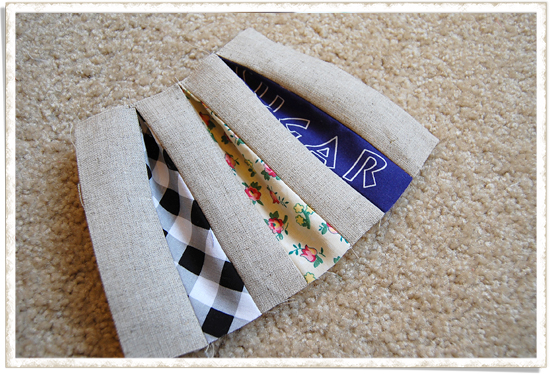
Let's start making the outer shell.
Sew the 1.75" width fabrics like this to make..

Two patchwork panels like these.
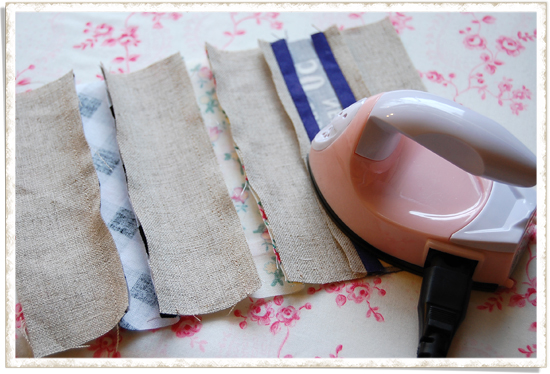
Then press seams open.
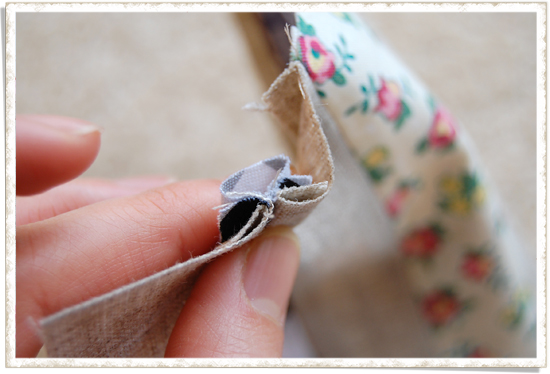
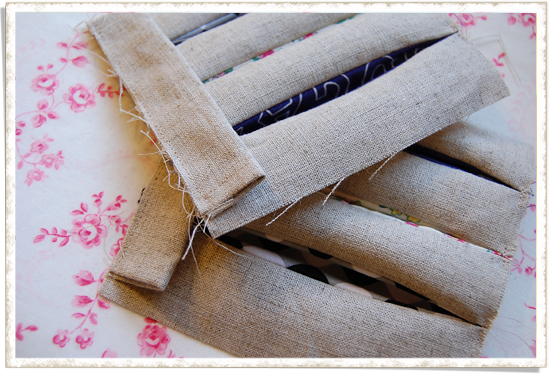
To make a peek-a-boo, grab the cotton fabric
like this at one edge.
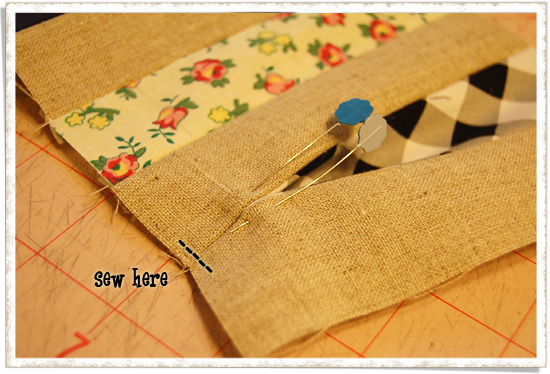
Pin and sew very close to the edge to secure the fold.
Do that for each short edge of the cotton fabric.
Here is how it looks like after you are done with
three edges on one side, and...
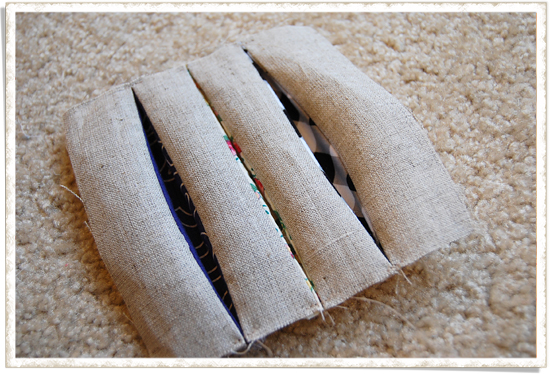
Here is how it looks like when all the edges are sewn up.
Repeat the same process for the other panel.

Now let's make the top part of the pouch.
Fold short edges twice, 0.25" and 0.25", of the
two 2" width linen pieces.

Sew very close to the fold line like this.
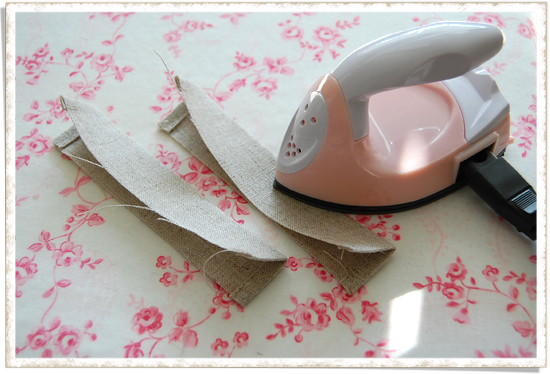
Fold in half and press.
If you are using a flex frame, jump to
the step with this little heart→.
If you are using velcro, please
bare with me and follow all the steps ;)
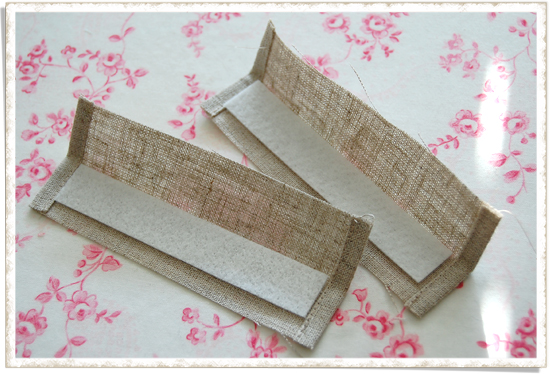
If the pouch is to be made with velcro,
we want to make sure the top part of the pouch
is firm and steady, so we add thick batting.
Cut out batting into two 4 1/2" x 5/8" pieces,
and place each piece in each linen piece,
one long edge aligning the fold line.
(Here, applying fabric glue to one side of the batting
will prevent it from moving when you sew,
which is the next step.)
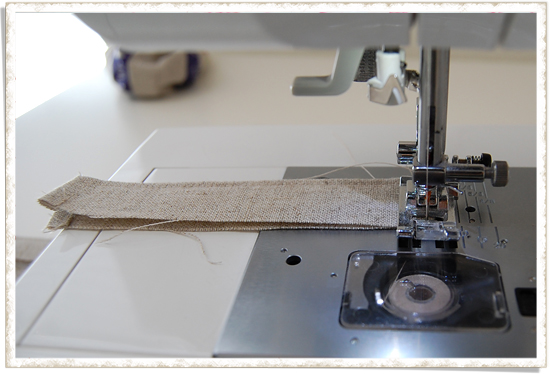
Sew very close to the edges with wrong sides together...
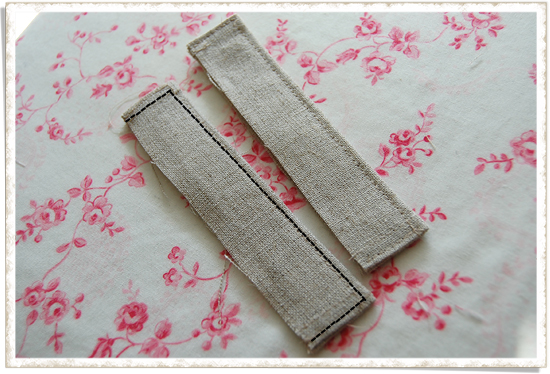
like this so that one long edge is left raw.
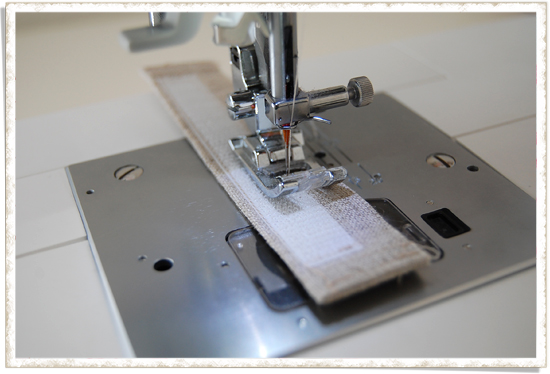
Now, place a strip of velcro measuring 4" x 5/8"
on each of the linen piece, aligning center,
very close to the long folded edge.
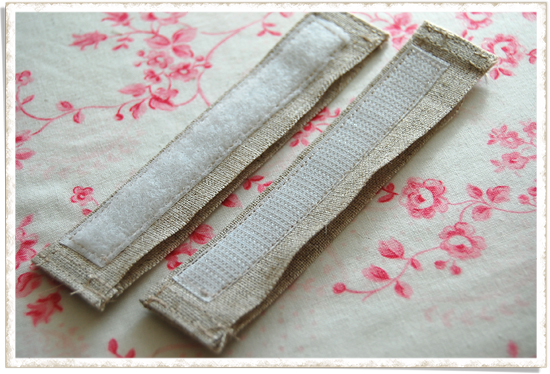
Repeat it for the other piece of linen so that
you have two top parts complement to each other.
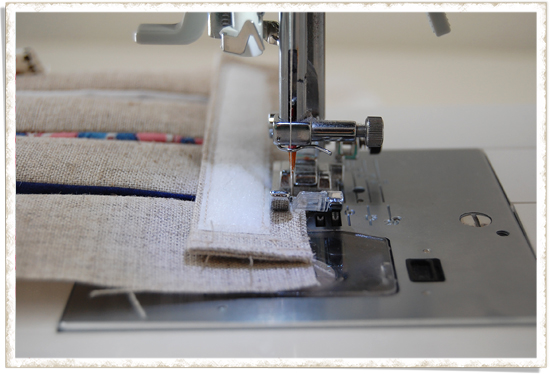
Machine-baste the piece onto the main patchwork
panel, very close to the edges.

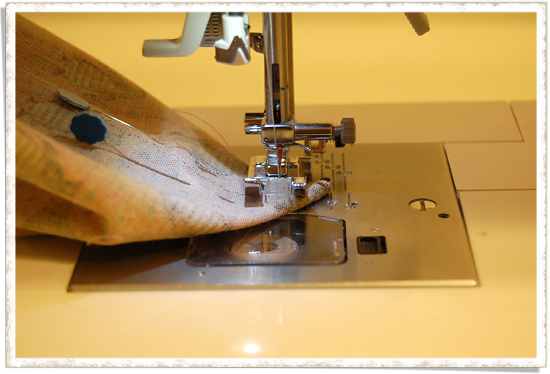
Welcome back, the flex-frame takers!
Sew the casing onto the patchwork panel.
So now you have two panels with this thingie attached.
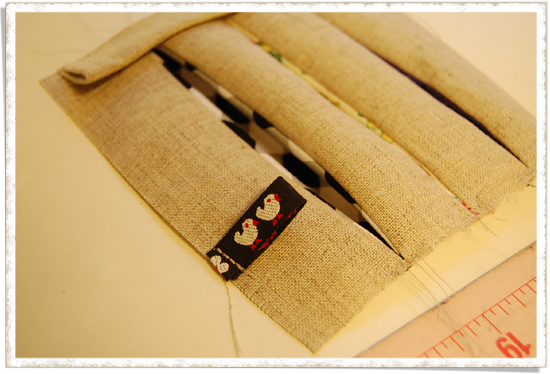
Absolutely optional, but it might be fun to add a little ribbon.

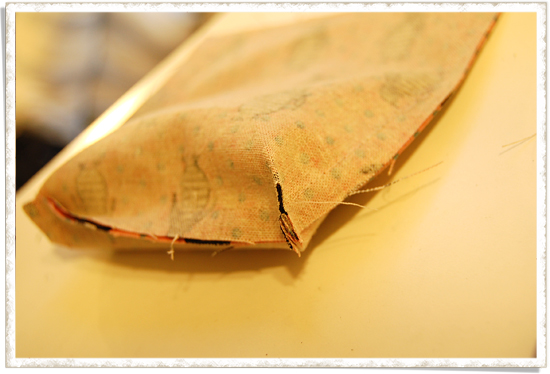
I totally forgot to take a picture of this critical step,
but here we sew the two patchwork panels with
right sides together, all the edges except the top
edge where the casing is attached.
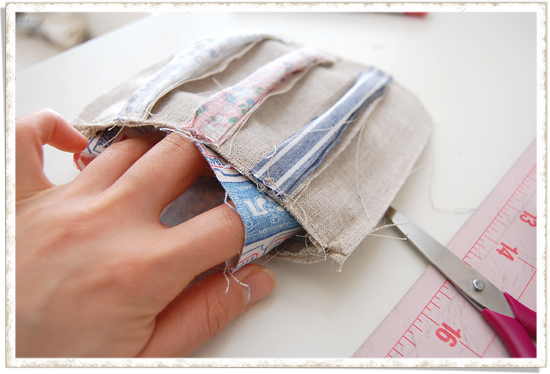
And this is optional, but if you box corner, your
pouch will turn out quite puffy with roundish corners.
(I sewed in the way that from the pointy end to
the needle was about 3/4".) Trim excess at the corners.
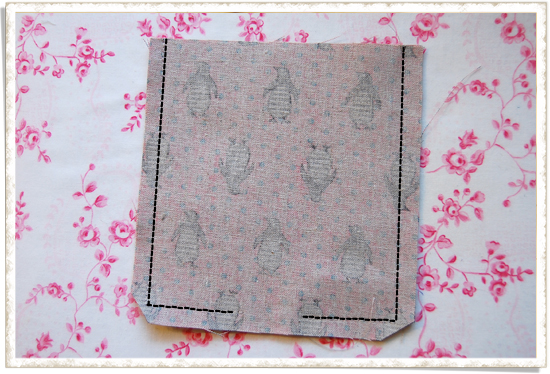
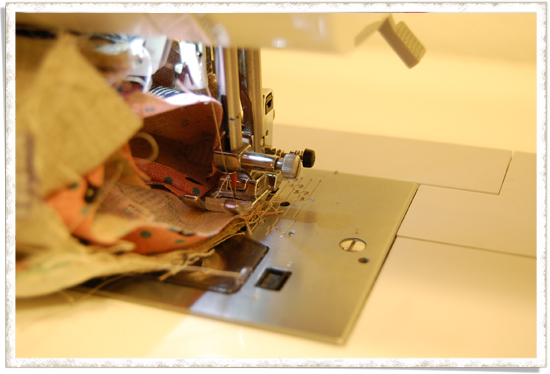
Just like you sewed the outer bag, you are now
making lining by sewing the fabric with right
sides together; this time, make sure to leave
an opening at the bottom.
If you boxed the corners, you may want to
repeat the same process for the lining too.
Then trim excess.
Turn the lining right side out and place it
inside the outer bag so that right sides
are facing each other. (Sorry for the different
fabric for the lining - I was taking photos
while making two pouches with different
fabrics.. I hope I'm not confusing you here..!)
Now sew all the way around the top edge.
Here, the lining and the exterior bag are
sewn right sides together, and the casing is
sandwiched in-between so that when you sew,
you don't see the casing just like the picture above.
This is exactly like the step lining and outer bag
were sewn for the fabric basket and the patchwork bag ;)
Turn the pouch right side out through lining
opening, and hand-stitch opening closed.
If you made it with velcro, you are done! Yay!
If you didn't, then now insert the 5" length
flex frame through casing.
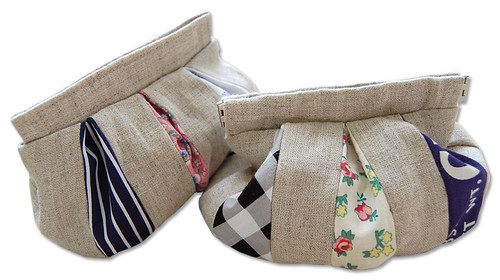
Hooray! Your pouch is finished!!
The left one is made with velcro and the right
one is made with a flex frame. Both of them
turned out really cute and practical ;)
I really hope this tute was easy to follow!
I can't wait to see your pouches in
this flickr pool!! As always,
I would LOVE it if you could let me know what
you think of this tutorial by leaving comments below.
Also as usual, this free tutorial
is only for personal use please.
Thanks for taking your time to stop by!

*FAQs*
Where did you get the cute mini iron?
I got it for my Christmas gift last year!
(How lucky am I?!) I think I've seen the
same iron at Joann but I also found it available
online here.
Where did you get the linen?
I got this ramie linen from this Japanese
online shop, but sadly, they don't seem to ship
internationally :( I think any medium weight
linen would be great for this project though!
Can linen be replaced by denim?
What a nice idea! I'm sure denim would
make a great pouch! I would try it with
light to medium weight denim ;)
Can the flex frame be removed for washing?
Hmmm.. I don't think so unfortunately.
A flex frame is constructed in the way that
once it's put into use, it won't be removed,
so I don't think removing it is very practical :(
Can I use a flex frame of a different size?
Sure you can! I would not go for
one smaller than 4" though, because
it might be a little too small project
to work with. I would also make sure
to adjust the measurements of
fabric pieces to fit nicely.
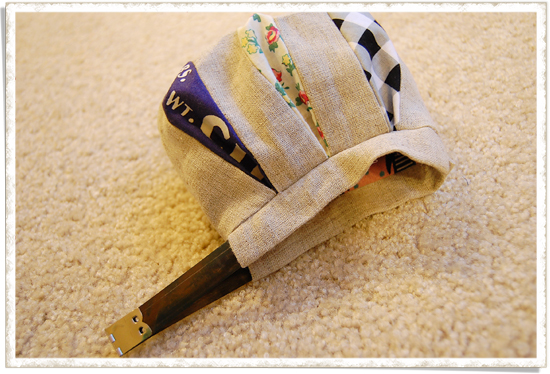
Can I use metal measuring tape instead
of a flex frame?
What an innovative idea! I've never tried it yet,
but someone made this pouch using metal tape and
told me that it worked really nicely! Let me
share with you what she said;
"You need to round the corners after cutting
to length, and I put masking tape over these ends
as a precaution. When you insert the ruler in the
casing, the numbers face the outside inside of the bag."
(Thank you for letting me know that numbers
need to face inside of the bag to let the pouch open!)
Wouldn't it be better if the lining
also had peek-a-boo parts so that
the pouch is really expandable?
I bet it would be just fine.
I made the lining this way because it's
much simple and quick to make, and I also
thought the pouch might turn out a little bulky
if I made it that way. But I bet it would
work just fine if fabrics you are
using are light-weight cotton ;)
How do you add handles to it?
If I were to add handles to the pouch, I would
use a type of flex frame that comes with a little loops
at the ends just like this one. Those loops are
for you to play with in case you want to add handles.
I've been looking for an online shop that carries
this type of flex frame without much luck.
If anyone finds it somewhere, please let me know
so that I can put the link to the shop here.
Can you make with a zipper?
I'm sure using a zipper instead of flex frame/velcro
will make a really nice puffy pouch too. I would
probably still have the top part of the bag rather
than attaching zipper directly to the main bag.
I would also enlarge the pattern a little just
so that it'd be easy to sew ;)


