Wednesday, July 18, 2012

Christmas in July: Mini Fabric Tape Tutorial


Welcome to the third stop on the Christmas in July blog hop!

Thank you Elizabeth for hosting this fabulous blog hop and for inviting me to take a part!
If you are anything like me, you'd wait til the last minute to get working on
Christmas gifts and realize a few days before Christmas that you totally
underestimated the time it takes to finish up gifts. Then you end up rushing
into stores to pick up store-bought presents for your loved ones. You are
apologetic that you are giving the store bought stuff rather than handmade
gifts that you had dreamed about making for them. Your new year's resolution
would include "Start making Christmas gifts WAY earlier!!" Can you relate?
Then maybe it's time for us to start doing something perhaps!!

1

Today I would like to share with you a very simple fabric tape tutorial.
I like making these because it is a great way to use up my fabric scraps,
and I enjoy using the tape for packages I put together. If you live in the
country that double-sided tape usually comes with backing, this tute
may not be very useful. I remember in the US the simple double sided tape
rarely had backing on it. This tutorial is for those who want to turn those
double sided tape without backing to fabric tapes!

8

I used parchment paper as a backing of the tape.
It is called "cooking sheet" in Japan, but it is the same thing as parchment paper
or bakery paper which is used to line baking pans as a non-stick surface.
Here I have a sheet of parchment paper measuring approximately 2" x 12".

6

I put on double-sided tapes throughout like this, being careful
not to create air bubbles in between the paper and tape.
(It's ok for the tapes to over-wrap a little.)

5

Then I placed it the sticky side down on the wrong side
of this fabric scrap that is a little larger than the paper at all edges.

4

Then I used pinking scissors to cut along both long edges.
(Make sure to cut along the paper so that your finished tape
will not have any surface with no parchment paper (backing).

3

Then I chopped it into pieces like this so the result is a lot of mini tapes
backed with parchment paper!

2

When you want to use the tape, remove the backing and place it where you want it to be!

1

It would be nice to have these made by Christmas! We know we never
have enough tapes for packages and cards and all!

I hope you'll turn your fabric scraps into some fun tapes!


Here is a schedule of Christmas in July! Don't forget to stop by
all these lovely stops for Christmasy inspiration!

Monday 7/16 - Don't Call Me Betsy
Tuesday 7/17 - Sew Crafty Jess
Wednesday 7/18 - Pink Penguin
Thursday 7/19 - Freshly Pieced
Friday 7/20 - Sew Sweetness
Monday 7/23 - Happy Quilting
Tuesday 7/24 - Comfort Stitching
Wednesday 7/25 - Diary of a Quilter
Thursday 7/26 - Felicity Quilts


Oh I almost forgot the best part! I have a great giveaway for you!
The fabulous Kathy of Pink Chalk Fabrics has generously donated
a $20 gift certificate to one lucky winner!

logo-pinkchalk

To enter the giveaway, leave a comment by the midnight Thursday!
One comment per person please ;)

Good luck and have a great day!!


Friday, July 6, 2012

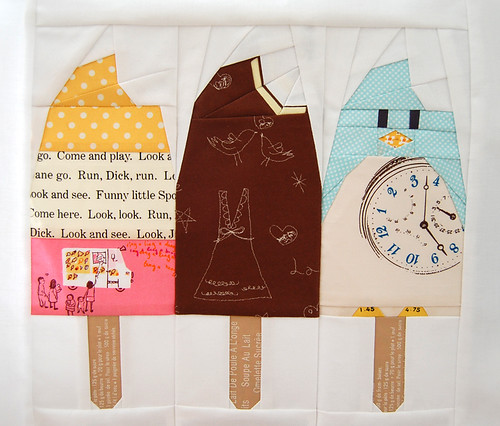
Popsicles Pattern at superbuzzy!!


Hello everyone! Remember me? It's Ayumi of Pink Penguin here! How have you been? If you are in the US, did you get to do something to celebrate the Fourth of July? (I miss the sound of people screaming for joy and the fireworks from everywhere!) It's been so Hot and Humid here in Japan. What's keeping me alive and not melting away is my daily intake of popsicles. I looove them so much, and Joe hates how much I eat them in the day. However much Joe says it is excessive, I have a special place for popsicles in my heart and stomach. I am not going to resist therm if I know they are waiting for me in the freezer, hehe!

Ringo Pie - Anna's Dessert Block


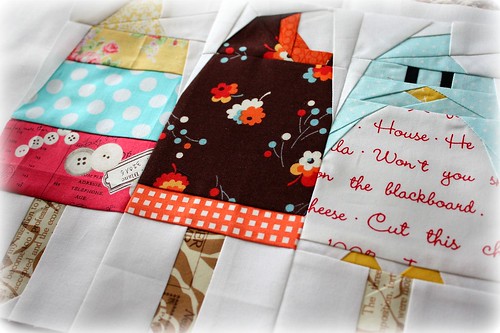
I'm so excited to announce my very first paper-pieced pattern debut today! Popsicles!! You may have seen this popsicles block above that I made for Anna for the Ringo Pie bee about a year and a half ago. I really enjoyed making the block and have always wanted to have this pattern available for friends! This pattern I wrote up is basically a simplified version of the popsicles block above (plus a watermelon bar as extra!)

The lovely Kelly of superbuzzy contacted me about a few months ago and suggested a superbuzzy/pink penguin collaboration where I make a block of the month around some theme for the superbuzzy shop and class! I was stunned! First of all, I have known superbuzzy for years for its BEST Japanese fabric selection! (I bet most of you have shopped there if you like Japanese fabrics!) My very first Japanese fabric I got in the US was a bundle of Atelier Akiko fat quarter prints from superbuzzy, which I used for the chocolate part of this block ;)

We will be offering you one block pattern a month starting this month! All blocks are to put together to make a quilt in the end! Yes, so this is basically a quilt-along! Would you let me call it "Super Penguin Quilt Along" or "SP QAL"??

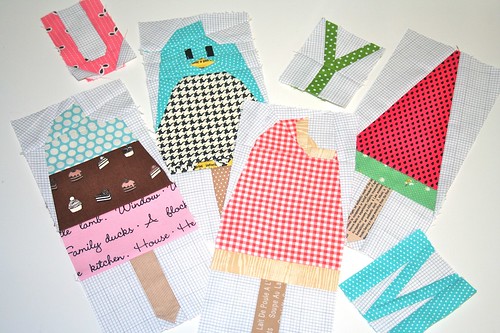
I knew I'd want my first paper pieced block pattern to be popsicles! Not simply that I am a popsicle addict, but that I can highly recommend this pattern for anyone with any level of sewing experience. All four popsicles, except for the penguin one, are very simply constructed so I say they are very friendly to newbies. The penguin one is for anyone up for a challenge ;) If you are new to paper-piecing and want to save heartaches, I suggest you skip the penguin and make the watermelon one instead, which is super easy peasy but is equally fun!

Speaking of the watermelon popsicle, it looks like this in real life. It is very popular among kids in Japan and shows up everywhere during the summer. When Kelly suggested I include this one for our July block, I found myself questioning her "But don't you think folks will find it weird?" And then I realized it couldn't possibly be weirder than the penguin popsicle that doesn't even exist!! LOL!

All popsicles are finished at the same size, so if you are following along the QAL, pick three of your favorite and put them together, which will be your July block. Three watermelon bars? Three penguins? Two napoleons and one chocolate? Whatever you like!

The theme of the quilt along is most likely going to stick with "sweets", but we would love any suggestions or ideas if you have any!!

If you just want to try out one or a few patterns only to incorporate into your other projects along the way or maybe just want to try out paper piecing for a little bit or whatever, that would be completely fine too! We'd be just grateful if anyone could discover the joy of paper-piecing from our patterns!

For anyone who is a neighbor to her shop (in Ventura, California, USA), we would LOVE to invite you to a monthly class Kelly offers there ;) I am unfortunately not very close (I WISH!!), so I just have to imagine myself being there meeting crafty people and having tons of paper-piecing fun.

Oh can you imagine how excited I was to find out when the first class for this QAL is going to be held? It will be July 22nd (1pm - 4pm). That is, July 23rd (5am - 8am) in Japan, the morning of my 30th birthday!!!! So I'll wake up thinking about the people playing with my block pattern with Kelly. I already know I'll have a great birthday!!
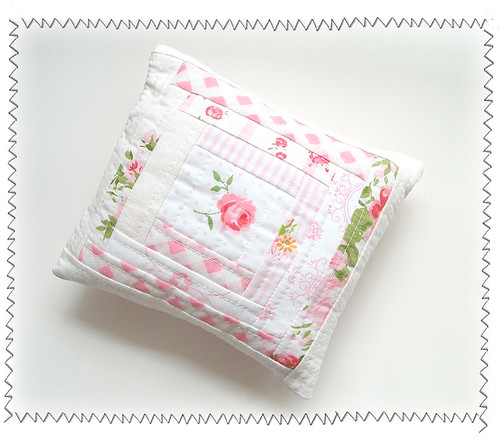
Could I show you my friends' lovely work??

Popsicles


This was pieced by the awesome Doe! It's hard to believe this, but this is her first time trying out paper-piecing! How could that be possible???

PTS 8


And this is my lovely real life crafty friend Tamiko's popsicles that will turn into a pillow soon!!

Seeing these made me teary for joy! Thank you so much Doe and Tamiko for letting me share your yummy popsicles here!


The block of the month will be available at superbuzzy in both instant download and printed version at the beginning of the month. (Popsicles block (July block) are now available!)

If you have any question, please go ahead and leave it in the comment so I'll reply directly there as it's likely there are other people who have the same questions.

Thank you for allowing me to talk a bit! It's always nice to be back! I'll be back very soon!!

Instant Download  ♥  Printed Version  ♥  Class (July 22nd!)

Monday, June 4, 2012

Gifts sent and received etc!

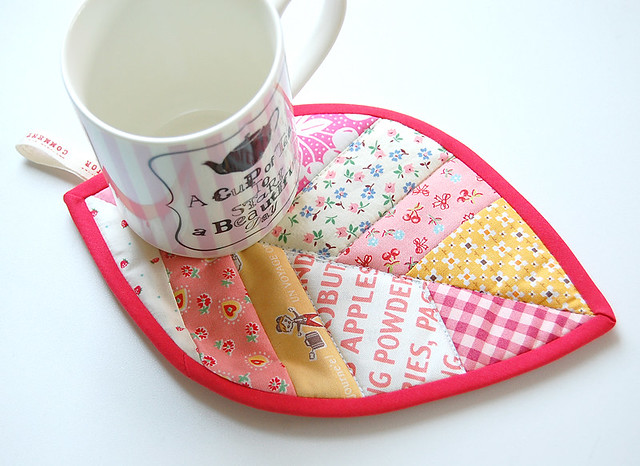
Leaf Potholder

I've missed you all so much! I apologize for my long absence here once again! I have so many things I want to share, so many to the point I am a bit overwhelmed! Of course I have tons of pincushions pics I want to share, but maybe it wouldn't hurt to talk about something other than log cabin pincushions just to give fresh air to this little blog?

The leafy potholder (or a mug rug?) above was a gift for a friend I whipped up last week. I used Leila's Scrappy Leaf Key Fob pattern that I had purchased a while back. (You can purchase her pattern in her shop!) This pattern has so many possibilities! Have you seen how she made not only some key fobs but also coasters and a potholder by altering the size of the same pattern? So fun! I was especially inspired by her potholder and basically couldn't help myself copying her! It was a lot of fun choosing fabrics for this potholder with the recipient's taste in fabrics in mind. I can't say any more about this gift since it hasn't made its way to her.. ;)


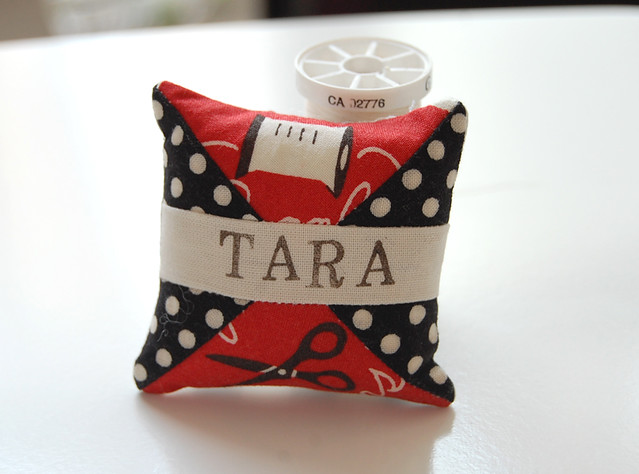
Spool pincushion for Tara


This is a teeny tiny spool pincushion I made for Tara a while back. It made my heart sing to hear from Penny that Tara liked it so much that it is attached to her sewing machine now. I've made several of these pincushions for gifts but this is the only one I didn't forget to take a photo of.


Fabric basket and scrappy organizer


Along with the pincushion, I made these for her too; a fabric basket and a scrappy organizer. You probably know the basket pattern (hehe, the tute is here!). The organizer was made using a tutorial, once again, by Leila. (Yep, I admit I am a huge fan of her works!!)


Scrappy Organizer


This too is something I have to make one for myself as well ;)

*Part of Purse Palooza*


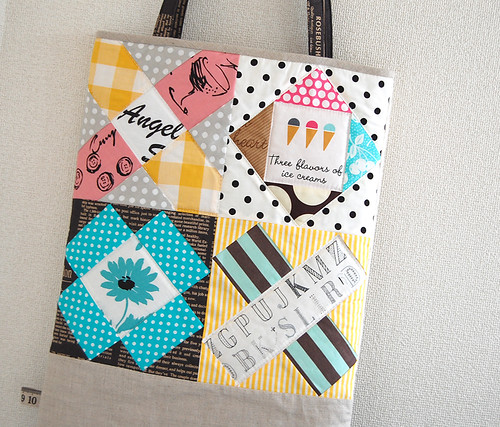
Signature Tote for Amy


And this is a quilted tote I made for Amy using one of the signature bag patterns in Kumiko Fujita's ABC book. Although this book is out-of-print and is very hard to find, the construction of this tote is quite simple enough for most folks with some bag/purse experience to figure out how to make it pretty easily. I'd like to talk about this bag as a part of Purse Palooza (more about the event in my previous post.) Here are some questions Sara of Sew Sweetness, the lovely host of this fun event, has kindly prepared for us.


Signature Tote for Amy


1. What materials are needed to make the bag? What type of interfacing did you use?

    Cotton print, linen, fusible web (for applique), cotton batting, and medium weight interfacing (for handles).

2. What fabrics did you use to make yours?

    Most cotton prints I used for are Japanese fabrics. (Suzuko Koseki, Kumiko Fujita, etc.)

3. Illustrations/Instructions (were the instructions easy to understand? Were there step-by-step photos or graphics? Was anything unclear?)

    It is a Japanese book, so all the instructions are in Japanese, but just like many Japanese craft books, every instruction has at least a few step-by-step graphics that basically explains the flow well.

4. Modifications (what changes did you make to the pattern and why?)

    I enlarged the pattern so that it's good enough for a library tote.

5. Difficulty Level (beginner, confident beginner, intermediate, advanced)

    Maybe confident beginner.

6. Conclusion (any final thoughts about the pattern...did you enjoy it? Would you make it again?)
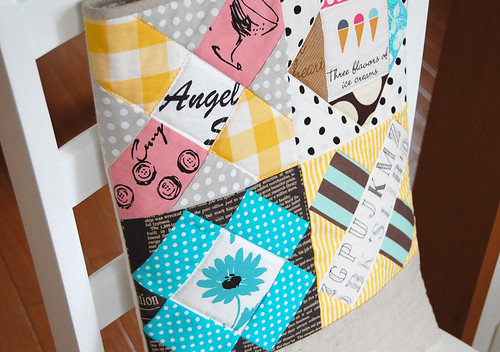
    I really enjoyed making this bag. Even though I've made this type of quilted totes many times in the past, this instruction called for quite a few things I had never tried before. For example, the way handles are sewn right onto the bag like this. You can see the stitching from the exterior. The short edges of the handles were raw when they are sewn to the bag. The raw edges were then to be covered by some fabric. I hand-stitched this linen tape instead to cover up the raw edges. Another thing new to me was that the lining fabric was used to bind the raw edges inside the bag. Basically, your lining is at the finished size plus extra at two side edges. These extra parts are used to cover up the raw edges inside the bag! Clever!

Covering up raw edges with linen tape


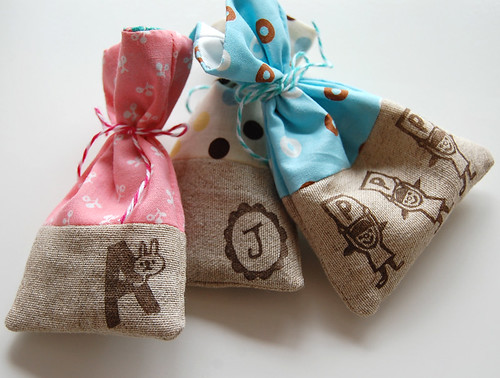
Hand-curved stamps


I have been terrible at remembering to photograph my hand carved stamps before sending them. Here are three stamps I didn't forget to take a picture. Can you tell I am having so much fun curving stamps?


Lastly, I'd like to share with you some handmade lovelies that made my weeks!


Thank you Charise!

Oh you know how much I covet them, don't you? Charise has been such a sweet and generous friend who never ceases to stop spoiling me, hehe! Receiving these lovelies finally convinced myself it's the time I got a wall shelf for my craft room to display my favorite small crafted gifts ;)


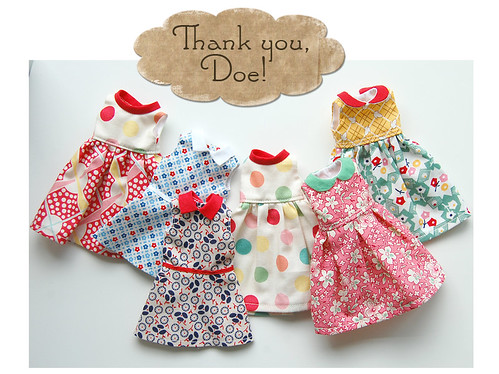
Thank you, Doe!


Doe is too aweome. Period. I am constantly inspired by all her projects, but lately we had a chat about dolly dresses and I told her how much I'd like some of them to hang up on the wall. And look what I found in the mail! I love them so much I could probably eat them no problem!


Purse Palooza 2012

In case you haven't heard about this event that kicked off today, 
let me share this post put together by Sara of Sew Sweetness
for guest bloggers (Yes, I'll be guest-blogging!)
------------------------------------------------------------


Announcing Purse Palooza 2012!!

This is a fun event, which I will be guest posting for in June over at Sew Sweetness to get you sewing a purse for the summer! Here's how it works:

1. Every weekday in June, there will be 2 amazing guest bloggers scheduled to share with you a purse sewing pattern review. The review will contain detailed information about what they thought about the sewing pattern, modifications they made, what kind of interfacing they used, and more! Get inspired!

2. Even more exciting...THERE WILL BE A GIVEAWAY EVERY WEEKDAY IN JUNE! That's right, 20 GIVEAWAYS! Your Giveaway Fairy Godmother is Kim from My Go-Go Life - she has some unbelievable giveaways planned!


3. At the end of the event, you will get a chance to show off your purse in order to win some amazing prizes!

Sara's free tutorial: Caliti Convertible Clutch

Pattern Review Schedule


June 4 - Sara @ Sewsweetness (tutorial: bag interfacing)
              Kim @ My Go-Go Life (Urban Jungle Bag)
June 5 - Meg @ Fashioned by Meg (Anna Maria Horner Art Student Tote)
              Lindsay @ Lindsay Sews (Posie Rosie Little Things Jane Market Bag)
June 6 - Kaelin @ The Plaid Scottie (Oliver + S Day in the Park Backpack)
              Colleen @ The Busy Bean (something from Amy Butler's Style Stitches book)
June 7 - Bree @ My Crafty Crap (Jenna Lou Designs Mabel Bag)
              Ayumi @ Pink Penguin (Signature Bag from Kumiko Fujita)
June 8 - Tamiko @ Patchwork Notes (Hexagon Patchwork Bag from Playful Patchwork)
              Jessica @ A Little Gray (Pat Bravo Verona Bag)
June 11 - Jessica @ Sew Crafty Jess (Amy Butler Spice Market Tote)
                Amy @ amylouwho? (V. and Co. Favorite Bag)
June 12 - Sara @ The Pretty Pickle (Charlie's Aunt Casablanca Clutch)
               Lindsey @ LRStitched (Noodlehead Envelope Clutch)
June 13 - Erin @ 2 More Seconds (Keyka Lou Bucket Bag)
               Caroline @ Sew Can She (V. and Co. Carry All Tote)
June 14 - Ali @ a squared w (bag from I Like Orange Too)
               Rachael @ Imagine Gnats (Jen Giddens Pocket Tote)
June 15 - Holly @ Bijou Lovely (Noodlehead Go Anywhere Bag)
               Katie @ There and Back (Sweet Pea Pocket Purse)
June 18 - Monique @ Sew Fun by Monique (Millie's Market Tote from Happy Home by Jennifer Paganelli)
               Katie @ Swim, Bike, Quilt! (Green Bee Scoop Tote)
June 19 - Jennie @ Clover and Violet (Lunch Bag from Pink Penguin)
               Joanna @ Shape Moth (Emmaline Bag)
June 20 - Jen @ Bettycrockerass (While Baby Naps Metal Clutch)
               Krista @ The Spotted Stone (The Sometimes Crafter Amanda's Knitting Bag)
June 21 - Katy @ The Littlest Thistle (Noodlehead 2-4-1 Tote)
               Terri @ Sew-Fantastic (In Color Order Lined Drawstring Bag)
June 22 - Elizabeth @ Don't Call Me Betsy (Amy Butler Weekender Bag)
               Sarah @ Fairy Face Designs (bag from the Bag Making Bible)
June 25 - Amy @ Sukie Don't You Know Who I Am? (Amy Butler Sophia Bag)
                Heather @ {House} of a la Mode (Retro Mama Granny Bag)
June 26 - Julianna @ Jednoiglec (Charlie's Aunt Kitchen Garden Bag)
               Jeni @ In Color Order (Bari J. State Street Tote)
June 27 - Kerry @ Very Kerry Berry (bag from Suzuko Koseki)
               Michelle @ I Like Orange Too (Left Bank Granny Bag)
June 28 - Kay Whitt @ Sew Serendipity Studio (tutorial: adjustable strap with metal slider)
               Amy Barickman @ Indygo Junction (tutorial: installing grommets/magnetic snaps)
June 29 - Melissa @ Bittersweet Designs (Bella Nonna Boutique Shoulder Bag)


Sara's free tutorial: The Underwater Stripes Bag
Contest Rules


1. Check out all the purse pattern reviews throughout the month and get inspired to sew up a purse of your own!

2. Join the Purse Palooza 2012 Flickr Group.

3. Link up your completed purse to the Flickr Group BETWEEN JUNE 4th and JULY 11th. Your purse must be created and photographed between those dates; purses made prior to June 4, 2012 will be disqualified. The purse may be of your own design, or made from a sewing pattern.

4. You may link up to 2 views of the same purse. More than 2 photos of the same purse will be removed from the group.

5. There is no limit to how many purses you may enter, as long as they were made between June 4th and July 11th, 2012.

Sara's free tutorial: The Urban Jungle Bag

The Prizes


First off, there will be a team of lovely judges that will choose 1st through 6th place. ALSO, 3 randomly chosen winners will be picked out of EVERYONE who completes a bag! Some great chances to win!!

1st Prize

* $50 gift certificate from Fat Quarter Shop         
* 3-pack of books from Martingale Publishing
* $50 gift certificate to Zipit
* $70 Pellon gift pack
* fat quarter bundle and sewing pattern from Art Gallery Fabrics


2nd Prize
* fat quarter bundle and sewing pattern from Art Gallery Fabrics
* 3-pack of books from Martingale Publishing
* fabric bundle from Sew Fresh Fabrics
* $30 gift certificate to Spoonflower

3rd Prize
* fat quarter bundle from Art Gallery Fabrics
* 2-pack of books from Lark Crafts Publishing
* $20 gift certificate to The Quilted Castle

4th Prize
* fat quarter bundle from Art Gallery Fabrics


3 Randomly Chosen Winners
Pink Chalk Fabrics
$20 gift certificate to Pink Chalk Fabrics


The Sponsors


Thank you to all of the lovely and extremely generous sponsors!
Art Gallery Fabrics // Artsy Crafty Babe // Noodlehead // Izzy and Ivy // Serendipity Studio // Martingale & Co. Publishing // Betz White // Sis Boom // Atkinson Designs // Mommy's Thimble // Lila Tueller // Sew Fresh Fabrics // Bari J. // C&T Publishing // Keyka Lou // Clover and Violet // Indygo Junction // Marie-Madeline Studio // Pellon // Pink Chalk Fabrics // Lark Crafts Publishing // The Quilted Castle // Fat Quarter Shop // Craft Apple // iThinkSew // Emmaline Bags // Bag Purse Frames // Zipit // Oliver + S // Ellen Medlock Studio // Charlie's Aunt Patterns // Spoonflower


Grab a button, and let's get this party started!!

Sew Sweetness


-----------------------------------------------------

Thank you Sara for allowing us to share this post!

Tuesday, May 15, 2012

Iron Pincushions and Sweet Gift

blog1

Goodness gracious, I did it again! So sorry for taking such a long blog break 
once again! I have a lot of my recent projects I want to share with you, but
 I will wait for a few weeks to do some lengthy blogposts.  I am in the midst of 
wrapping up my pet project and gearing up for a new venture!
I'll tell you all about it along the way, hehe!

blog2

Many of you are so kind to say you aren't tired of seeing my pincushions!
 thank you so much for that! It means a lot to me because I am still very much
addicted to it and will not be able to resist showing you as I make them!
Thank you so much to all of you for snatching up my pincushions 
and fabrics from my shop! I can't begin to tell you how exciting it is for me to
share my pincushions with folks who would appreciate them!
blog3
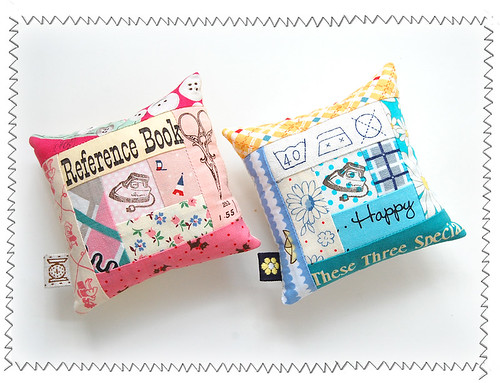
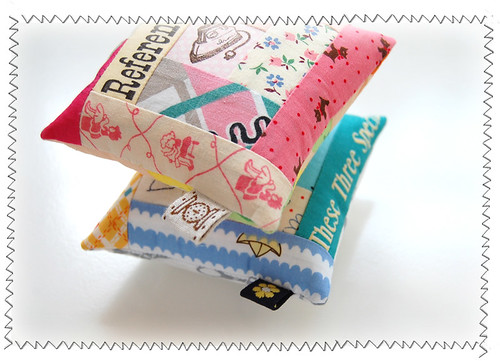
These two pincushions are my most recent
pincushions that are available in my shop ;)


Today I want to show you this pretty pincushion that traveled
all the way across the ocean from Norway!
blog5
Isn't it soooo sweet??!! Marit surprised me with a little package with
this cutie inside! I'm loving it so much!!
blog6

She was so sweet to use the stamp I carved for her on the back of
this little pillow! I feel so lucky to have a kind friend like her!
Thank you so much, Marit!!

I hope you are having a great week so far ;)
Thank you for stopping by my little blog!