


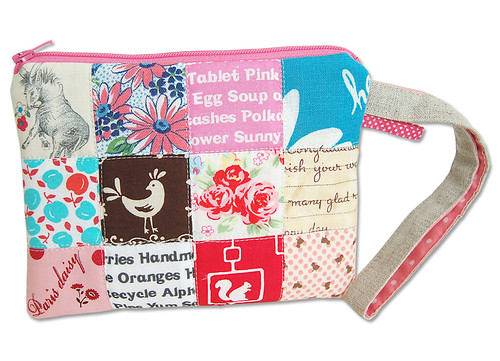
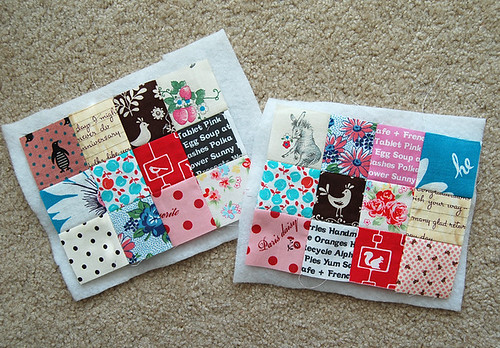
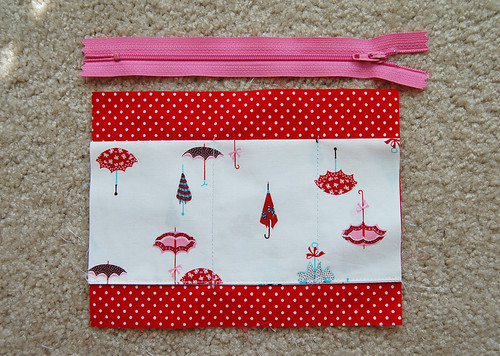
Thank you to many of you who requested
a tutorial on this pouch. This wristlet,
measuring approximately 6 3/4" x 5",
has some fun features including three inside
pockets for cards and a chap stick and a little
loop outside the pouch that holds a key chain.
I have been making tons of these pouches just
because this project is simple, easy, quick, fun,
and quite addictive, so I hope you enjoy this tutorial.
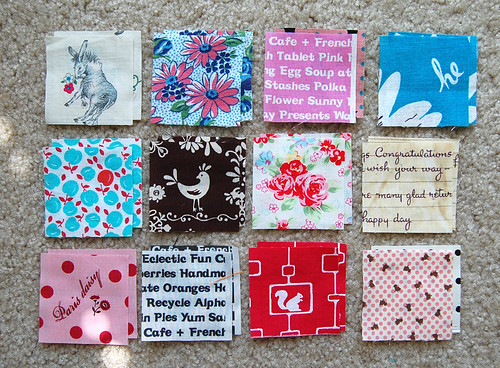
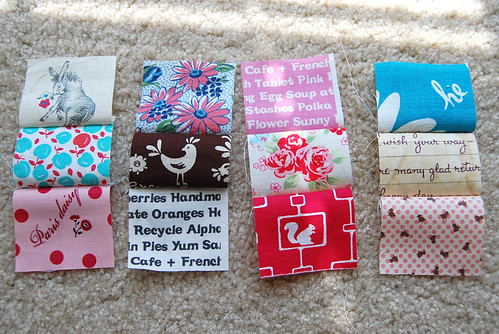
We start off with twenty four 2 1/4" squares.
(Once again, seam allowance of 1/4" is
included unless otherwise noted.)
Twelve of them will be one side, and
the other twelve go to the back side.
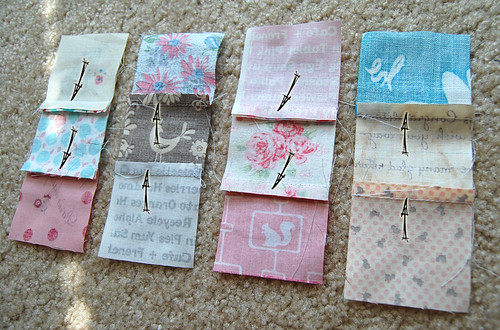
We now take the twelve squares that come to
one side of the pouch. Then we'll make
patchwork strips of columns.
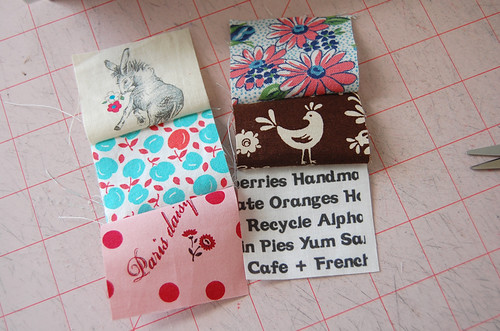
Fun ;)
After you have four strips, it's time to press.
Pressing seam allowances like this will make
your finished patchwork piece less bulky and
it helps to ensure that each corner of a square
piece matches with corners of other squares around it.
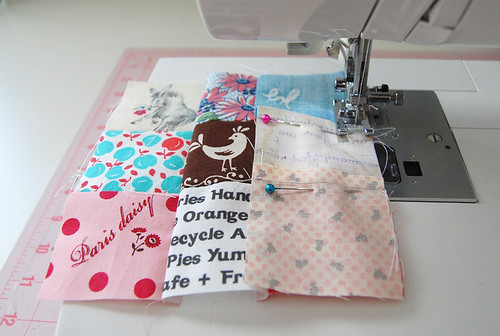
We'll sew them together.

Then press seams open! Yay just like you
did for the fabric basket and the patchwork
drawstring bag! I sure love square patches :D
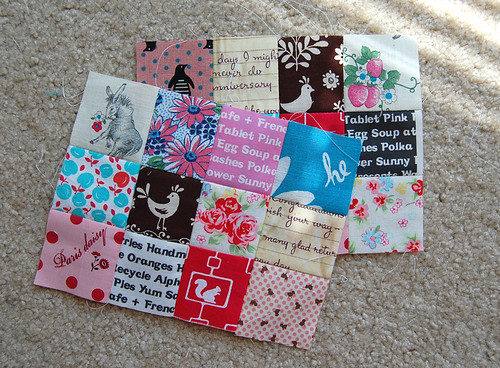
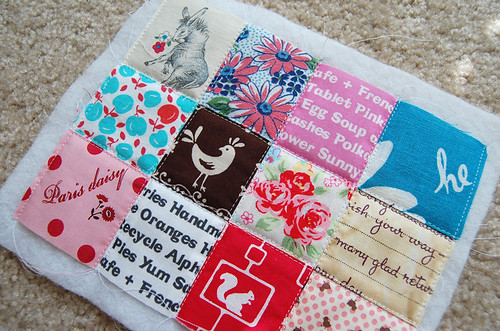
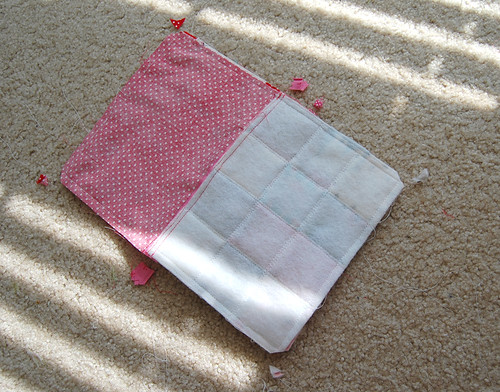
After repeating the same process with the rest of
twelve squares, we have two patchwork panels.
Then we'll fuse each of them onto a piece
of medium to heavy weight batting. I like
to use quilting spray for this process
rather than using fusible batting.
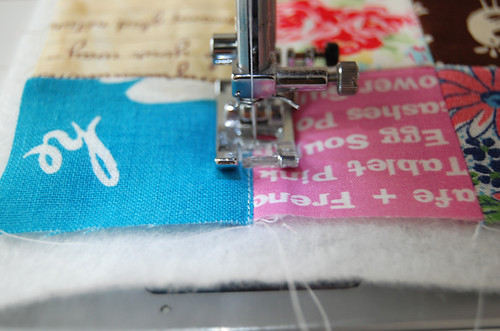
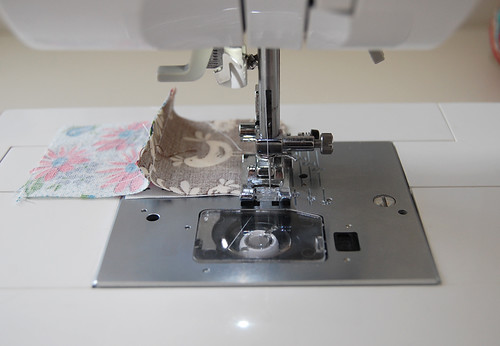
The quilting style here is totally up to you.
Zig-Zag stitching is fun and quick, but
what I've been doing is this; quilting
very close to both sides of each seam,
and the short edges..
like that.
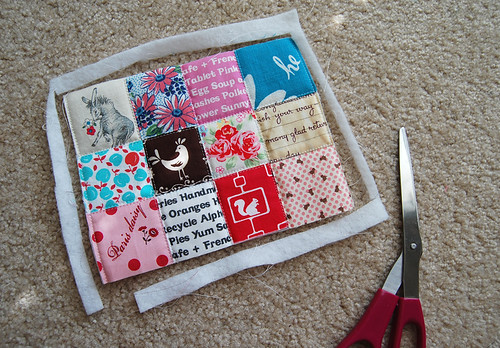
Then we cut off the excess.
Fun part ;)

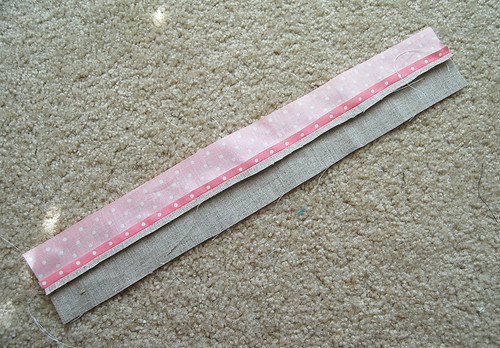
Now let's move onto making a handle.
We need two strips; one linen piece
and one cotton piece. If you'd rather
use cotton for both two strips, I
recommend that you use interfacing.
(Just like how the handles for the
lunch bag are made.)
Once again, this is just like making
handles for the lunch bag and
the fabric basket.
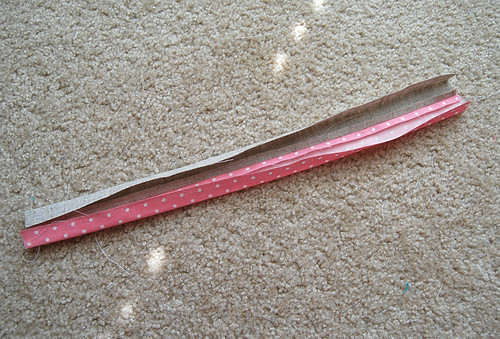
Folding each long edge toward the middle..
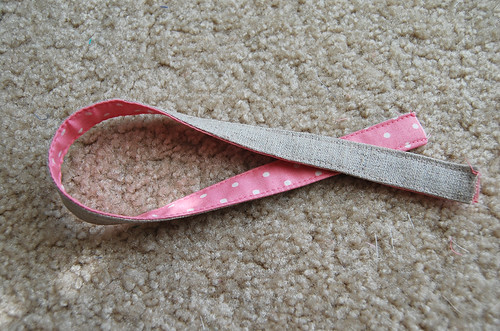
Then top-stitching both long edges.
If you want to attach a loop for your
pouch, cut out one rectangle piece
measuring 1" x 4".
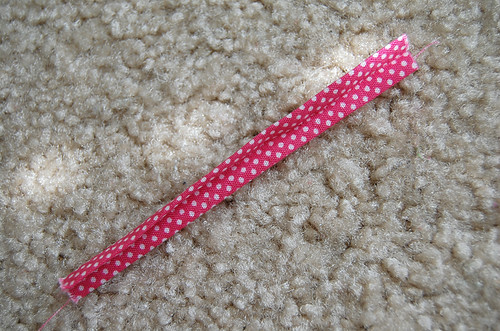
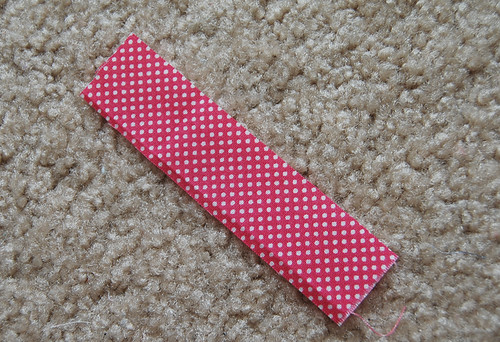
Just like the handle, we fold and
press this piece like this and..
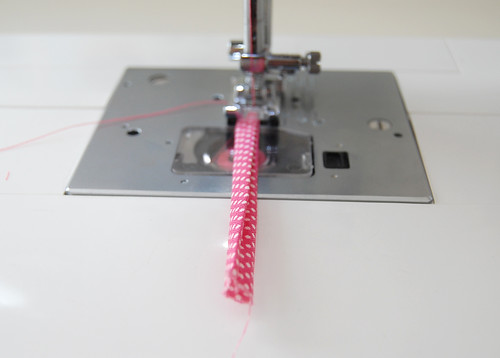
top-stitch both long edges.
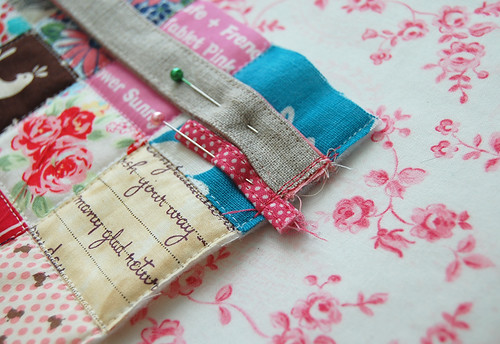
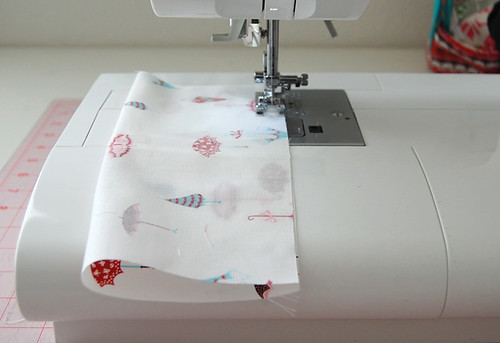
We will now machine-baste the handle
and the loop you made onto one of
the patchwork panel close to the
top right corner like this.
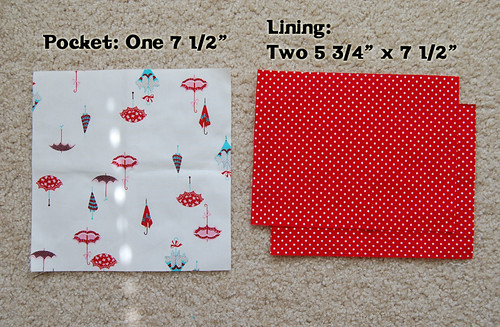
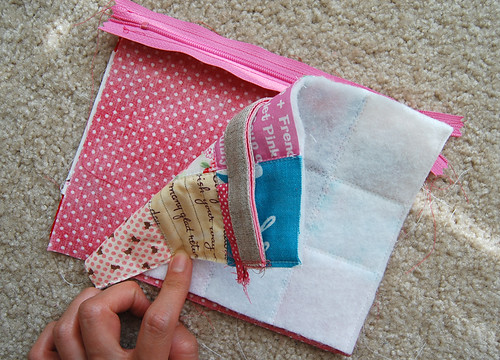
Now let's work on the lining. We need
two pieces for the lining and one piece
for three pockets.
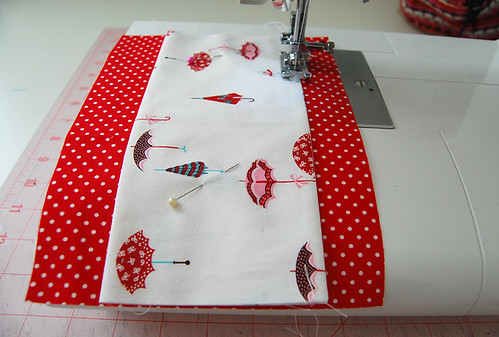
Take the pocket piece, fold it in half
with right side together, and sew the
one long edge together.
So your pocket looks like this.
Not so cute, so let's turn it inside out.
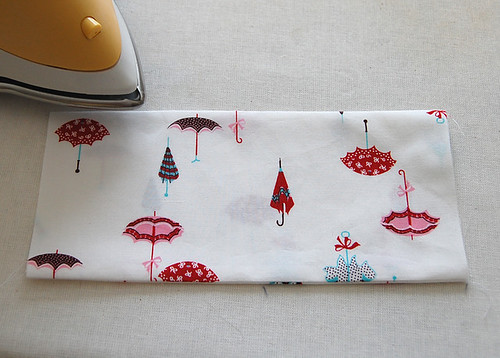
And press. That's much better :D
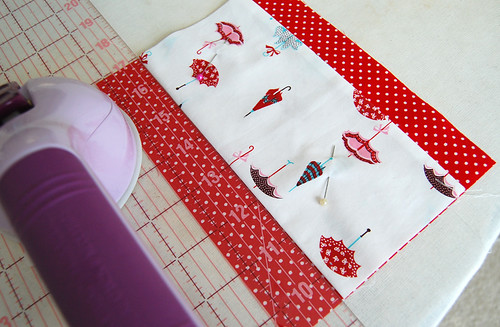
Now take a ruler and one of the lining pieces
to attach a pocket onto. I like to leave
about 1 1/4" above the pocket.
Then sew the bottom edge of the pocket
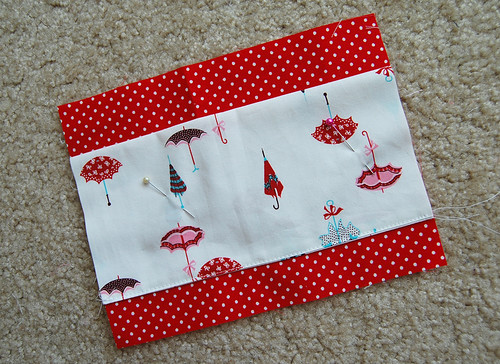
so it looks like this now.
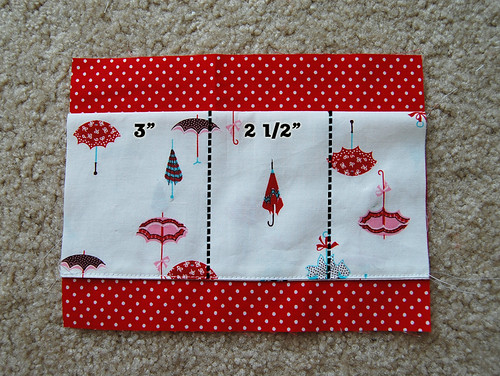
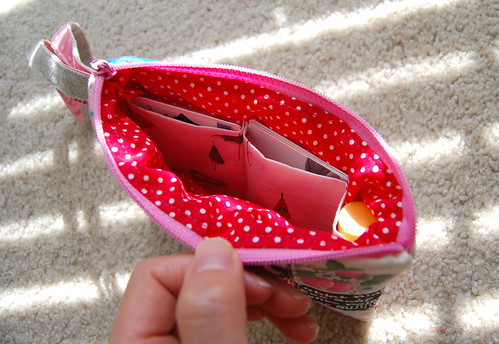
Using a water soluble pen, draw these lines.
The two pockets on the left are going to
be for your cards and one on the right is
for your chap stick, if you like to carry one.
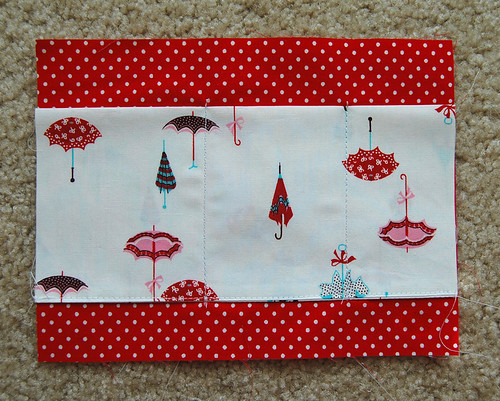
In this image, there is no sewing done at the
short edges of the pockets, but I recommend
you sew very close to those edges just so that
you'll deal with less pins later.
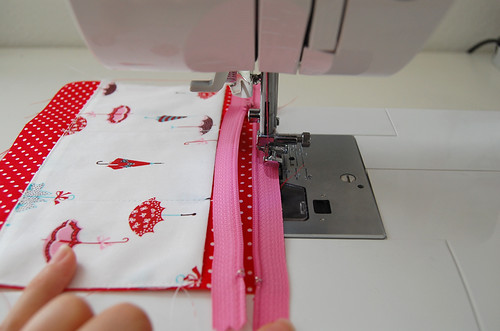
Let's now attach a 7" zipper. I know that
dealing with a zipper is a bit intimidating
for a beginner, (I used to be terrified at this
too) but it is actually not that hard. Trust me.
After attaching a zipper in several different
ways, I found this way the easiest, so if you
are a beginner, I hope you'll follow this
step-by-step instruction ;)
Oh and I have to tell you that Zipit is a great place to
get zippers! The owner Jennie is extremely
nice and generous and her zippers are just
the best! Fastest shipping too :D
I don't think I'd ever buy zippers from
anywhere else. yeah, that's how much
I'm in love with the shop, hehe.
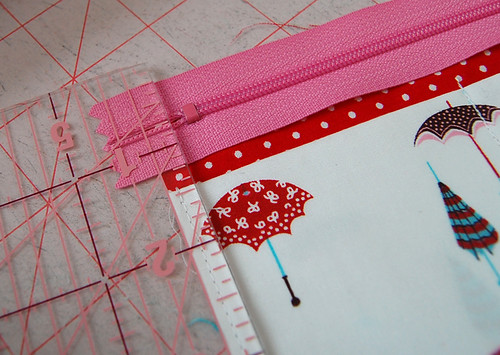
So here, I make sure that there is more than
1/4" from the left edge of the lining piece to
the metal part of the zipper. This way, we can
avoid sewing onto the metal, which will break
your needle instantaneously. (Don't ask me how
many needles I have broken this way, lol)
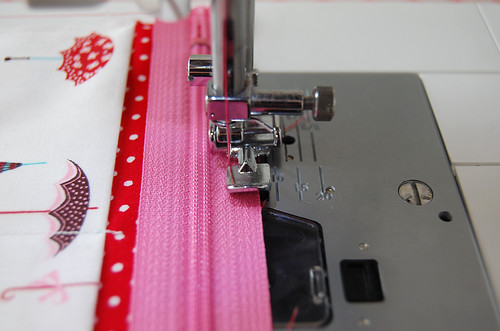
Remember to use a zipper foot that probably came
with your sewing machine that should look like
this one in the image above. With a zipper foot,
start sewing from the end of the zipper.
Here, your zipper is completely closed.
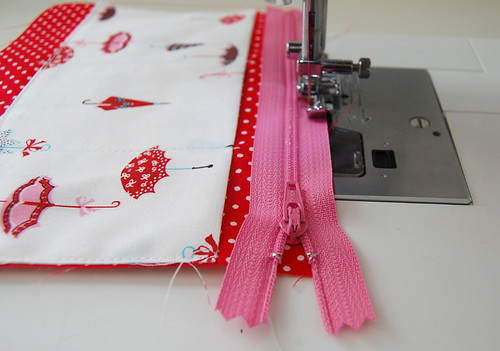
Stop, once you sewed it half-way and lift
up your zipper foot.
And bring the zipper-head to the very end,
lift down the foot again, and keep sewing.
I've found that it is very important to always
have the zipper-head very far from where I am
sewing. It is quite difficult to keep stitching
straight if a zipper-head is near the foot.
I do this moving-zipper-head for every single
piece I attach to a zipper.

With the zipper completely closed,
we'll attach another lining piece onto the
zipper. This time, we can't really see a zipper,
but as long as you can make sure that the piece
is aligning with the zipper, it's totally fine.
Oh and don't forget to move the zipper-head
when you sewed it half-way just like you did
for the other lining. (I hope I am not annoying
you by repeating this, lol, it's just so
helpful to do it that I can't stress enough.)

When both lining pieces are attached to the
zipper, it looks like this. Nice :)
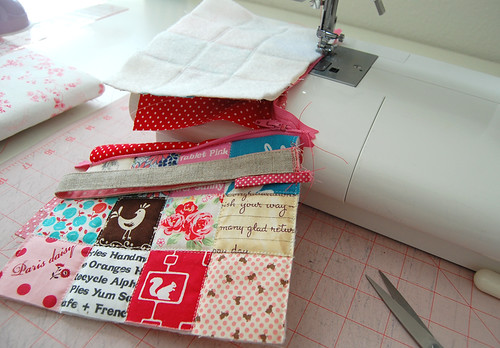
Take a patchwork piece that has a handle
and a loop attached. We are sewing
this onto the zipper now.
Like that.
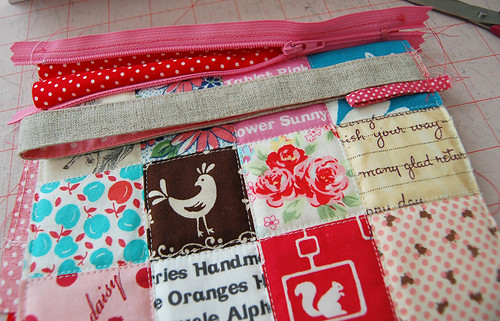
This is how it should look like.
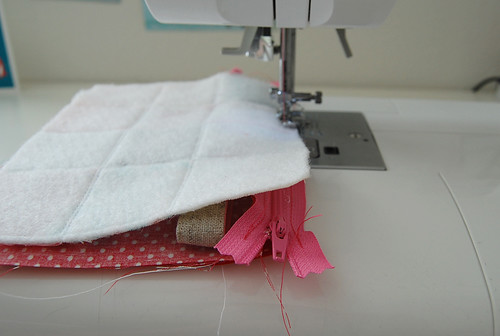
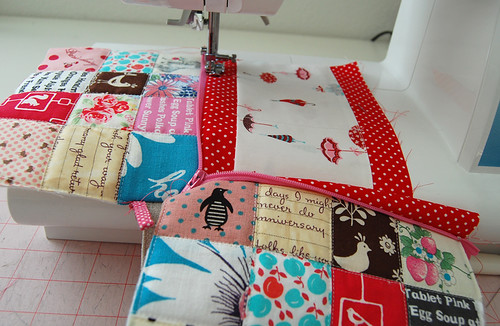
Now we will attach the other patchwork piece.
This time, it's a little different, because
we start off with the zipper completely open.
Then when we come to half-way, we close up
the zipper to keep sewing.
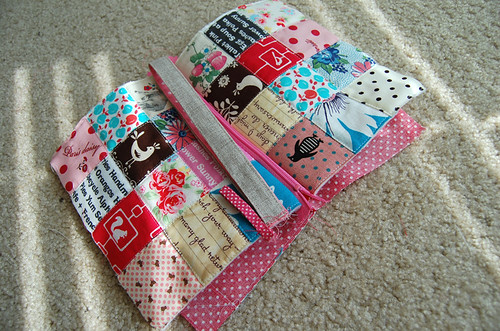
After all the pieces are attached,
it should look like this.
This is optional, but you might want to sew
the top of the lining just to make sure it
won't be too puffy and in your way when you
open the pouch. Here we want to make sure that
in this process, we don't have our patchwork
panel underneath the lining piece being sewn.
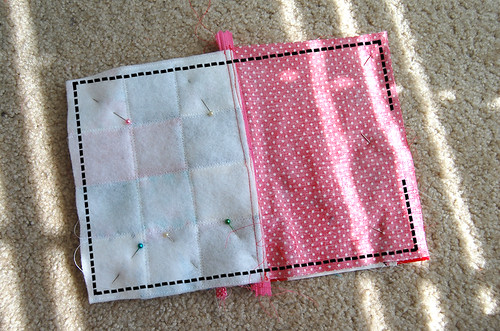
With right sides together, pin both patchwork
panels together and do the same for the lining.
Cut off corners and excess,
and flip it inside out from the opening.
Hand-stitch the opening closed will complete
your wristlet with these three pockets ;)
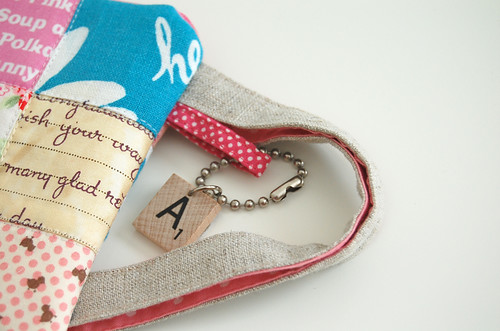
How about adding a key chain here..?
This is so much fun that I really hope
you'll sew up some of these! I am off to
making a few more because I have my old
friends visiting from Japan this weekend!
Oh how I am excited. I am picturing
them with these pouches at the Farmer's market. Yipee!
I'd love it if you
added your finished pouches in this flickr pool ;)
Have a fabulous day!


Thanks for the tutorial-I'll be sure to add it to the pool once I've made one :)
ReplyDeleteGreat tutorial! Looks like fun! I will have to try one
ReplyDeleteThanks for sharing another fabulous tutorial! (P.S. - I spy your new Spoonflower fabric in there!!!)
ReplyDeleteYay for the tutorial :) Thanks!
ReplyDeleteLove it! Thanks again for another wonderful tutorial. Which is your fabric? Because I'm loving the little blue and red apples - too cute!
ReplyDeletethanks for the detailed tutorial....going to try and make this!!!:)
ReplyDeleteA great tutorial.. The zip instruction is very good. Thank you! I will sure do one.
ReplyDeleteThank you so much for another wonderful tutorial - I was looking forward to this one!
ReplyDeleteThank you for being so generous with all your projects. I have made several of your other projects and now I have to go out and get a zipper so I can make this. Thanks again
ReplyDeleteWow! What a great tutorial! And so much work to make a cute little wristlet! I don't think I appreciated the work as much until I read this tutorial. You rock!
ReplyDeleteThis is a wonderful tutorial. It is now on my "to do" list.
ReplyDelete:)
Courtney
Thank you so much for the wonderful tutorial.......will go to try it.
ReplyDeleteThank you for he tutorial! I am in a making pouches mood too lately! I love yours!
ReplyDeletei was waiting for it!!!! 素敵ですー!!! チュートリアルをありがとうございます!! ぜひ作ってみたいです~ 今日はPOUCHを作りましたが、とても簡単であゆみさんのPOUCHと比べたら全然ダメですけど・・・ ハハハ でもこれからチュートリアルを使ってあゆみさんのようなPOUCHを作ることができますよねー 本当に嬉しいです!! ^^
ReplyDeleteI love these little pouches and the fabric is to die for - thanks for this!! xxx
ReplyDeletep.s what is that lilac coloured thing in the picture with the pocket (looks a bit like a suction cup or something - never seen one before and intrigued).... x
This is super tutorial!! Thank you so much!
ReplyDeleteYou are so brilliant!!!
Thank you so much , I wil try it right now , love it !I have made several of your other projects . from U.A.E
ReplyDeleteThanks, the tutorial is great!
ReplyDeleteThanks a lot!!! It's wonderful!!!)))
ReplyDeleteYour tutorials are great and so thorough. They are really helpful to a beginner such as myself. Thanks for putting the time and effort into these. I think I might even give one a try.
ReplyDeleteWhat a pretty little pouch!! I linked to your tutorial over on Craft Gossip Sewing:
ReplyDeletehttp://sewing.craftgossip.com/tutorial-patchwork-zippered-wristlet-2/2010/08/26/
--Anne
Thank you so much. I love this little tutorial.
ReplyDeleteI've been loving making little zipper bags and I'll give this one a try too! thanks so much for the tutorial!
ReplyDeleteThis is another stroke of brilliance on your part! you explain things so clearly. I have recently overcome my zip phobia - I did a course called "the zippers clinic" at a place called The Make Lounge in London (UK) - I've been ordering loads and loads of zips on eBay ever since! It's a holiday weekend in the UK this week - so I'll be having a crack at this one! Well done! (oh and been meaning to congratualte you on your gorgeous new husband!!.
ReplyDeleteXx
I love the zipper application. I am going to try making a bag from my stash of felted wool. Thanks for your hard work.
ReplyDeleteshelly...studioat7199.com/blog
Pink looks great on a zip! I lovel the little scrabble tile, cute finishing touch
ReplyDeletethis is so precious! love the patchwork and the pockets are so functional. The wrist straps are just the icing on the cake!
ReplyDeleteGorgeous!!! and so well explained :)
ReplyDeleteThank you for the tute, can't wait to try one!
super!...
ReplyDeleteWhere did you get the cute little wooden tile? What a great idea, especially for gifts!
ReplyDeleteLove the detailed tutorial!! :) I saw this and now have to make this! :) Thank u!
ReplyDeleteThank you so much, everyone! I'm so glad that you guys like this tute! Can't wait to see what you'll come up with ;)
ReplyDeleteRedmagda-
"The zippers clinic" sounds funny but I wish I could've attended a class like that before I broke a million needles, haha. I bet it was a really nice class ;)
Anonymous-
I got the vintage letter-looking fabric designed by Suzuko Koseki from this Japanese online shop. I love the fabric too ;)
I love this - thanks so much!
ReplyDeleteCarolyn NC
xstitching5@yahoo.com
Love your tutorials, so clear and understandable with great photos.
ReplyDeleteThank you for this great tutorial! The pouch is really lovely and practical! I love the details like the pockets inside and the loop for a key chain outside! :-)
ReplyDeleteThank you so much for the tutorial! I will definately be making a few of these :)
ReplyDeletethank you so much for this tutorial! i've already made the basket and i'm so happy with it. so happy for your explanations! i do have 1 question though.. i simply do not understand how you make the handles. i get this part:Folding each long edge toward the middle..
ReplyDeletebut after that... i don't understand, maybe i'm missing a step. cause in my eyes, when i "Then top-stitching both long edges" (the next step), i don't undestand how you get the different fabric on both sides of the handles... do you cut it in have than? can you please help me out a bit with the handle making thing? thank you so much! (if it's possible: revlie.schuit AT gmail.com
Thank you for writing this wonderful tutorial! I can't wait until I have a bit of spare time to try sewing one of these wristlets! :)
ReplyDeleteBest tutorial EVER. How clear and concise. Thank you so much for sharing!!!
ReplyDeleteAyumi, thank you so much for the time and efforts you've put into this amazing tutorial. HAve a lovely weekend :)
ReplyDeletewonderful! Thank you so much for this tutorial!
ReplyDeletexo, Yana.
Your amazing! That's what I was looking for quite some time. Thank you :) (and besides, love the fabrics).
ReplyDeleteBest wishes
Jo and cats
Thank you so much Ayumi, I have now made a pouch and your tutorial is really great! Did you know that a Nintendo fits perfectly in it! Perfect gift for my girls!
ReplyDeleteadorable!!! And a great way to use up scraps :)
ReplyDeleteAfter making the bento bag yesterday I wanted to make something else straight away.
ReplyDeleteSo I made this pouch! I will be posting a picture on my blog soon so I will link to your blog. Its another great tutorial!
Thanks
http://miya-miya-kl.blogspot.com/
Thank you so much. I made pouch and had posted a picture here: http://naerra.blogspot.com/2010/08/blog-post_30.html
ReplyDeleteThank you very much for this very detailed tuto!
ReplyDeleteCecile
Great tutorial! You are so generous sharing with us!!
ReplyDelete; )
Love your sense of colors and the way you are combining pretty fabric!!!
Thank you so much for another fabulous tute! I just couldn't help but to make one for myself and I'm loving it! いつも可愛いものをいっぱい紹介してくれてありがとう♪ これからもこちらのブログを心から楽しみにしています☆
ReplyDeleteOh Ayumi! Thanks for a lovely tutorial once again! ! I've followed 2 of your tutorials now and made 2 lovely items! I just took pictures of them today.. I shall share them on flikr! ! ♥
ReplyDeleteOh, it's so amaizing!!! I love it so much!!!
ReplyDeleteThank you for this great tutorial
ReplyDeleteAwesome. I just posted a pouch that I want to redo because I love the design. I like to see if there are little tricks I don't know about for construction perfection. Love that umbrella fabric!
ReplyDeleteI love how informative your tutorials are, Ayumi! Thanks for all the pictures!
ReplyDeleteSto entrando per la prima volta nel tuo blog: i tuoi tutorial sono chiarissimi anche per chi non comprende la tua lingua. Molte grazie.
ReplyDeleteNadia da Torino, Italia
This is so cute Ayumi! Thanks for the tutorial ;)
ReplyDeleteOMG! I love to sew, I am quite creative and when I saw this, I thought "it's amazing. I love the inside so much that I included it in my own wristlet. So thank you so much for a decorative inside that pairs well with my funky outside :)
ReplyDeleteMichelle
Thanks a lot for your tutorial! I was looking desperately for something like that!
ReplyDeletei haven't had a chance to read blogs for a few weeks--i come to yours and there's not only one but two very cute, really well-written and well-photographed tutorials--thank you so much!
ReplyDeleteWhat a great great tutorial!! Thanks so much for sharing!!
ReplyDeletelove it !!! great tutorial !!! thanks !!!
ReplyDeleteThanks for a great tutorial on the zipper! I'm just learning to sew zippers this past week. = )
ReplyDeleteThe wristlet is so pretty and the tutorial easily explained. I love your blog!!!
ReplyDeleteGreetings from Spain,
Sylvia
What an awesome project tutorial!
ReplyDeleteamazing tutorial, thanks for share it! I can't wait to use it!
ReplyDeleteLove your blog and love your Flickr photos. Thank you for sharing.
ReplyDeleteThank you very much for sharing this tutorial - I am dabbling in some sewing projects and I loved this one right away! I blogged about my version of the wristlet and I linked here. Looking forward to working with the lunch box / bag tutorial next!!
ReplyDeleteSo adorable! I love the fabrics you used, and the tutorial is great! I'll be trying those out soon :)
ReplyDeleteThank You for the tutorial......I've gotten as far as cutting out my squares, now I just need to complete it! Wish me luck
ReplyDeleteWhat a clear tutorial. Can't wait to try this out. And where on earth do you keep finding these fantastic fabrics!
ReplyDeletethanks a lot,
Ann
like it very much .. but i dont have sew machine.. but i'll try it using my own hand... thank you very much
ReplyDeleteHallo,
ReplyDeletedanke für die ausführliche Anleitung !
Susanne
Thank you so much for your detailed directions! It came out terrific. My only concern, do you happen to h ave any helpful hints for the lining? My lining ended up a little more poofy than I'd like although I did top stitch to the zipper... Thank you for sharing your talent!
ReplyDeleteThank you so much, everyone!
ReplyDeleteAnonymous-
I'm glad yours turned out great! Maybe you can iron your lining with steam so that it won't be as puffy. Hope this helps :)
Thanks for posting. I made this and posted it on my blog with a link back to you.
ReplyDelete... absolutely great, and many thanks!!!
ReplyDeleteLove
Gabi
I love how you do your directions, so easy to follow! I have made a few of these for holiday gifts. Wasn't till #6 that I broke a needle!! :-)
ReplyDeleteThis comment has been removed by the author.
ReplyDeleteI adore your blog,very creative and fun......great tutorial:)))
ReplyDeletehttp://nakitbynara.blogspot.com
It's really cute!!! very well explained, I tink I'll do some as Christmas gifts.
ReplyDeleteThank you very much for this wonderful tutorial.
Greetings from Spain
charosgd@gmail.com
www.charopatch.blogspot.com
hai ayumi, what the name of the white fabric, inside the pouch, is it silicon press? were do you buy it? medium to heavy weight batting--- what is it?
ReplyDeleteI liketo use quilting spray for this process
rather than using fusible batting--- what quilitng spray and fusible batting, I'm really new in pacthwork, sorry bothering you much ayumi.
thank you very much
the white fabric is fusible batting right? and use it by sew it or use by spray adhesive on the batting and attach it to the fabric without sewing? what method do you use ayumi? sorry bothering you so much. thank you
ReplyDeleteThank you, everyone!
ReplyDeleteAnonymous-
The fabric I used for lining is print cotton fabric (I believe it was by Alexander Henry.) I bought it a long time ago at Hart's fabric in Santa Cruz, but if you search around, you may be able to find it online. Batting is the white soft-looking thing in the pictures that keeps your pouch nicely firm. You can google batting and find many different kinds of them. I use a quilting spray that can be found at a local fabric store. Quilting spray helps your fabric to be attached to batting temporarily - it makes the quilting process a lot easier. The use of quilting spray is not really a replacement of sewing. I use quilting spray first to put together batting and fabric and then I quilt (sew). I hope this helps! Good luck on making your wristlet :)
Hi Ayumi Thank you for your nice help
ReplyDeleteSo the white fabrib attach the pouch is batting, I'm really new about it, thank you. may I know where do you buy this batting online, and what kind of batting do you use? thank you in advise
Anonymous-
ReplyDeleteI buy batting from Joann's retail stores, but you can buy the same batting online too here.
I can't believe this! I just made something similar last weekend and only stumbled upon this today! Awesomeness!
ReplyDeleteKonichiwa Ayumi. I am pleased to have found your blog.
*Smiles*
Fantástico, adorei, e vou guardar para tentar fazer, obrigada por partilhares :)))
ReplyDeleteThank you very very much!! I loved this tutorial! Sorry my english! :)
ReplyDeleteThis project rocks ! I love the colors-& it has easy instructions. I'll be able to make a few of these -for all my lady friends & myself !Thanks . Angeltea9@verizon.net
ReplyDeleteLove all of the fabrics you chose, and the combinations are fabulous!!! Looks really like a basic simple sewing project, too!Shelley
ReplyDeleteHi and thank you so much for this great tutorial!!
ReplyDeleteI've tried to do one wristlet for me and I think I'll try again, I need to learn more ;)
Anyway, I've linked you on my blog, I hope it's ok :)
Last thing: please, come back soon on Etsy, I would like to see your shop!!!
xxx Simona
adorei o blog, são lindos seus trabalhos!
ReplyDeleteI love this! you have the cutest fabrics!
ReplyDeleteOne of my dearest friends made me one of these for my "dreaded 40th" birthday! It's adorably cute! She generously shared your blog with me, so that I can try my hand at it.
ReplyDeleteThis was wonderful. This is the first time i've attempted a zipper and your instructions and advice were so helpful.
ReplyDeleteGreat! This is my weekend project. Everything is so clear.
ReplyDeletewow...niceee...will try this one too. Can't wait to see if i can make it like yours. thanks for sharing dear.
ReplyDeleteomg these r so fabulous, i just made 2, thinking on 1 for each of my girls .... now i dont want to give them to them I want them for my self !!!! thank you so much for your tutorial , i love it!!!!!!
ReplyDeleteThank you so much for this GREAT tutorial! I will definitely make this in many variations for my friends as a gift. Many greetings from Czech rep.!
ReplyDeleteAyumi, thank you for the great tutorial. I've done one and put it on my blog with a link to your tutorial. Please kindly visit my blog :Stitch n Sing.
ReplyDeleteI have done another oriental patchwork wristlet. Please kindly have a look . :) Thanks again for your tutorial. I just love to do it so much!
ReplyDeletehttp://stitchnsing.blogspot.com/2011/06/oriental-patchwork-wristlet.html
I agree with your point, please share with us more good articles.1996 Mitsubishi Pick-up Truck AC Compressor
ReplyDeleteI just finished sewing a wristlet based on your tutorial..Arigatao Ayumi..thank you and terima kasih.
ReplyDeleteThank you for showing how to sew a zipper!!! I have always been afraid to try one. I can't wait to try now. I'll keep a bandaid close just incase. ;) Thanks again
ReplyDeletei love your blog!! you're so talented! greets from germany ;)
ReplyDeleteI really love your blog!
ReplyDeleteThank you very much to give us all this gifts.
Greets from Brasil! :)
THANKS, for a Beautiful proyect like this, sweet
ReplyDeletelovely and simple, nothing complicated and you can do it in a really short time, and THANKS TO YOU for you generosity sharing with us....
Lovely...
This wristlet is so beautiful. Are you allowing people to make products from this tutorial on a small scale for a boutique?
ReplyDeleteThank you everyone!
ReplyDeleteAnonymous-
Yes. I would love it if you could add a tag to show that the original tutorial came from here :)
Nice job. I love this. Thanks for sharing the beautiful job.
ReplyDeleteOMG I love it and you explained it so well plus love the pictures it looks FAB thanks!!!
ReplyDeleteyour tutorial is so detail, and i very love it.
ReplyDeletejust perfect!!!!
ReplyDeletethank you so much for the tutorial, ayumi!♥♥♥
ReplyDeletei made one for my daughter, and she'll be thrilled!!
you're on my flickr list and i registraded to get a feed back from your blog. =)
xoxoxox
A tutorial to sew a bag like this one is perfect because I spend a lot of money buying bags in the store and this is the perfect opportunity to change my mentality, thanks so much for this tutorial it has been something really simple for me.
ReplyDeleteThis is adorable!! I'm hoping to make a couple as Christmas presents this year. I've added it to my 'To Do' list and pinned it. Thanks for the fabulous tutorial.
ReplyDeleteCute little animals on the patches.
ReplyDeleteWow what a great tutorial and purse, i shall have ago at making one of these after christmas....best wishes.
ReplyDeleteIts made....photos to come soon....and regardless to what the person has put above its a great tutorial and ive made two....Thank you so much.
ReplyDeleteThis is adorable!!! I love your pictures and simple to follow instructions!!! Love Your blog too!!
ReplyDeletegreat tutorials, thanx for an inspiration!
ReplyDeleteHello!
ReplyDeletei made a pouch with your tutorial, you can see it here:
http://mthlde.canalblog.com/archives/2012/01/30/23378055.html
Thank you for sharing your tuto, i love your blog!
Mathilde.
Hi
ReplyDeletei just stumbled upon your blog and i was inspired to make on of these last night i have been sewing for years for profit and decided to take a year off and sew just for fun.
This was so much fun thank you for sharing.
ola, conheci seu blog e me encantei com seus trabalhos e agradeço os tutoriais, já me tornei sua seguidora, e a convido para conhecer meu blog e se tornar minha seguidora, bjs
ReplyDeleteHey Ayumi! I love this pouch! I made one, too. And I shared it on my blog (it's a very new blog, i started it at the weekend). If you want to see how it looks like: ein-sternchen@blogspot.com. The site is in german, but I told that you have a great tutorial for the pouch.
ReplyDeleteWOW,EXELENT
ReplyDeletehttp://masinski-kutak.blogspot.com
welcome :)
Огромное спасибо за мастер-класс !!!!
ReplyDeleteКатя из Сибири
Hi Ayumi, I recently discovered your blog - it's great. This particular tutorial of yours is the reason why my housework is piling up :)
ReplyDeleteHere is the proof:
http://a-75sqm-facelift.com/sewing/a-mild-obsession-with-patchwork-wristlets/
Thank you so much for this. I used your tutorial to inspire a bag - but changed the shape and added a lanyard. Love it! http://www.flickr.com/photos/53865436@N00/7545460728/
ReplyDeleteI love your pictures and simple to follow instructions!!! Love Your blog, Send gifts to Pakistan from UK.
ReplyDeletemulberry bags outlet
ReplyDeletereplica mulberry handbags
Had to make one of these right away! Love your tutorials, they are so easy to follow. Anyway, posted my final produkt on Flickr.
ReplyDeleteHugs from Annelin, Norway
annelinaas@gmail.com
This is great! It's a really nice improvement on a zipper bag, of which I've made a few copies already. Now I'll move on to this improved version and make a few more! Thank you for the excellent, clear instructions!
ReplyDeleteVicki
(email address is vicki with the domain of twissa dot com. You know how to put that together...;)
These are totally addicting! I think I have made about 6 of them. I use them as snack bags for the kids and myself. I have put a link back to here from http://notyournormalsteam.wordpress.com/2012/08/31/never-say-never-bags/
ReplyDeleteThank you for so clear, simple abut detailed tutorial! <3
ReplyDeleteThose are so cool! Thank you so much for this tutorial!
ReplyDeleteLove this! Will try it out! Thank you are sharing!
ReplyDeleteGrateful for sharing the PAP ...
ReplyDeleteI've been following your blog, by email, ok?
Thank you very much for your tutorials, thery are easy to follow and very helpfull
ReplyDeleteGreat tutorial. Thanks for sharing it.
ReplyDeleteThanks for this! I have never sewed a zipper in my life, and your steps made it so easy! I've made two in the last two days. Check them out if you're interested!
ReplyDeletehttp://olivesoriginals.blogspot.com/2012/12/small-zipper-wristlet.html
nice sharing thank you....
ReplyDeleteMuitooo bom . Adorei.
ReplyDeleteObrigada por compartilhar com a gente!!!!
beijos.
Muiiiiiito bom. Graças a você fiz a minha primeira costura e meu primeiro patchwork. Estou muiiiito feliz. Sou brasileira.
ReplyDeleteI love the pouch. I love your blog!
ReplyDeleteThanks for the tute
Stephanie
Thank you!!! Excellent PAP!!!
ReplyDeleteok, just made one of these! I didn't do the patchwork...I used a bandana fabric. and I used a ribbon for a handle instead of the fabric handle. I am just lazy that way.
ReplyDeletethe only part I messed up on was when we stitched all the way around all of the pieces before we turn it right-side out. I think I sewed over the zipper too much and it looks funny. it still works though and I am VERY happy with it. I needed one with the little pockets inside.
your instructions for putting the zipper in were great! they intimidate me very much.
thank you again for your awesome tutorial. I will be taking my wristlet everywhere I go!!
cheryl
Hi Cheryl, I am so glad you were able to make this pouch successfully in the end and that you are happy with the result :) Thank you for your kind words! Enjoy your pouch!
DeleteMaking the pouch as I type....Really enjoying it. I have never sewed a zipper before so this was a good test. I use a pouch in work for my phone, some coffee money and lipstick. I added a small outside pocket for my ID badge too so it will be just perfect. Thank you so much for sharing and making so many of us smile!
ReplyDeleteI have made my second wrist let and for me this time & very happy with the results So glad this tutorial is always available. Thank you for sharing and for the easy directions. The next project is the bag for my sister. Yeah!!.
ReplyDeletelovely! thank you so much for the tut!
ReplyDeletei´ll be back!
pami
Hi Ayumi, what kind of batting do you use? I want to make this so badly. please let me know, the name, or let me know to shop online, thank you so much, is it ok use cotton batting?
ReplyDeleteHi Sarah,
DeleteI used cotton batting!
Happy sewing! xoxo
This is just what I need for my Great niece, she is at the stage of wanting a bag like Granny this is very cute. Might also make one for my holidays much nicer than carrying a big bag everywhere.
ReplyDeletehttp://artesanatoeartesanato.blogspot.pt/2012/11/necessaire-patchwork-passo-passo.html
ReplyDeleteLove this! I made 3 in a weekend and then scaled it up and made a larger version too. Thanks for the great tutorial and I look forward to more :-)
ReplyDeletevery good your posting created a link for you on how to make PaP www.comofazerpap.blogspot.com
ReplyDeleteVery interesting! Thanks you
ReplyDeleteignature:
Jugar juegos de frozen en línea gratis, los nuevos de princesa de Disney juegos frozen - la princesa encantadora y linda. Divertirse frozen!
You’ve written nice post, I am gonna bookmark this page, thanks for info. I actually appreciate your own position and I will be sure to come back here.
ReplyDeletekids games online
friv 2
unblockedgames
un show mas
Fantastic articles is post by you in this blog. You give a nice thing. Thank you for such a nice article. Every word of this blog helps me to give detail to me.
ReplyDeleteVisit: jacket snowboard
I find your article very cognitive and meaningful. Thanks for sharing this information
ReplyDeletebody slim herbal original
fungsi body slim herbal
After you charge the Secret Key Sequence Invisible Camera for three hours, you are ready to start documenting. The system has a integrated vibrations method that will tell you when you when the unit is switched on, and when it begins taking movie, and still pictures. It won't tell you when you stop shooting movie, so you have to believe that it works.
ReplyDeleteBuy Cameras in Pakistan at Best Prices
A good blog. Thanks for sharing the information. It is very useful for my future. keep sharing
ReplyDeleteSignature:
i like play games happy wheels online and play happy wheels 2 games and agario , agar , fireboy watergirl
Thank you for perhaps the most level headed thing I have read today. I am sure there are many people who are faced with the same problems I recently had. I couldn't find Just look at the service http://goo.gl/PCirPs. Its pretty easy to use. I think you can get a free trial if you ask for it.
ReplyDeleteThis is the very first time I frequented your web page and thus far? I amazed with the analysis you made to make this actual put up amazing. Excellent process!
ReplyDeleteLicensed Money Lender