skip to main |
skip to sidebar
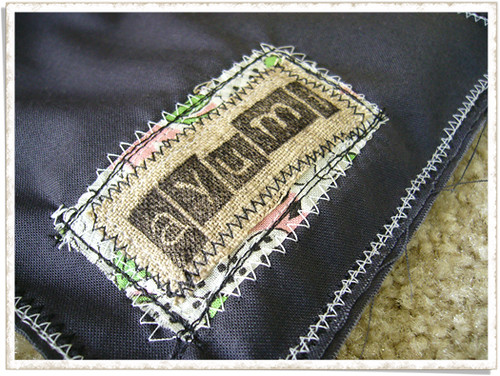
Loves2experiment over Oregon was so kind to mail me this sweetest
handmade gift: "ayumi" stamp. *smile* I truly love it.
I have been very interested in carving my own stamp using erasers
like she did. I've collected everything I need to start. This Japanese
stamp-making book, an x-act knif, and even a couple of big erasers
that are specifically made for carving stamps out of.
But the question is then, "why don't I begin?".
Well, I am quite terrible at drawing. Even just tracing seems
a little intimidating to me.
But thanks a lot to Loves2experiment, now I have my own
original name stamp that's way cuter than I would make
by myself! Woo hoo!!

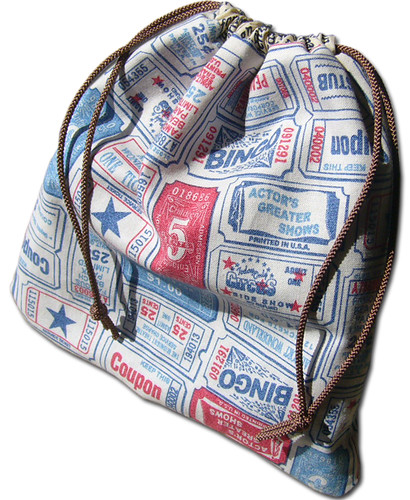
So I used the stamp to make this little "ayumi" bag.
It was quick. No lining. No patchwork. Not even caution to
sew neatly. This time I wanted to have fun with free-stitching.
It turned out pretty cute. I am using it to put some necessities
in including fruity gum, a chopstick, and dental floss.

Sometimes crazing sewing is fun.

By the way, thanks soooooo much for many nice comments
on my last post. I am absolutely grateful that you guys
like the tutorial and surprisingly some of you already
made super cute reversible patchwork bags!!!
You are super fast! And I love it!
Enjoy looking at..
Reversible Patchwork Bag by Hirono, Trina, Upstatelisa, PinkPaisely!
Fabric Baskets by Jane, Our Busy Little Girls, Gina, Cybele, Kalora, Tracy,
Jillian, Jacqui, Molly, Dawn, Handmaiden-Handmaiden,
AmandaJean, Kristinemhanson, Bec, Anna, Alice, Vera, Tracy in CT, MissyMack, Ali
Thanks so much! xoxo!!
Thanks for reading!

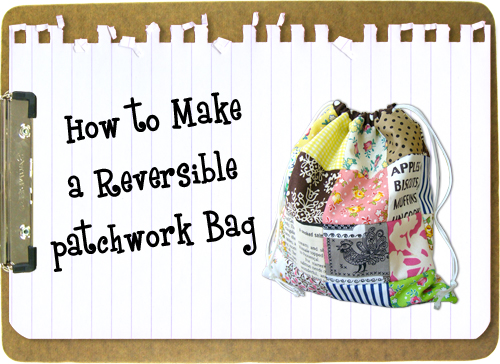
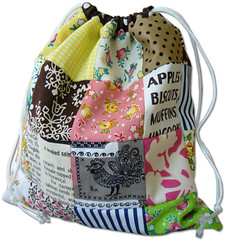
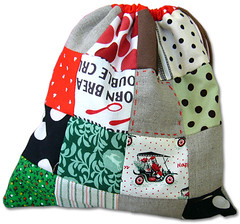
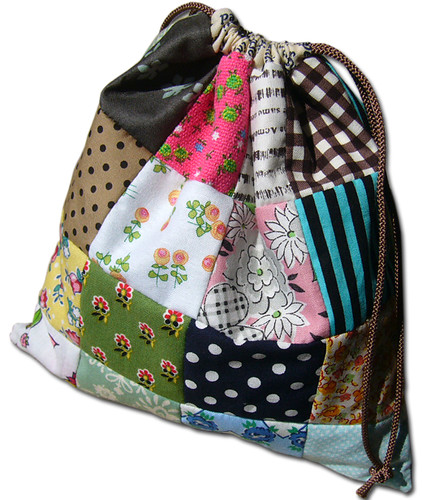
Something I've wanted to do really bad... A new sewing tutorial!!
It really makes me happy that you guys enjoyed my sewing tutorials
and made beautiful fabric baskets, camera cases, and pen cases.
My finding is that you like easy & quick projects like I do!
How about this reversible patchwork bags that are easy and quick
to make and can be lovely little handmade gifts?
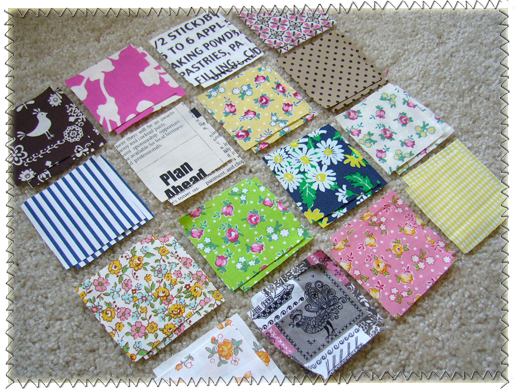
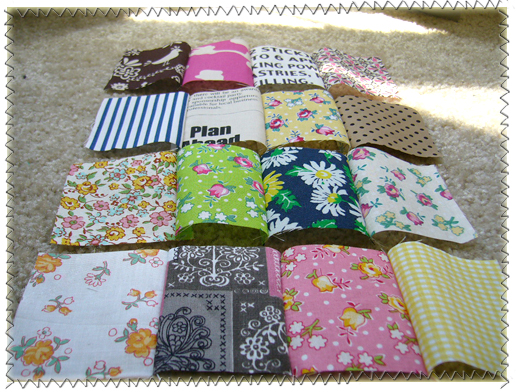
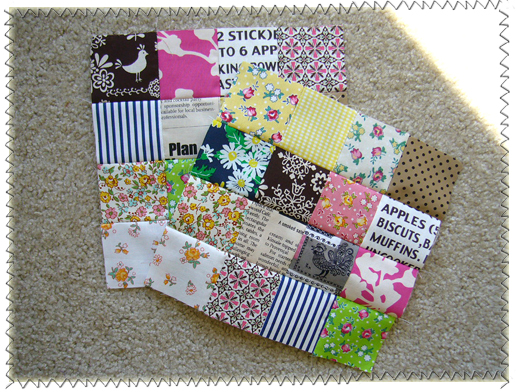
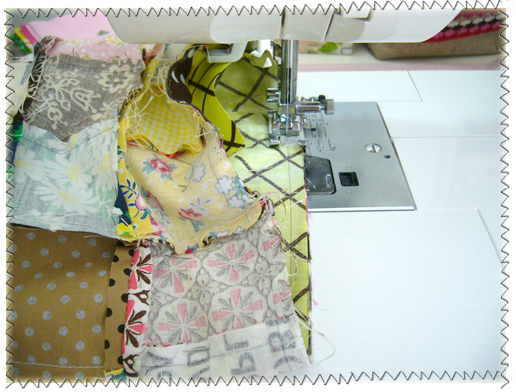
Cut out 32 of 2 1/2" squares. (I used 16 different kinds of
fabric, 2 squares from each different fabric)
Arrange to make 2 sets of 16 x 16 top layers.
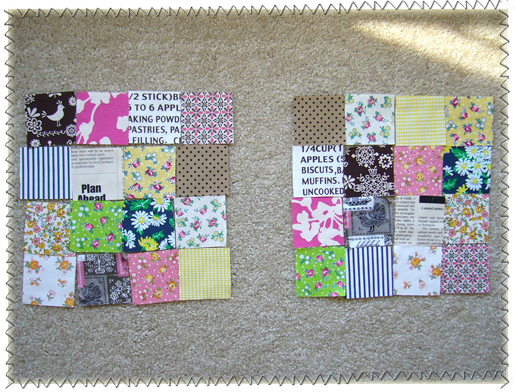
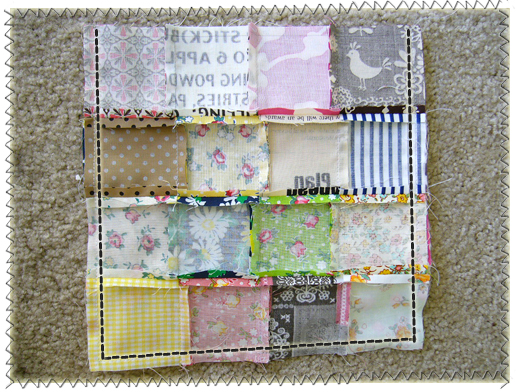
Sew each row consisting of 4 squares.
(Seam allowance: 1/4" throughout the process unless otherwise indicated)
4 rows completed!
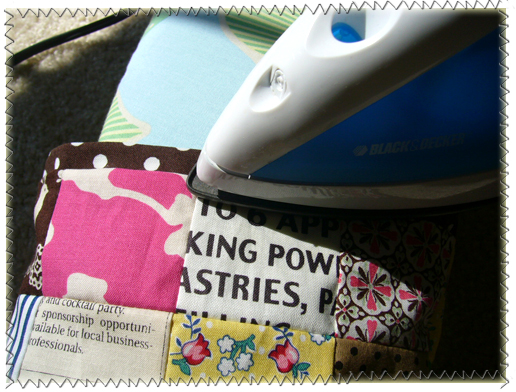
Press seams to one direction, making sure ones next to each other
are pressed to opposite directions.
Now let's sew all the 4 rows together.

Press seam open.
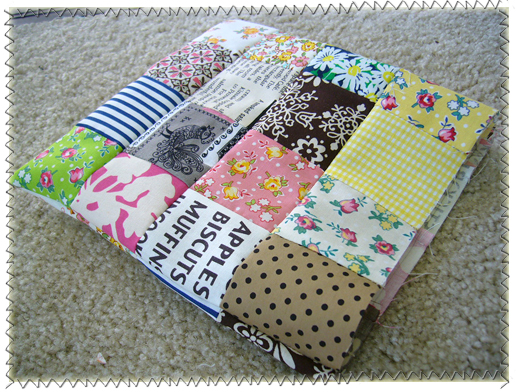
Do the same for the rest of 16 squares and now
you have 2 patchwork tops complete!
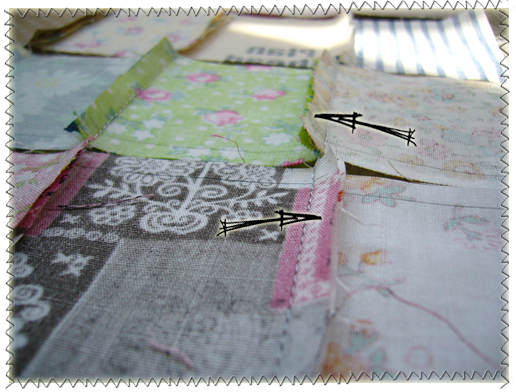
Sew them right sides together.

Cut out the bottom 2 corners.
Turn the bag out. Yeah! This is a fun part!
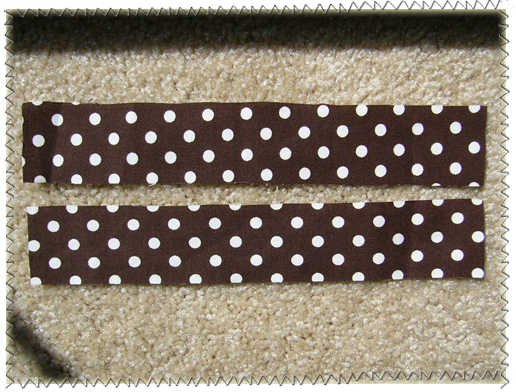
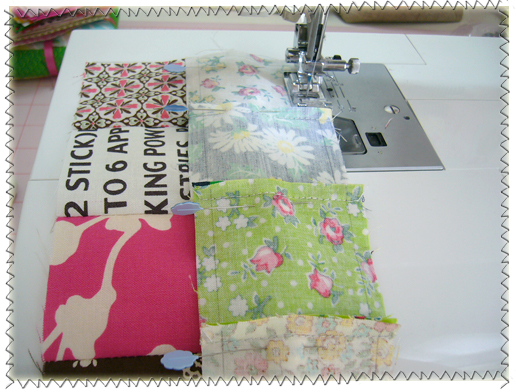
Cut out 2 pieces measuring 8 3/4" x 1 1/2".
These will be casing for cords.
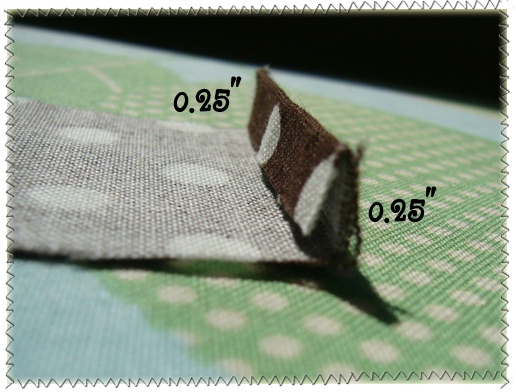
Fold the edges like this. Fold 1/4", press, fold 1/4" again, press.
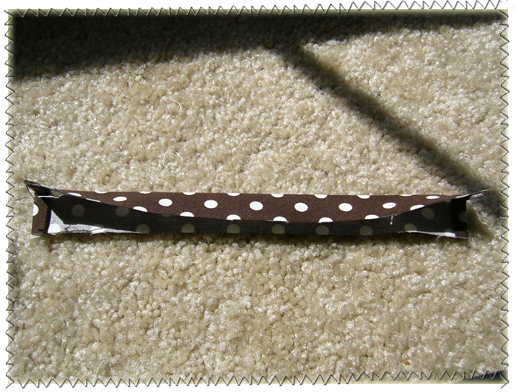
Fold the pieces in middle, wrong sides together and press.
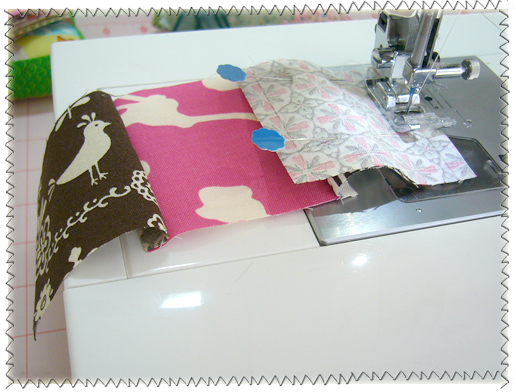
Sew them onto the top part of the patchwork bag like this.
(Sew very close to the edges.)
Cut out 2 squares measuring 8 1/2" x 8 1/2".
This will be a reversed version of the bag, so pick cute one!
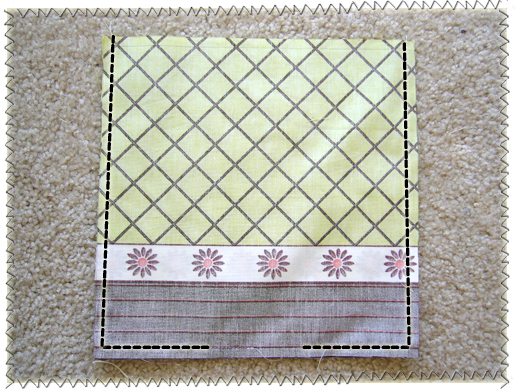
Sew them right sides together, leaving an opening in the bottom.
Cut the two bottom corners like you did with the outer bag.
Place the lining inside the outer bag, right sides together.
Sew the top edge so that the lining is attached to the outer bag.
Turn the bag right side out through the lining opening.
Then, press the top edge of the bag. Hand-stitch opening closed.
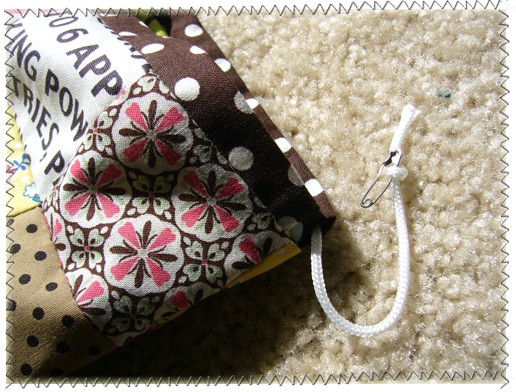
Prepare two 22" long craft cords. (can be found at Michael's)
Thread one cord through casing and knot ends together.
Thread second cord from a different casing opening and do the same.

Now your reversible patchwork bag is complete! Hooray!!
Enjoy making! And add your pictures of bags to
this flickr group and share with us, if you wish ;)
These bags will be listed in my shop tonight.
When buying these, tell me in the note to seller
that you came from this blog and receive a little
piece of cute Japanese fabric!
Thanks for looking!!

So glad I finally got to work with my sewing machine,
have this relaxing time to post, and say hi to you guys.
Sorry if I have disappointed any of you by not posting
in so long, but I was having a tough time trying to
get used to my new schedule here.
After going through all the crazy registering thing,
I made a decision to take 7 classes this semester.
The most classes I've taken in a semester in the past
is 4... Yes, I know it will be busy and crazy at times.
I don't know how much time I will be able to allocate
for my crafting and blogging (which I enjoy a ton), but
hopefully I'll get better at time management and
come here to say hi every once a while!
I just LOVE communicating with crafting people here!!!
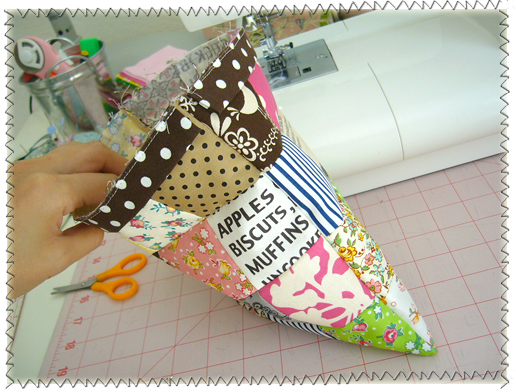
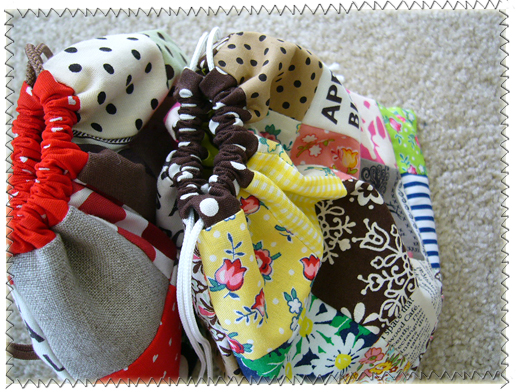
Oh so this is what I finished this morning (and now in my shop.)
I kinda wanted to work on something I am used to
and can be done very quickly. I missed making the
patchwork bag that I gave for my sister, so I
decided to make a similar one.
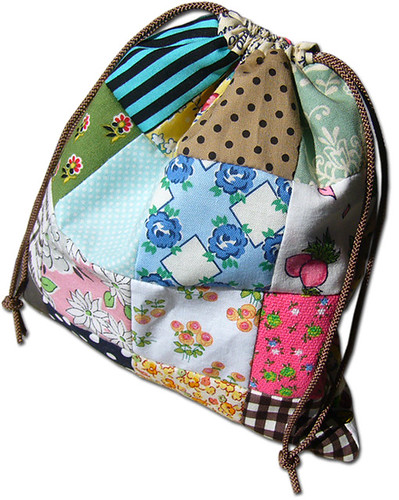
Piecing square patchworks is a lot of fun!
I used the same 16 kinds of fabric for the back and front
surface, but it gives a little different impression
depending on how they are arranged. Don't you think?
Most of them come from my fabric shopping trip in Japan,
and some of the others are vintage fabric that I adore.
I realized while working in process...
"Hey, isn't it going to be a reversible bag..?"
and yes it did come out reversible! Woo hoo!
Maybe next tutorial?..hmm...

By the way, thanks so much for joining this flickr group!
I smile looking at cute fabric baskets being next to
each other. If you've made anything based on my three
sewing tutorials, please feel absolutely free to join
and share your creations there!!
I have a lot of links to beautiful fabric baskets again today.
 Fabric Basket by Barbara
Fabric Basket by Wendy
Fabric Basket by the demanding doll
Fabric Basket by Knitter's Haven
Fabric Basket by Joanna
Fabric Basket by Happysquirrel
Fabric Basket by Sherri
Fabric Basket by Cybele's patch
Fabric Baskets by Nancy and her friends
Fabric Basket by Tozz
Fabric Basket By Amy
Fabric Basket by Julz
Fabric Basket by quilting canuck
Fabric Basket by Karen
Fabric Basket by Jo
Fabric Basket by Cinnamon Stitched Primitives
Thanks a lot for making fabulous fabrics and sharing!
Thanks for reading!


