Tutorial: Scrappy Hour Glass Blocks
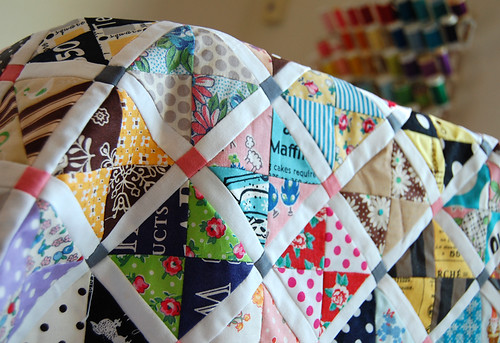 Hello everyone! Here is a virtual big hug for all of you lovely folks for coming back here after my longest blog break ever. I apologize for having being away for this long without giving you a heads-up (again!). I have been tied up with some project for the past few months, which is coming to an end now, so I will be back to my normal crafting and blogging schedule very very soon! I can hardly wait! You have no idea how much stuff I have on my to-blog-about list now. I have so many things I want to talk about and share you with, but for today,I have a super simple scrappy hour glass block tutorial for you.
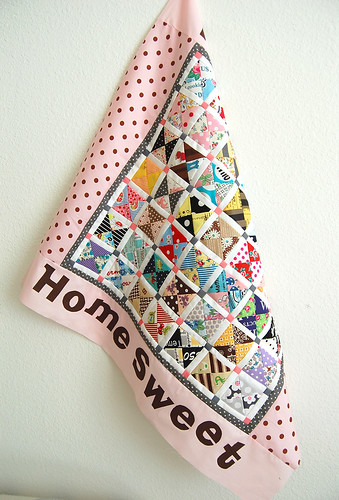
Do you remember this quilt top? I started working on this about a year and a half years ago with no plan ahead. I just had so much fun playing with my precious scrappy fabrics and hoped they would inspire me to make something with them.
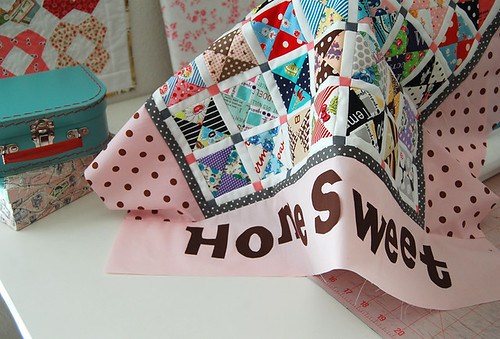
I remember this project being very pleasing partly because it didn't turn out to be too busy (at least I think so, hehe!) I love scrappy look so much, but when my scrappy project is big in scale, I tend to worry that it would be too busy for my eyes. I added solid sashing between each block, which I think helpedto offset the craziness. And the little square blocks are added fun ;)
Just like what happens to many projects of mine, it was side tracked by other projects and months passed by so I haven't made a progress since then!When the sweet, talented friend Rachel of Stitched in Color contacted me last year if I could participate in Scrap Attack she is hosting,I immediately thought of this idea of revisiting this quilt top for it. I got it out of a zip lock yesterday and it had its first fresh air in Japan.Thanks to Rachel for giving me this opportunity! Now I actually want to finish this quilt.I always appreciate this kind opportunity that gives me a littlepush to go back to my old projects and actually finish them.
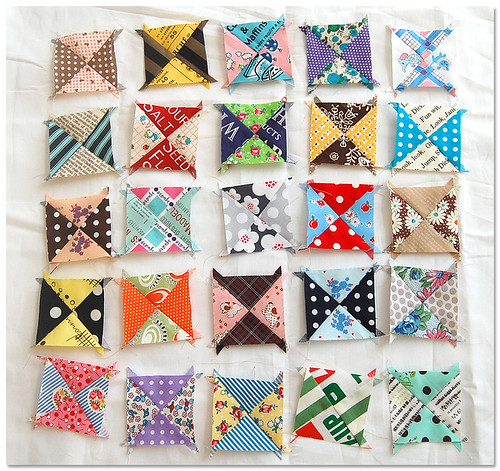
This tute might be a bit too simple, but I hope this will inspire some of you to turn your scraps into teeny hour glasses and hopefully do something with them! Each block finishes at a 2 1/4" square. Yup, it's teeny tiny, so these have potentials to be used for some small patchwork projects too!

Two squares, each measuring 3 3/4" x 3 3/4".

Cut from one corner to the other corner.
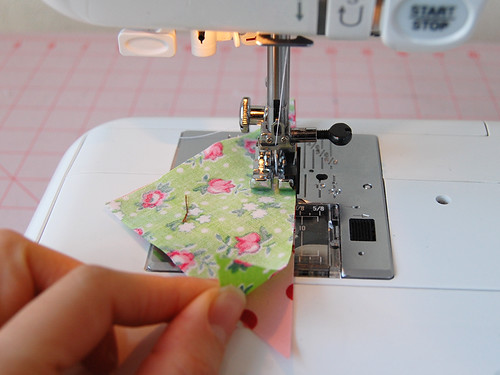
Take one of each triangle and sew along the long edges like this.(1/4" seam allowance as usual ;) )
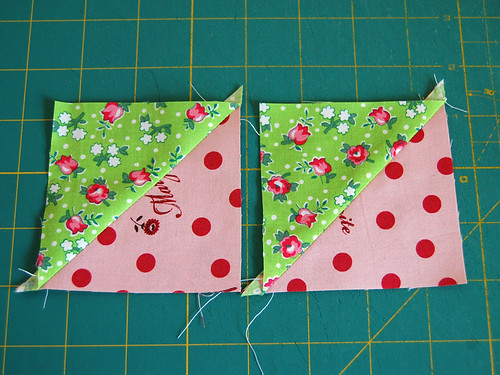
Press seams to one side (same side for both.)
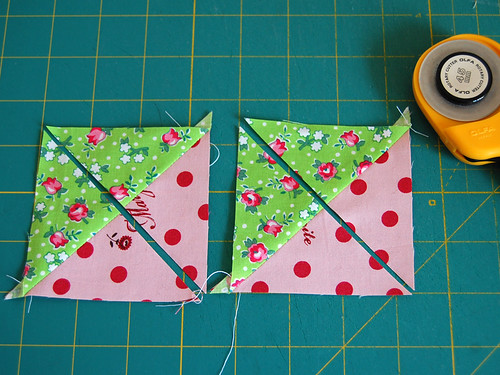
Chop!
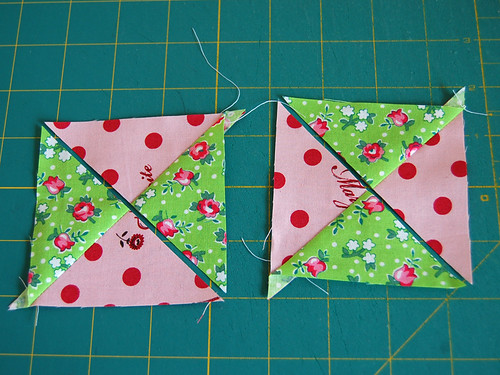
Trade between the two!
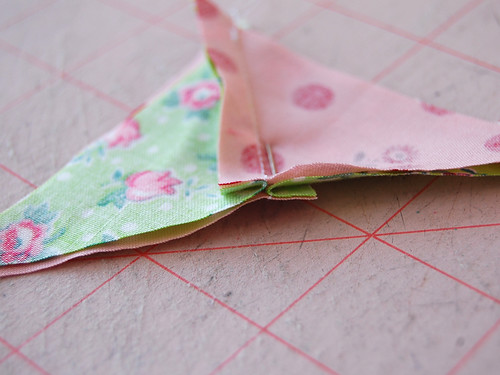
Now to sew this bottom edge.
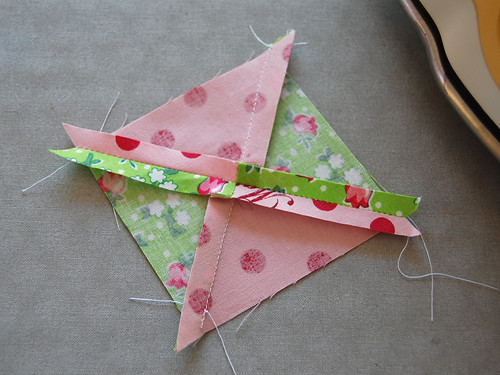
Press seam open.
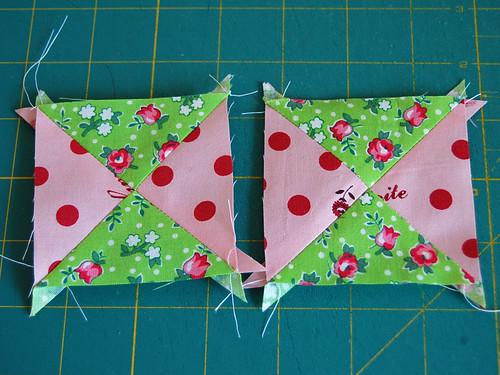
Now you have two hour glass blocks, each measuring a little larger than a 2 3/4" square.
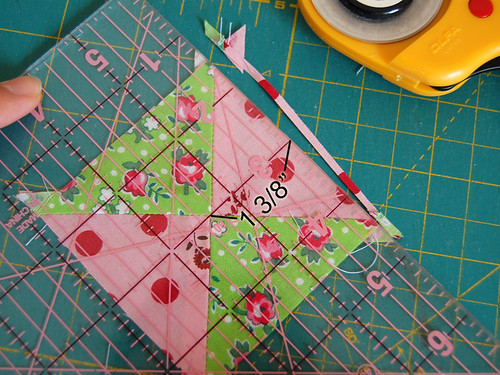
We want to trim down each square to be a 2 3/4" square. (1 3/8" from one edge is the center point.) Cut off the excess.
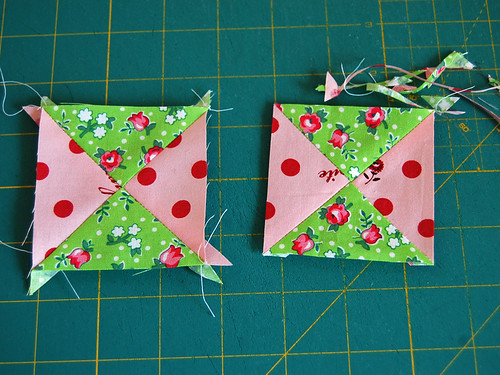
The one on the right hand side is done.Repeat the same process for the remaining block too.
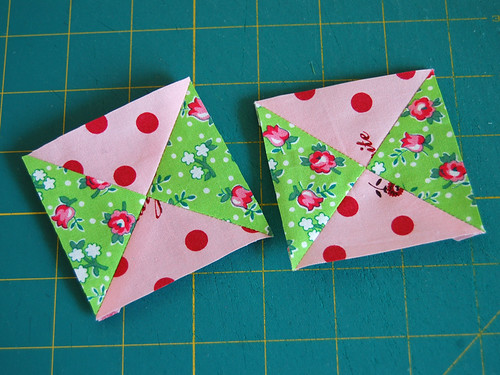
Now they are clean and pretty ;)
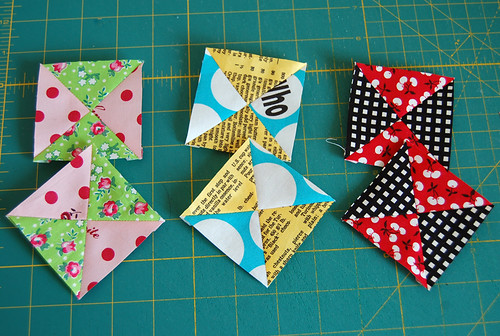
It's quite addictive!
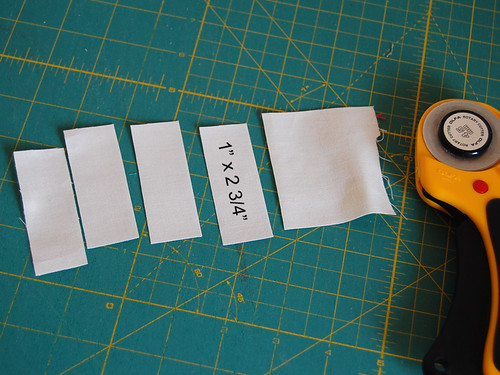
We'll need some 1" x 2 3/4" strips.
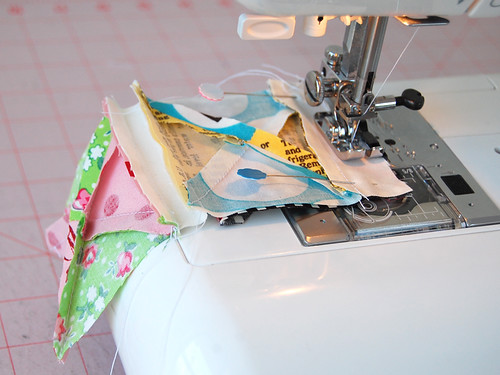
to join blocks to make a row.
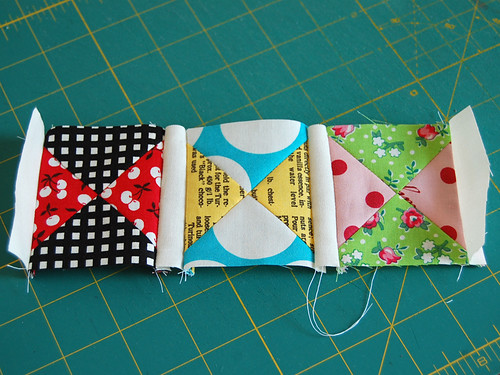
Here I have the white strips sewn at the short edges of the panel,but you can choose to do that part later. Completely up to you.
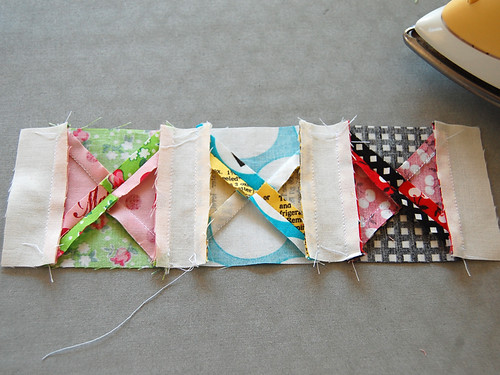
I like to press seams this way.
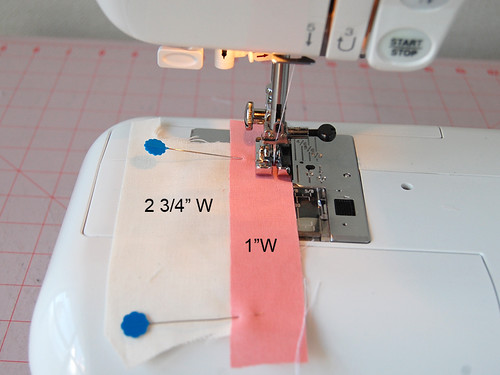
To make a sashing that comes between rows, we'll needsome strips with a little colored block attached.Here I am sewing together a 1" wide pink strip anda 2 3/4" wide white rectangle. (Don't worry about length of each fabric.)
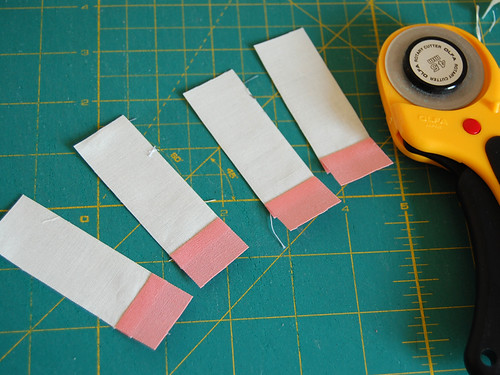
After pressing seam to the colored fabric side, chop it offto create some 1" wide strips like this.
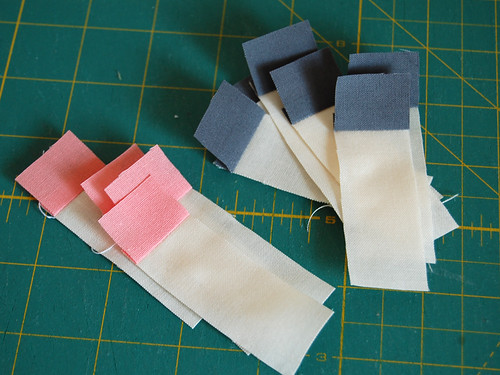
And repeat the same process with grey fabric.
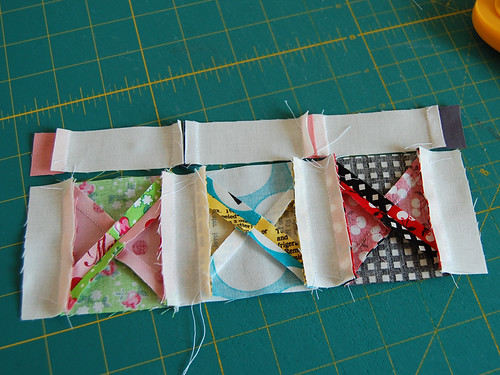
Here is to show you how I pressed seams on the sashing. (I made the sashing by sewing three strips and a 1" square at the short end.)

Sew along the edge.
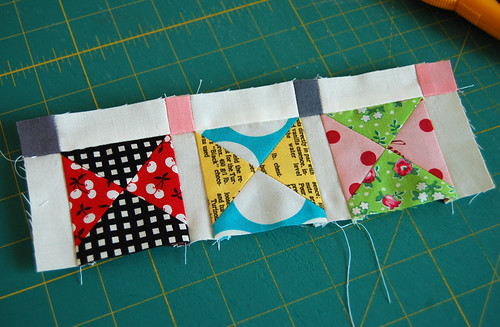
Tada! Here is the beginning of the scrappy quilt.

If you would like to make a similar mini quilt, here is a measurement of my quilt. I have 49 hour glassblocks with sashing between and around them.I added a 1/2" wide border and then finished with a 4 1/4" wide border.This quilt measures a 32 3/4" square - a nice size for a baby quilt?
I would be thrilled if this tutorial could inspire you toplay with your scraps! If you are feeling scrappy, don't forget to stop byRachel's blog and Scrap Quilt Attack Quilt Along Flickr pool tocheck out everyone's scrappy projects - so inspiring!!
I'll be back next month and have tons of stuff to share with you!Hope you are all having a nice week ;)


Ohh! This is lovely, I would love to use my scraps for this. Welcome back Ayumi x
ReplyDeletemuy bonita la clocha yes una manera de aprobechar los restos de telas .
ReplyDeleteSaludos Begoña
Hi Ayumi, it's always great to hear from you! And thank you for another great tute :-)
ReplyDeleteThis is adorable A, and a great tute! If only my scraps were as pretty as yours. Looking forward to hearing more about your other projects! Jxo
ReplyDeleteThis is really beautiful - thanks Ayumi xxx
ReplyDeletePS Missed you!
Great to have you back! we've missed you!
ReplyDeleteFabulous quilt - you have such a wonderful eye for colour!
Great work!:)
ReplyDeleteGood to have you back Ayumi, that is a sweet mini, looks like Spring!
ReplyDeletegood to see you!
ReplyDeleteyou know I'd be just as happy if you blogged about the weather or your everyday shopping when you are doing secret projects!
lovely... I love anything to do with scrap. TQ for the tutorial
ReplyDeleteLooks great, nice to see you back :o)
ReplyDeleteWhat a fabulous tutorial!
ReplyDeleteWelcome back! I love this quilt, I might just have to give it a go!
ReplyDeleteThanks for sharing, it's so beautiful!
ReplyDeleteIt's good to have you back!
ReplyDeleteThanks for the great tutorial, it's very inspiring, as always!
Welcome Back,
ReplyDeleteWhat a beautiful quilt.
Fleur xx
What fun colors! It's so beautiful!
ReplyDeleteWelcome back, Ayumi! :) I was wondering where you have been.
ReplyDeleteThank you very much for a great tutorial as always. :D
Hello Ayumi! This is a perfect job!!!! So beautiful!!! A Big Kiss!!!! Leia Joaquim
ReplyDeleteSo cute Ayumi. Glad to have you back! :) xo
ReplyDeleteOlá, adoro os seus trabalhos!
ReplyDeleteObrigado por compartilhar, o tutorial está ótimo.
Bj
Roseli
dedodemoçapatchwork.blogspot.com
Beautiful little quilt and great tutorial :-) Welcome back, you were missed!! x
ReplyDeletehola guapa,que bonito te quedo,gracias por compartir,
ReplyDeletebienvenida,besos
i correo es lascosasdeeni@gmail.com
ReplyDeleteOlá Ayumi, lindo seu trabalho e inspirador, parabéns, Deus te abençoe mais e mais!
ReplyDeleteBjs!
Hello Ayumi! So nice to see you again in my reader. I have missed your lovely posts. Thankfully you are back with one meaty enough to hold me over until you resume your regular blogging schedule. In the meantime, good luck with wrapping up your project. :-)
ReplyDeleteYea! A new tute from Ayumi!!! Welcome back....
ReplyDeletebtw...I am taking a Curves Class from your friend Rachel, and what a wonderful job she is doing. No wonder you guys get along - you are both so very detail oriented.
Hello! Nice to hear from you! Thank you for the great tutorial, it looks fun, but I think my patience would only be enough for a small project like a pillowcase. :-) All the best for your projects!
ReplyDeleteFabulous quilt!
ReplyDeleteGlad to have you back!
Thank you very much for a great tutorial!
Ione
Como siempre tus tutos son geniales!!!
ReplyDeleteGracias por estas estupendas fotos :)))
Un saludo
My favourite quilt! I'm so glad it's back. I was digging through your scrap bin the other day and came across a whole bunch of these little squares! Miss you!
ReplyDeleteI added this little quilt top to my flickr favorites ages ago, so I am thrilled to see your process for it's creation. I so love this! I so want to do one! Thank you!
ReplyDeleteCome sempre i tuoi tutorial mi mettono allegria e voglia di fare. Bravissima!!! un saluto
ReplyDeleteAdorable! Thanks for the super clear tutorial - I love the end product! Too cute!
ReplyDeleteAyumi, thank you for tutotial! every time I think - those pices are so small!! how to deal with them? :)
ReplyDeletesure they are pretty!
I'm glad to read you again!
hugs from Russia,
Masha
Hallo from Germany! Wow, what a fine, great work, you've done! Nice, that you are back!!!
ReplyDeleteYour blog was one of the first blogs I saw, when I started do swim into the big bloggerworld ;)
liebe Grüße, best whishes, JULE
I love your project - it's absolutely gorgeous! You've got unique sense of color - I wish I could sew like you:)
ReplyDeleteI am so happy that you are back! I am in love with your scrappy quilt....I think I will give it a go....and hope that it turns out as pretty as yours...Thanks so much, yet again, for the inspiration...Your art is so full of joy!
ReplyDeleteSusan
Welcome back! I have missed you. I can't believe you would make all those QST blocks. They are my nemesis, and yours are perfect. That little scrap buster quilt is perfect and beautiful, like all your projects.Thanks for sharing the mini tute
ReplyDeleteI'm so happy that you are back and blogging!
ReplyDeleteWhat a wonderful tutorial!
Can't wait to see what else you've been up to!
Hello Ayumi, very pleased to read your blog post again! Wonderful project!! I recently bought 'Zakka Style'- so happy to see you in there. The little girl looked so gorgeous in your pretty frame, was that you as a child? Love her beautiful little dress too! Who made it?
ReplyDeleteI love it Ayumi!! Definitely something I am going to keep in mind for all those scraps of mine!
ReplyDeleteMy goodness...such a pretty new pattern from you!
ReplyDeleteI can't wait to see what everyone makes with it ;)
So cute. Wow, those are teensy. You have such fun fabric!
ReplyDeleteLovely, Ayumi! Glad to have you back!!!
ReplyDeleteLovely to have you back.
ReplyDeleteSo glad you're back, dear! Thanks for another lovely tute! It's always great to find things to do with our small but precious scraps...
ReplyDeleteLovely to 'see' you and your beautiful work again, Ayumi. I am so happy you want to finish this project. It is so much fun. I love the sashing and cornerstones - it's a great way to keep those tiny scrappy blocks as individual gems. Thanks for sharing!!
ReplyDeleteThanks is so cute , pretty .
ReplyDeleteSo glad to have you back -- and with another great tutorial!
ReplyDeleteHave a lovely day, and thanks for sharing your lovely work with the world.
Lovely,süperrrrrrrrr
ReplyDeleteThis comment has been removed by the author.
ReplyDeleteThis is great! I love the little tiny colored squares! They really make it pop!
ReplyDeleteHi Ayumi, so happy to hear from you!
ReplyDeleteMyrto
Great you're back!!
ReplyDeleteHello Ayumills, I couldn't wait to see a new post from you! Your works are so beautiful!
ReplyDeleteCongrats!!!
Big hugs and Happy New Year!!!
sandra
¡¡¡Very Sweet and wonderful colors, Beautiful. Thanks for Great Tutorial¡¡¡
ReplyDeleteThank you so much for sharing, Ayumi! Another great idea to tackle some scraps just lying around.
ReplyDeleteIt's so nice to have you back ~ I've missed your posts. Glad to know it's because you've been busy!
ReplyDeleteLove this little block ~ so simple and sweet ~ I've got just the fabric for it! thanks so much for the tutorial.
Ayumi, this is such a cute project! I will definitely enjoy pulling some favorite scraps to shine in a little hourglass project like this!
ReplyDeleteCute quilt! Thanks for the tutorial. It's always nice to see how people press things, too.
ReplyDeleteWelcome back! Can't wait to hear about your project!
thanks for the great tutorial :)
ReplyDeleteHi Ayumi,
ReplyDeleteI am so pleased youe back I have missed you.
City Krafters
I love it Ayumi! I think the sashing is a great idea and really gives your eyes a place to rest and the hour glass blocks stand out! Total scrappy goodness!
ReplyDeletethank you for inspiration and the tutorial.
ReplyDeleteThat is gorgeous! thanks for the tutorial, maybe one day I'll have enough patience to try : ) Glad to see you posting again.
ReplyDeleteThank you so much for this tutorial. This little quilt is just yummy.
ReplyDeletei love your bright, happy, scrappy quilt. thank you for sharing it.
ReplyDeleteI gasped when I saw your newest project! Thank you for the tutorial, I can't wait to try it.
ReplyDeleteyes lovely to have you back Ayumi, and what a great start with this adorable quilt! fantastic. Jessie, xo
ReplyDeleteHi Ayumi, great having you back on the blog . . . just love your new project . . . thank you so much for the tutorial. Happy New Year, Cheers SuziQ
ReplyDeleteAyumi!!!!! I fell in love with your little blocks way back when and now that I see what you're doing with them, I love it even more!!!! It's absolutely beautiful!!!! Thank you for the tutorial!!
ReplyDeleteAAAhhhh your back. And with a tute too.... So nice to have you back blogging! Can't wait to see what you've been up to. :)
ReplyDeleteI just found your blog recently...and it has been refreshing! Love your fabric and style.
ReplyDeleteI'm glad to see you back online blogging too!
ReplyDeletexoxox Cyn
Yipppppppppeeeeeee! So glad to see you are back! Thanks so much for the tutorial too. Getting ready to pin it on Pinterest now :) Virtual Hugs from Me :)
ReplyDeletePreciosos trabajos y tutoriales espectaculares, te has ganado una sorpresa en mi blog, puedes ir a recogerlo. Gracias por tus enseñanzas.
ReplyDeleteYour tutorials are great, like your blog. I love it! thank you very much.
ReplyDeletegiesta-giesta.blogspot.com
Have just found your blog, you are very generous with your tutorials.
ReplyDeleteI need inspiration, have had a slow year stitching wise. This scrappy quilt is just the ticket!
PS your fabrics are beauitifulx
Wow this is a great tutorial Ayumi, thank you! I don't know how I missed it before. As always your work is beautiful!!
ReplyDeleteThis type of scrappy look so pretty.It some extraordinary work.It look so fabulous.It really wonderful idea to stitch on the fabrics.
ReplyDeleteelectric scooters
Your tutorials are so great! thanks a million for sharing them. You're a great inspiration in both creativity and generosity.
ReplyDeleteThis is soooooo cute!! thank you for the print friendly button!
ReplyDeleteSo nice to see you back!
How lovely to see you! And what a great tute...
ReplyDeleteHi Ayumi,I'm so happy to see this tutorial. I loved the quilt when you first
ReplyDeleteshowed it on your blog. I already have 14 blocks done, and I've neglected 2 baby quilts I'm working on. I wish you much happiness on
your move back to Japan. Glad to see you back on your blog. I really
missed reading it and love all the inspiration you provide.
Irene in OHIO
Thank you Irene! It is really nice to be back on my blog!
DeleteI'm so happy to hear you are using this tute to make your blocks! I'd love to see them ;)
Random question for you, are you on Twitter on Pinterest by chance? If so I would love to follow you there too :-) Twitter: https://twitter.com/#!/SmilieMommy & Pinterest: http://pinterest.com/smiliemommy/ and I think my pic will take you to my blog, nothing, not even close to like yours yet though :-)
ReplyDeleteQUEDAN PRECIOSOS!!!!!!!!
ReplyDeletePERO QUE PACIENCIA...
SALUDITOS
Hi! I just wanted you to know that I pinned this quilt on Pinterest and in the last two days and in that time it has been repinned about 30 times!! It's a great quilt!!
ReplyDeleteThank you so much Helen for letting me know that! I'm blushing!
DeleteThis comment has been removed by the author.
ReplyDelete