


Thanks so much for lots and lots of sweet comments
encouraging me to write up a tute for the tissue box cover
and I'm sorry I couldn't catch up with you guys sooner.
I had some other projects to wrap up and school kept
me pretty busy for the past few weeks. But here I am back
with the tutorial for a super easy + quick reversible tissue box cover!
Hope you'll enjoy.... ;)

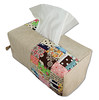
***Fabric Measurements for a tissue cover that will
fit on a tissue box including Kleenex 200 ct.***
Exterior
Eight 7 1/2" x 2 7/8" pieces
Two 5 1/2" x 4 5/8" pieces
Interior
Two 7 1/2" x 10" pieces
Two 5 1/2" x 4 5/8" pieces
(1/4" seam allowances included)
***Other supplies***
elastic strip (3/4 wide, 5 1/2" long)
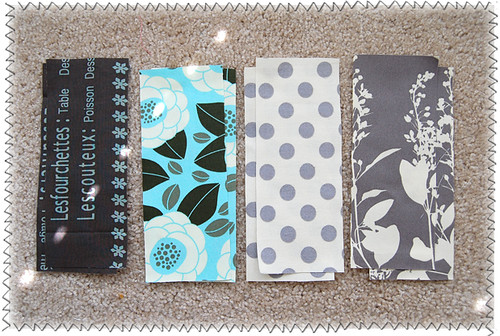
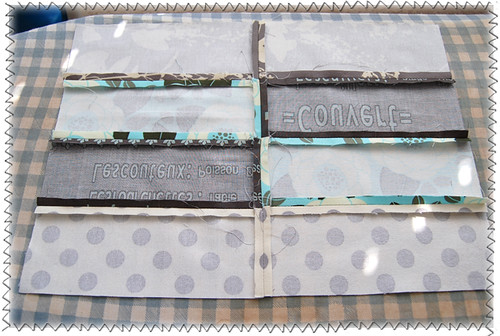
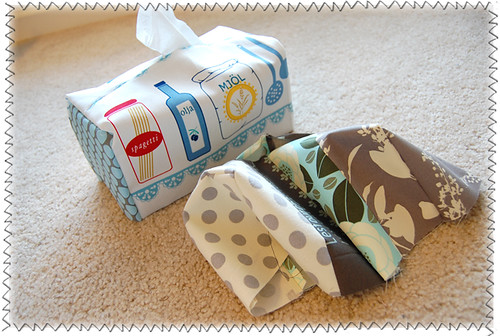
Let's cut out eight pieces for the exterior cover.
I chose 4 different fabrics, two pieces from each.
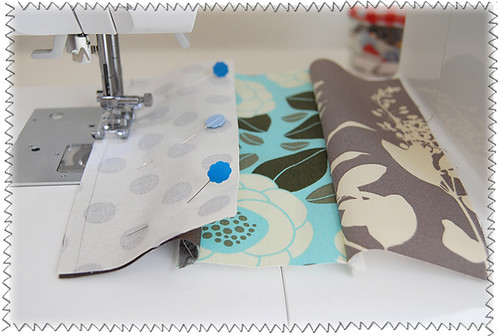
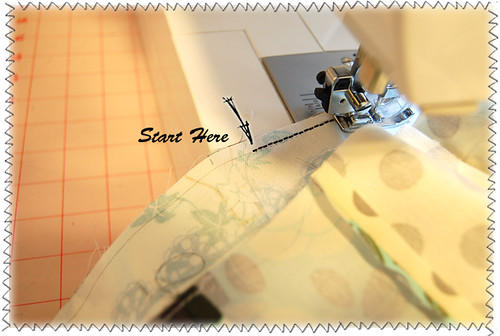
Now with right sides together, sew four
pieces together, aligning long edges.
Repeat it with the rest of the four pieces
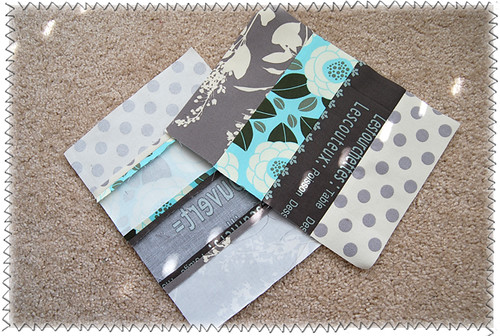
and press seam open. Now you have two patchwork panels.
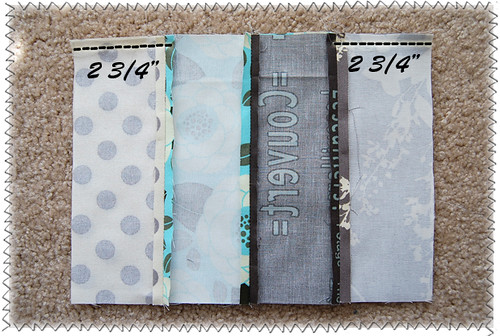
With right sides together, sew the top edge just 2 3/4"
for left and right sides leaving a big opening in the middle.
(Remember to backstitch at the end toward the middle.)
Press seam open, including the middle part which you didn't sew.
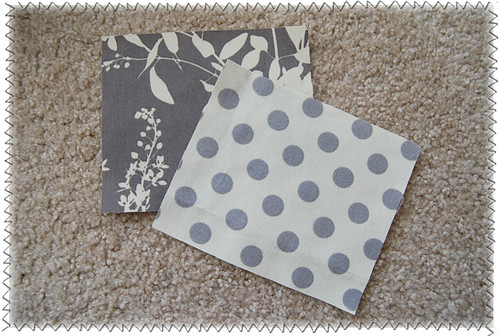
Now let's work on the sides of the exterior
cover. Cut out two pieces of fabric according
to the dimensions given above.
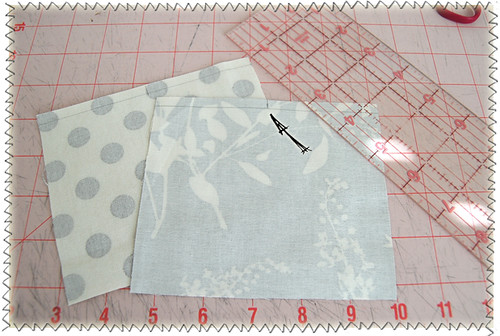
For each piece, make a little mark in the center in the
top edge which you can measure 2 3/4" from one side.
Match the mark on the piece with the center
of one of the long edges of the main panel.

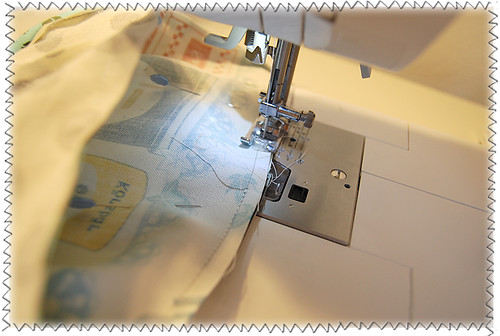
Sew the top edge of a side piece onto the main panel.
Make sure to backstitch before you reach the seam
lines on the sides.
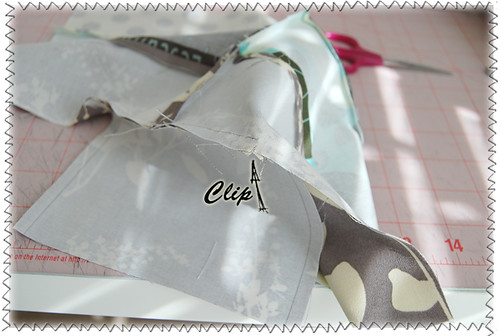
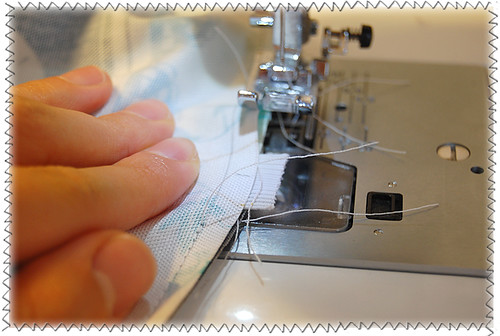
Clip into the seam allowance but make
sure not to cut beyond seam lines.
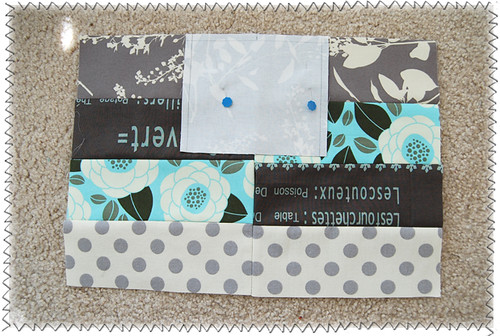
Do the same for the other side of corner.
(This makes the next step 10 times easier!)
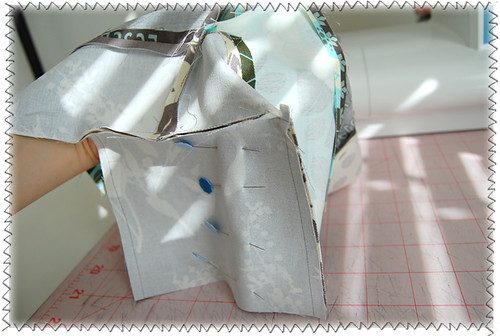
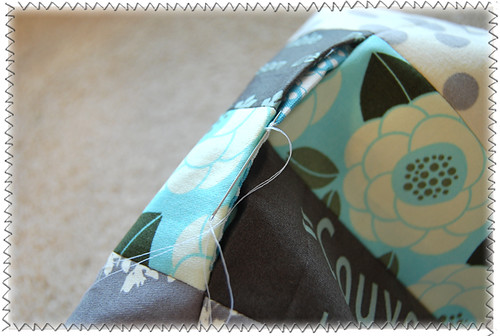
Align the right edge of the side piece and
the main panel like this and sew them together.
Repeat it with the left edge of the side piece
so that one side of the exterior cover is complete.
(Important note: Make sure to trim the top corners
as depicted in the photo. Doing so makes the tissue cover
less bulky.) Now, repeat to sew the other side to
the exterior cover.
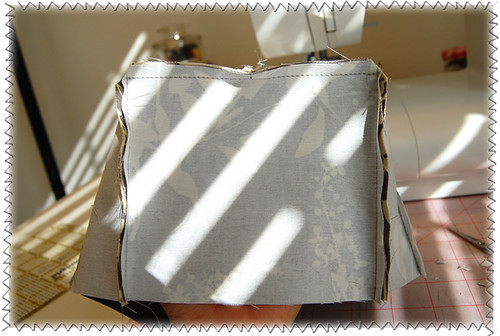
Hooray! The exterior cover is completed!
Let's now move onto the reversed side!
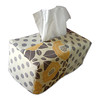
It would be perfectly fine if you choose to make patchwork
panels for the interior just like you did for the exterior,
but here I am simply using two panels cut out from just one
fabric just because I felt a little lazy. Forgive me ;)
Complete the interior cover in the exactly same way as the
exterior cover (in this case, excluding the patchwork part.)
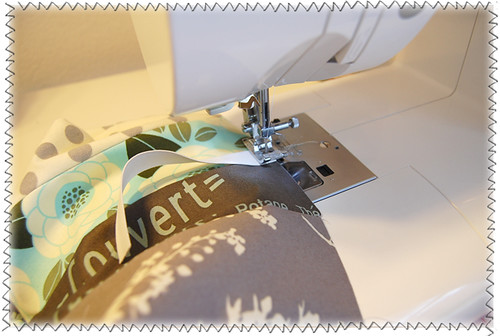
In the center on one of the long edges of the exterior cover,
Baste a strip of elastic, very close to the edge.
Make a mark in the center of the other long edge.
This will be a reminder for you to sew the other
side of the elastic strip in between.
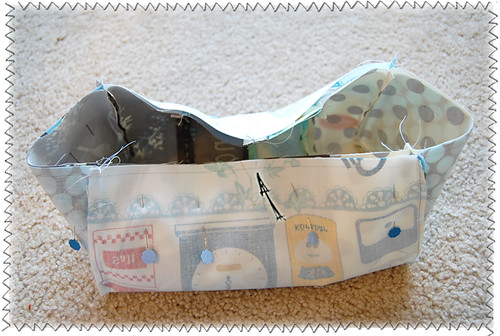
With right sides together, align and pin the the exterior and the interior.
Sew the bottom edges, starting from the point about
an inch away from the mark you just made.
When you're about to reach the mark, backstitch
about an inch away from the mark so that you have
two inches wide opening centering the mark.
Yup, Exactly. You don't wanna forget to attach the
other short edge of the elastic to the bottom! Using your fingers,
pull out the short edge of the elastic, place it
between the covers, and sew it up in place.

Turn the cover inside out and topstitch at the bottom.
Lastly, hand-sew the top part of the cover, connecting
the openings of the exterior and the interior.
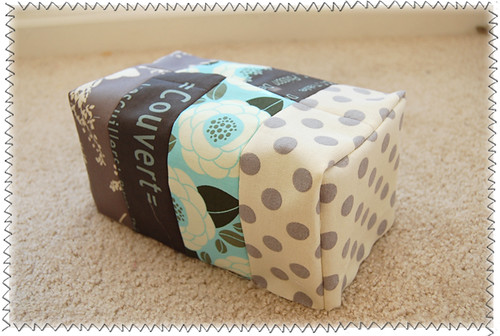
Then your reversible tissue box
cover is complete!!! Woo Hoo!!

This cover will fit on a tissue box measuring 8.2" x 8.4".
(Kleenex 200ct, the most standard one that I found
at Walmart, will be perfect for this cover.)
I'll go and get other standard tissue boxes including
the cube one and come up with dimensions to make
tissue covers for them later, and share with
you the dimensions here.
I totally agree with some of you who told me that
it's so hard to find a tissue box at stores that
will match well with your rooms. It's just a tissue
box, but it make a pretty big, nice difference
if the one in your room is covered in the color/
design/pattern that you love to look at.
Trust me on this one!
Like some of you said, I think this will make a
great holiday gift. How about making a reversed
side a holiday pattern? ;)
When you make reversible tissue box covers,
Take a photo and share your tissue box covers
in this flickr group!
I'd also love it if you could let me know what you think
of this tutorial in the comments too!
Thanks for coming and reading!!


Thanks so much for posting this! :)
ReplyDeleteLooks great. I just made the patchwork drawstring bag, and I love it. Thanks for taking the time to put these together!
ReplyDeleteThank you for your tuto!!!
ReplyDeletenice and easy! thanks for the tutorial, can't wait to make my own cover :D
ReplyDeleteThis comment has been removed by the author.
ReplyDeleteAwesome! I love your style of tutorial - really clear and simple. I keep coming back to your blog as a result :o) Looking forward to the next
ReplyDeleteThanx a lot for this great tuto!
ReplyDeleteThank you so much for this. It's going on my short list of projects--it's wonderful. Love your blog!
ReplyDeleteSo fun! Thanks for sharing - I'm going to make some for my parents who are always blowing their noses. The "woohoo" penguin at the end of your tute is adorable.
ReplyDeletethank you for sharing another great tutes! very practical!
ReplyDeletecreates more! you rock the sewing world!
So cute and clever. Thank you - I love tutorials!
ReplyDeleteVery nice! Thank you!
ReplyDeleteSusette
So pretty!!! I posted a link to your tutorial on Craft Gossip Sewing: http://sewing.craftgossip.com/tutorial-make-a-patchwork-tissue-box-cover/2009/07/03/
ReplyDelete--Anne
Wow, this is beautiful! Thanks so much, I'll be linking.
ReplyDeletegreat idea! i love new ways to show off more fabric!
ReplyDeleteWhat a great tutorial, I will have to try this!
ReplyDeletethank for the tutorial...u make sewing easy and fun... really thank u...
ReplyDelete...and lovely fabric...
you are SO AWESOME for sharing this tutorial! I love visiting your blog!
ReplyDeleteI'm starting to prepare for the holidays (yeah, when you like to give handmade--which are always the best gifts!- you start in the summer!) and I definitely think this would be a charming and useful gift!
thanks!
Thank you so much for the tutorial! After I posted a comment about making one for my mom, I realized that I didn't know how! :-)
ReplyDeleteMy machine is being serviced right now, so I hope to make this before we move to Mozambique in two weeks!!
I was getting ready to alter your basket pattern (I've had for awhile) to make a tissue basket, but I just found this! I am psyched. Thanks!
ReplyDeleteYou are really great I love your tutorials, Thanks for sharing.
ReplyDeleteGreat idea especially the elastic underneath the tissue box to keep it from falling out when picking it up. I will definitely try this tutorial and give it as a gift to love ones. Thanks so much!
ReplyDeleteJackie
Thanks everyone! I would LOVE to see your tissue box cover in the flickr pool once you make it!
ReplyDeleteThanks for your tuto, it's very nice. I write from Italy and unfortunately I'll need to convert all the measures in cm before starting the project.. Be sure I'll do my best... Bye, Aggy
ReplyDeleteWhat a neat idea. Thanks so much for the step by step.
ReplyDeleteHappy Creating,
Heather
http://nightdreamer_371.bravejournal.com
HEY! I made this, and it turned out AWESOME, I love it. I posted pix and a link to this tutorial on my blog. I LOVE PINK PENGUIN tutorials, by the way! Keep it up and THANK YOU!
ReplyDeletehttp://lovinmycrazylife-melissasue.blogspot.com/2009/11/these-things-make-me-happy.html
genial merci a toi jojo
ReplyDeletelovely! thank you :)
ReplyDeleteI just discovered your blog today when I saw this. It's SO hard to find tissue holders for this size box, so this is great! I'm going to have to make some for my bathrooms once I get them painted. Thank you!
ReplyDeleteThanks for posting this tutorial! Indeed it's rather easy to follow and I love it!
ReplyDeleteI'm going to make one of these today for a bridal shower gift. Such a great idea...thank you for sharing the instructions!
ReplyDeleteVery lovely!!
ReplyDeleteThank you for this tutorial! I made one today and I am planning on making a few more!!
ReplyDeletethis can be very useful for me since I tend to buy many tissue boxes and I don't like the cover of those ugly boxes, I will make a beautiful cover for my tissue boxes, thank you a lot!
ReplyDeleteGreat post and really wonderful tutorial! Thanks so much for posting!!
ReplyDeleteHi!
ReplyDeleteI was so glad to find your blog and especially this tutorial. He is great and I loved your cover!
I was looking in stores and didnt like the few I found ...
I've made two for my home.
If you want to see them look at http://omeuladocraft.blogspot.com/2010/10/capa-para-caixa-de-lencos.html
Congratulations and Thank you from Portugal
Hi! I found your blog and I'm so glad...this tutorial useful....claws itch to get to work...:)uhhh... thanks You!
ReplyDeleteRegardes from snowy Latvia
I love this idea, making a mundane, but necessary, item look like it belongs in a room by coordinating the fabric with your room design. And having the option to change it is a great bonus. And it can be done with scrap fabric! Great idea.
ReplyDeleteThank you for this great tutorial! I loved making mine...
ReplyDeletehttp://creadientje.wordpress.com/2011/02/01/omkeerbare-tissue-doos-hoes/
I love this tutorial, arigato gosaimasu ^.^
ReplyDeleteAdorei sua ideia!
ReplyDeleteYour tutes are so clear and - professional! Thank you!
ReplyDeleteI love your tutorials! And the fabric that you use for them are always great. I just added your tutorial to my blog, I hope you approve! Thank you :)
ReplyDeletewww.vintagekatiejean.blogspot.com
Brilliant blog posting. I found your post very interesting; I think you are a brilliant writer. I added your blog to my bookmarks and will return in the future.
ReplyDeletehi this is awesome!, thanks for the tutorial...
ReplyDelete___________________________________________
sbobet
hi, i am really happy can be here and will more happy if you want to link exchange...
ReplyDeletehello thank you so much for the info,,,i am so happy can be here...
ReplyDeletetaruhan bola
What a neat idea, it is so cute! Great tutorial!
ReplyDeleteThank you! Making it reversible was a great idea!
ReplyDeletejennyy
thank you so much:) it is realy easy:)
ReplyDeleteAmazing because it's not only beautiful but also it's really useful in order to put in there the napkins, I know that my sister is gonna want that box.
ReplyDeleteLovely tissue box holder!! I really love your fabric choices and the way you mix and match them in your projects =)
ReplyDeleteThank you so much everyone ;)
ReplyDeletethank you for the tutorial
ReplyDeletehttp://regalartesanal.blogspot.com.es/
I'm so happy to have come across your blog. I want to make so many of your projects. I'm hoping to make several of these for my son's teachers (present and past). I think it will be so neat to have the different seasons and holidays represented on their tissue box cover. Thank you for sharing your talents!
ReplyDeleteLove your idea of having the seasons/holidays represented on tissue box covers! The teachers will love them for sure!
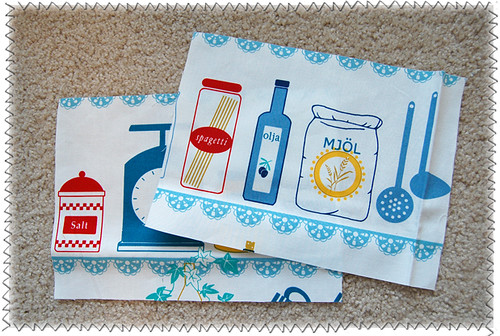
DeleteThank you so much for your tutorials, I just found them. The kitchen fabric you used above has Swedish words on it. Do you know if it is from Sweden? I do notice that it was some years ago...
ReplyDeleteYou are welcome, Sofie! The kitchen fabric was manufactured in Japan. I can't read a single Swedish word, but I just love how it looks so much ;)
DeleteHi Ayumi,
ReplyDeleteI´m your 5000 follower!!! I love your fabulous blog penguin too :)!I found you today and I'm so happy! Thank you so much about your great tutorials, particulary these because I began another model that didin't go well and I am now inspired by this tutorial to fix it .At the end I'll send you a picture .Thanks again for sharing all your talent.
Have a look at my blog I’ll be very glad .
Hugs from Portugal
Ana Love Craft
www.lovecraft2012.blogspot.com
email : love.craft@hotmail.com
I love your tissue box, Ayumi! Your directions are so clear and easy to follow. I'm redecorating my bathroom and will be using these directions to make a matching tissue box. Thank you so much.
ReplyDeleteI love this! I am hoping to purchase a sewing machine soon - this has gone straight to the top of the lists of projects to try!
ReplyDeleteThis comment has been removed by the author.
ReplyDeleteThanks for taking the time to put this tutorial together. What a great idea an update to the old crocheted boxes :)
ReplyDeleteI attempted a tissue box cover without a pattern thinking it would be simple. It's unfinished and collecting dust now. I'm so glad I stumbled onto your tute. What a great idea to do the other side for Christmas. I'm going to make a bunch for each season because I got through tons of tissue! A big thank you for this. YAAAY!
ReplyDeleteI attempted a tissue box cover without a pattern thinking it would be simple. It's unfinished and collecting dust now. I'm so glad I stumbled onto your tute. What a great idea to do the other side for Christmas. I'm going to make a bunch for each season because I got through tons of tissue! A big thank you for this. YAAAY!
ReplyDeletebello il tuo tutorial
ReplyDeleteLove your tutorial and had to share with my Facebook Group: Quick Quilt Saturday https://www.facebook.com/groups/quickquiltsaturday/
ReplyDeleteI love your tutorial and the well written instructions. I see a few gifts to be made in the very near future! Thanks!
ReplyDeleteThis comment has been removed by the author.
ReplyDelete